


 Header Through Cloudflare")


![[Interview] The Future of Screen Experiences ②: From Watching to Understanding With Vision AI Companion](https://www.hawkdive.com/media/samsung-tvs-and-displays-vision-ai-companion-interview_thumb932-218x150.jpg "Exploring Vision AI Companion: Transforming Screen Experiences for Users")


If you’re a Mac user, you may have run into a situation where you needed to share a network or other resources between two MacBooks but couldn’t tell them apart because their names were too similar. Your privacy is at risk if you have a MacBook and another Mac with the same name since the two computers may communicate or interact. Changing and setting a unique Hostname for your MacBook will make it easier for users utilizing sharing to identify your computer, preventing these issues from occurring.
With the release of macOS Ventura, we will discuss how the computer name or hostname may be modified in sharing on both macOS Monterey and macOS Ventura. So, stick around until the conclusion of this post to learn simple, efficient methods to alter your Mac’s hostname.
Since its release, the macOS Ventura has received universal acclaim for its refined, speedy, and intuitive user experience. It is also one of the most noteworthy operating systems because of its novel and original features.
Follow the below steps to rename your Mac and alter its local hostname.
1. You may rename your Mac if you like.
2. Change your Mac Change your Mac’s name.
3. Follow these instructions to rename your Mac, and they’ll work with your Mac (iMac, MacBook, MacBook Pro, Mac Pro, Mac mini, Mac Studio, etc.)
If you’re on macOS Ventura, follow these steps:
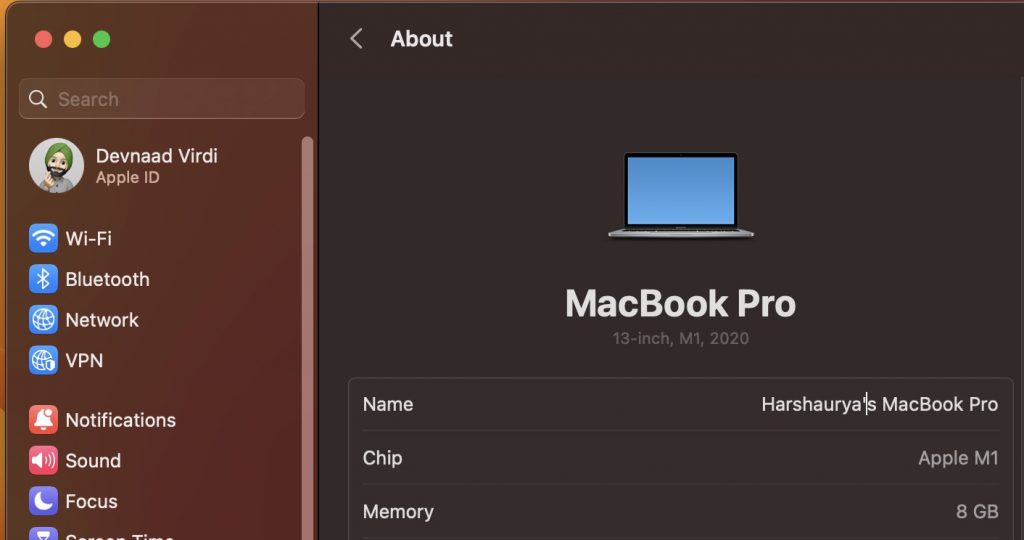
1. Select General on the menu bar.
2. Select the “About” tab.
3. Fill up the Name area with the new name. When you’re done, close this window.
On macOS Monterey and earlier
1. Select > System Preferences from the menu bar.
2. Select the Share button.
3. Name your machine by filling in the Computer Name field.
4. The final step is to close the window.
Change Your Mac’s Local Hostname: A Step-by-Step Guide
Under your Mac’s name in the Sharing settings page, you’ll see its local hostname or local network name. The extension “.local” is appended to the local hostname, and the spaces in “Mac’s Name” have been replaced with hyphens. If our Mac is called Harshaurya’s Computer, your MacBook’s local hostname would be “Harshaurya’s-Computer.local.”
1. First, open your system preferences by clicking the Apple menu’s icon and selecting sharing.
2. If the settings menu for your preferences is locked, you may access it by touching the padlock icon in the upper left corner of the screen. Now, seek for the “Edit” option and click on it.
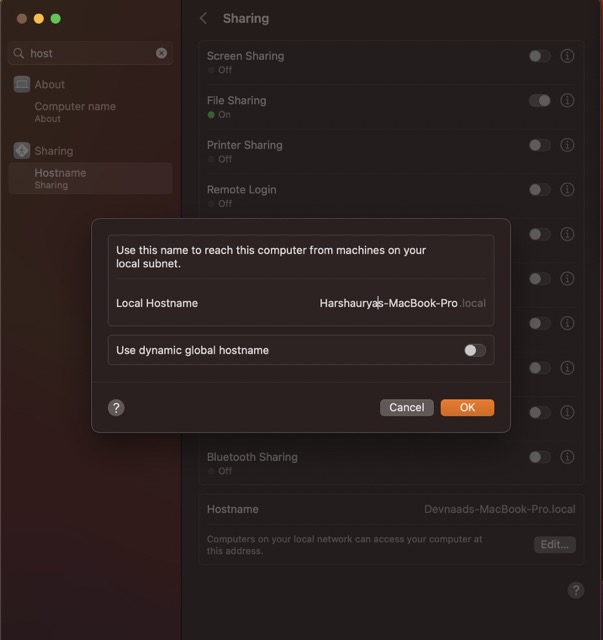
3. Substitute a New Hostname Just Before
4. Choose OK. Check the box labeled “Use dynamic global hostname” if you want to employ a Dynamic Hostname. Enter your Hostname, Username, and Password in the corresponding fields.
Using Terminal, you may rename your Mac.
The terminal allows users acquainted with the command line to rename their Mac.
1. Launch the Terminal program on your Mac.
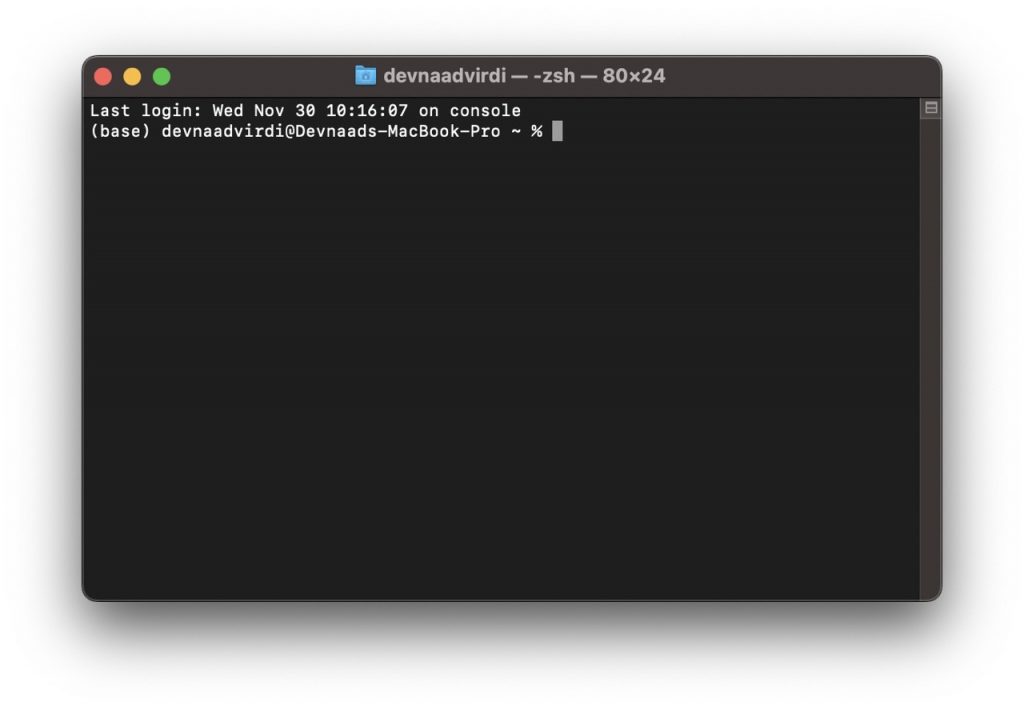
2. Enter the following command, changing “YourNewComputerName” to the desired name.
3. To change your computer’s name, type: sudo scutil —set ComputerName YourNewComputerName
4. Press Enter or return key
5. enter your Mac’s security password.
6. If the new name does not appear in System Preferences > Sharing, restart your Mac.
Please note that if the machine name you wish to configure contains spaces, you must wrap the name in double quotation quotes (” “). If I wanted to change the name of my Mac from “xyz M1 MacBook Pro” to “Harshaurya M1 MacBook Pro,” I would type sudo scutil —set ComputerName “Harshaurya M1 MacBook Pro” in the Terminal. Terminal only recognizes the first word unless I include it in quotation marks ().


