


 Header Through Cloudflare")


In this article, you will get to know how to debloat Window 11 to improve its performance considerably.
Bloatware is any such app that is pre-installed on your PC or computer that is of no use to you. The downside of this app is that consumes the disk space, has its share of the RAM, and degrades your PC’s performance. All the pre-installed apps on your Windows PC such as Weather App, Game Centers, Video, and Music players come into this category. These apps are seldom of any use and they even pose a threat to your privacy.
Similar to its ancestors, Windows 11 has a bad reputation of having several impractical apps and software that come under the category of bloatware. While a very small number of users may consider them useful, they gobble up so much of the system’s resources that their usefulness becomes almost negligible. Some of this bloatware is not on the list of Windows Apps in the settings but they can be seen eating up your system’s values resources in the Task Manager of Windows 11.
This is why it is quite a challenge to uninstall this bloatware via the Settings App or the Control Panel of Windows 11. This is the reason why debloating your PC comes into play. Debloating refers to the process of disposing of these useless apps that come pre-installed on your PC and degrade your system’s performance.
There are many ways by which we can debloat your Windows 11 PC such as uninstall method, command prompt, and using the third-party debloating software. So let’s get started and see how to debloat your Windows 11 PC.
Also Read: 100% Disk Usage In Windows 11: Fixed
Getting Started
Install the latest Windows 11 update
Before you begin debloating your Windows PC, it’s important to ensure your PC is running on the latest version of Windows 11. Let’s see how to download and install the latest version of Windows 11.
- First of all, head to the Start menu and type Settings in the Search bar. Choose the relevant search result to open the Settings App.
- When you’ve in the Settings App, look for the Windows Update tile at the bottom of the left pane.
- Now choose the ‘Check for Updates option in the right section of the Windows Settings.
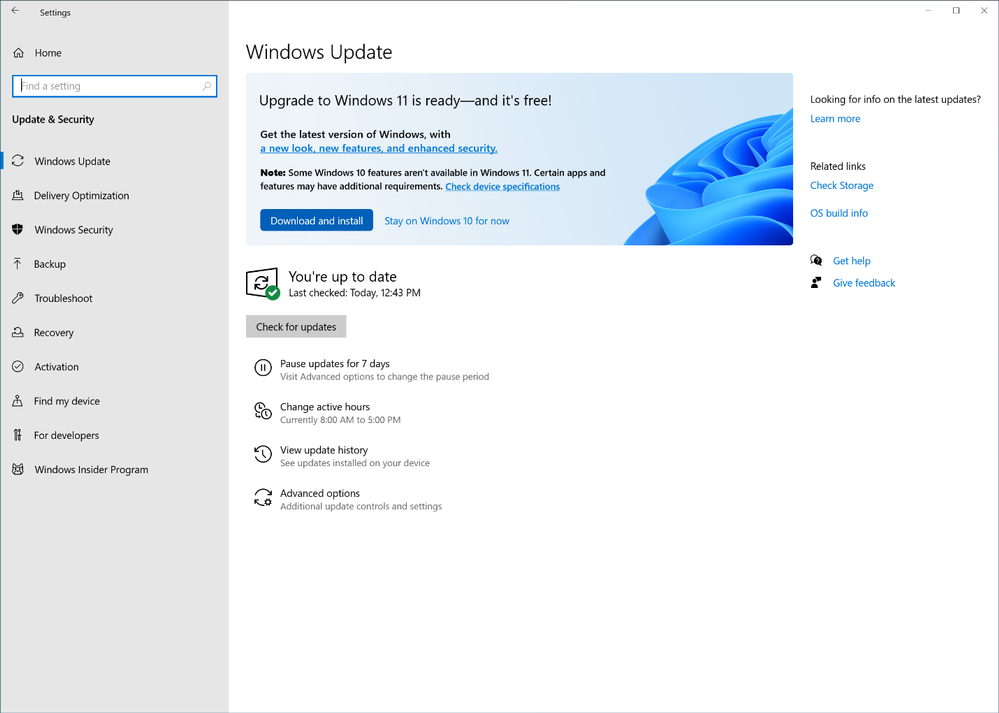
- If there are any pending updates, click on the download button.
- Wait for the update to install and restart your PC if you’re prompted to do so.
Create a Restore Point on your PC
It is recommended to create a system restore point before you attempt to debloat your Windows 11 PC. This is essential so that your PC does not become unstable if anything goes wrong during the debloat process. Besides, if you do not like the performance or the system messes up post debloat, you will always have an option to revert the changes and go back to the previous stable state. Let’s see how to create a restore point on your Windows 11 PC :
- Head to the Start menu of your Windows 11 PC and enter ‘Create a restore point’ in the search bar. Now choose the relevant search result.
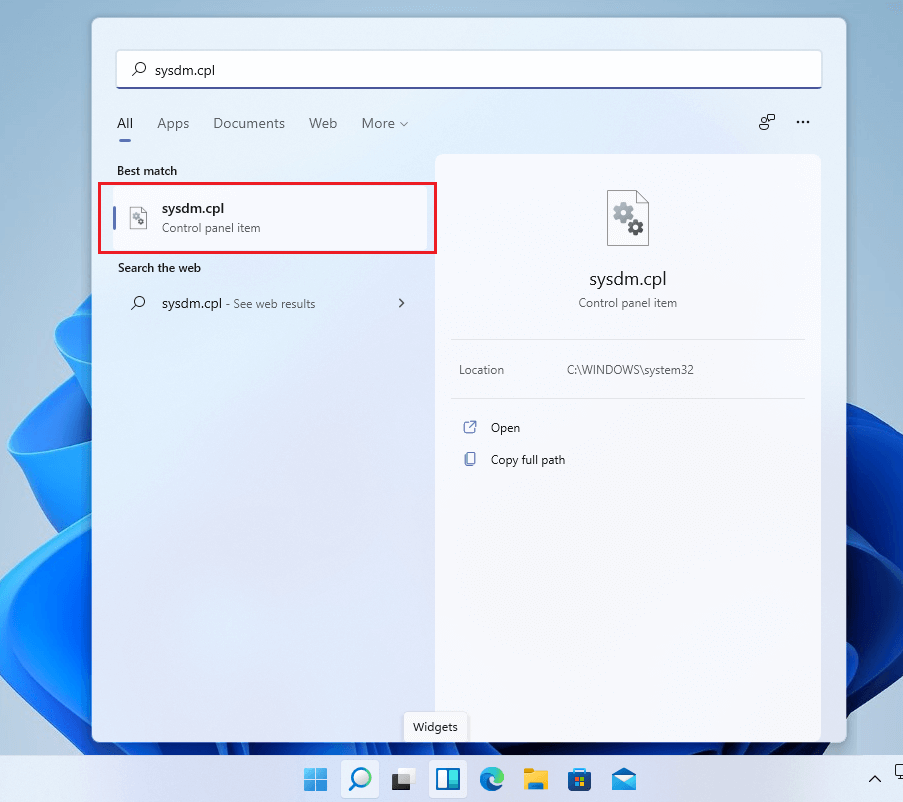
- This will take you to the ‘System Properties’ window. Now go to the ‘System Protection tab and choose your System drive on which your OS is running.
- Next, hit the ‘Configure’ button.
- Next, turn on the Radio button next to ‘Turn on system protection’. Press the Apply button followed by OK.
- Now that the system protection is enabled, click on the Create button to create manual restore points.
- Enter the name and description of the restore point and hit Create button.
When the restore point is successfully created, you will see a message on the screen.
Use the Traditional Uninstall method to remove bloatware
As mentioned, uninstalling the unwanted apps via the Settings App or the Control Panel is one way to get rid of the bloatware. While this method will not be successful completely in removing all the bloatware (not all bloatware are visible in the Windows 11 Settings), it is the first method that you should always try. Let’s see the traditional method of uninstalling an app:
- Open the Settings App using the Windows+I shortcut and click on the ‘App’ tile in the left pane.
- Now head to the right pane and choose ‘Apps & Features’ from the right pane of the Window.
- Here you will see the list of all the apps installed on your PC.
- Look for the unwanted apps that you want to get rid of.
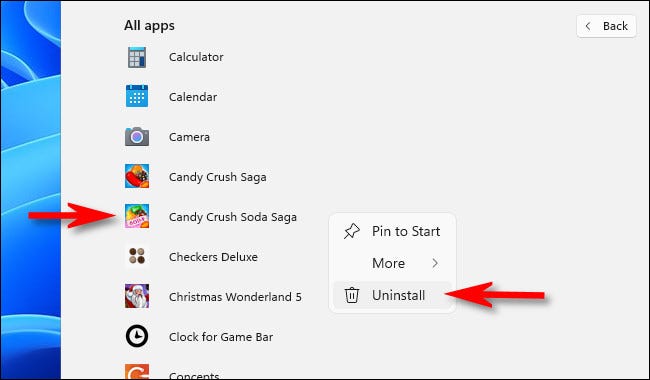
- Click on the three dots next to the app and choose the Uninstall option to remove that bloatware from your PC.
Use the ‘Remove-AppxPackage’ Command to hide/remove bloatware
Since it is not possible to access and remove all the unwanted apps using the old good uninstall method, you need to find a workaround to uninstall such apps. For instance, click on the three dots of the Windows native apps such as Xbox, Camera, Photos, Video, OneNote, and more. Now you’ll see that the ‘Uninstall’ button for these apps is disabled.
Fortunately, there is another way to uninstall these apps; use the ‘Get-AppxPackage’ and ‘Remove-AppxPackage’ commands to get rid of these apps from Windows 11 PC. You need to type these commands in the Windows Powershell as these powerful commands are capable of utilizing the Administrator rights and other policies to uninstall this bloatware.
Using the ‘Remove-AppxPackage’ command to hide the bloatware does not remove the app from the Windows 11 ISO; it just uninstalls or hides that particular app from the user account you’re currently logged in. This means if you will create a new user account and log in using that account, this bloatware will still be present on that account. Even if you perform the same workaround on all the user accounts on your PC, these apps will still appear on any user account that you will create after completing this task.
Hence this method can restore these apps anytime if you suddenly realize that you need these apps. So let’s get started with this method:
View all the Pre-loaded apps on your Windows 11 PC
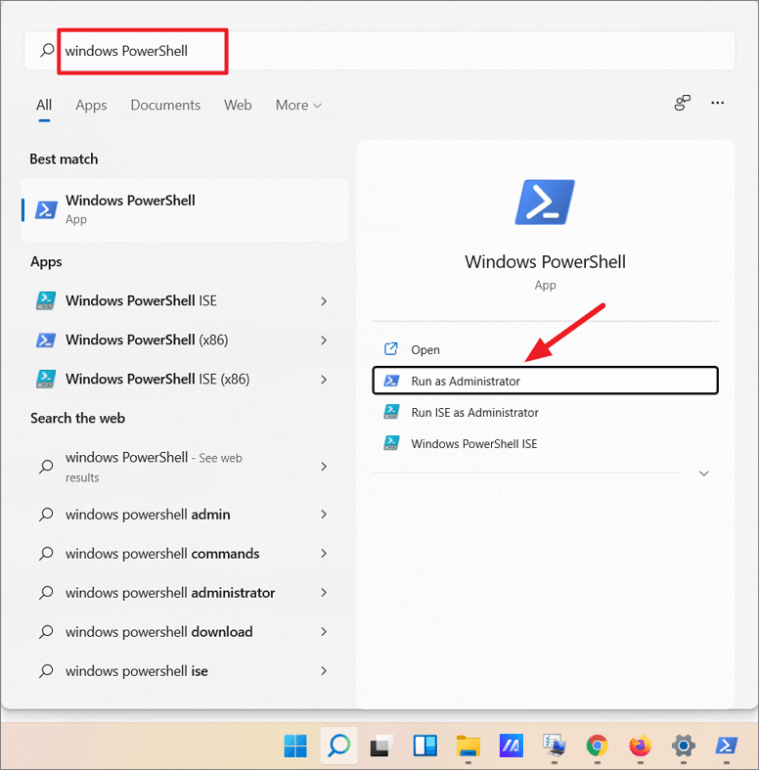
- First of all, head to the Start menu and type ‘Windows PowerShell’ in the search bar on top.
- Now right-click the ‘Windows PowerShell’ from the search result and choose the ‘Run as Administrator option from the context menu.
- Now you need to see the list of all the apps pre-installed on your PC. For this, type the following command in the Powershell window and press the Enter key.
Get-AppxPackage - This will show the list of all the installed apps in the current account you are logged into. You will also see detailed information regarding each of the app.
If you wish to see the apps and their details installed on a particular user account, try this command followed by the enter key.
Get-AppXPackage -User <Username>
Type the name of the account in place of <Username>
- If you want to see the list of all the apps along with the info on each of the user account, type this command followed by the enter key.
Get-AppxPackage -AllUsers - If you are not interested in the complete details of the apps and only want to see the PackageFullNames since it is the most essential information to know whether an app is bloatware or not, type this command followed by the enter key.
Get-AppxPackage | Select Name, PackageFullName - This command will only display the Name and PackageFullName of all the apps installed on the account you are currently logged into; other information will not be shown with it.
- To find the Name and PackageFullName of all apps installed for a specific user, type the following command along with the enter key.
Get-AppXPackage -User | Select Name, PackageFullName - If you want to see the list of all the apps installed for all the users, this command will come in handy.
Get-AppxPackage -AllUsers | Select Name, PackageFullName
Remove Pre-Loaded Apps from Your System
Now it’s time to use both Get-AppxPackage and Remove-AppxPackage commands to get rid of these unnecessary apps from your Windows 11 PC.
- If you want to delete any app from your Windows 11 PC, use the following command:
Get-AppxPackage <AppName> | Remove-AppxPackage

- Write the name of the app you want to uninstall in place of <AppName>. For instance:
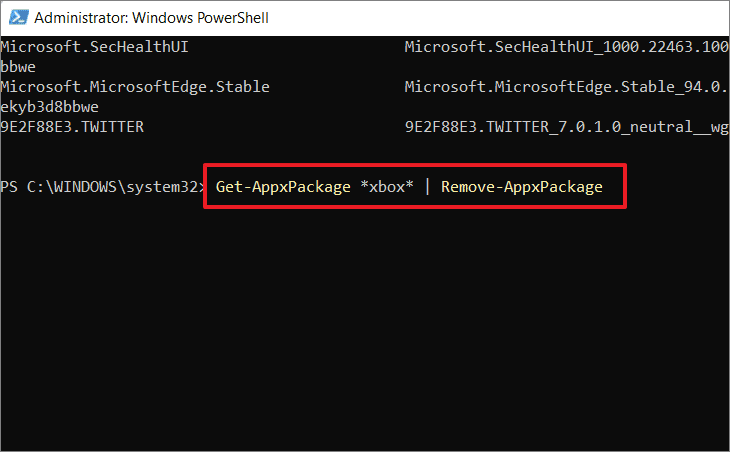
Get-AppxPackage Microsoft.Xbox.TCUI | Remove-AppxPackage - If you don’t want to type the name of the app or the name of the package, use the wildcards (*) in place of the parameter. Using wildcards in the commands makes it easy to write and remember. Suppose you want to remove the ‘Microsoft.XboxApp’ app, then instead of using its whole app name, you can replace the name with wildcards such as:
Get-AppxPackage *Xbox* | Remove-AppxPackage
You also write it like this:
Get-AppxPackage *XboxApp* | Remove-AppxPackage
When you’ll write the above command, the Xbox app will be uninstalled from the user account you are logged in currently
- If you want to uninstall the app from a particular account, this command will help you:
Get-AppxPackage -user | Remove-AppxPackage - Here will be replaced by the name of the app that you want to uninstall. For instance,
Get-AppxPackage -user Taiba *xbox* | Remove-AppxPackage - Similarly, if you want to remove a particular app from all user accounts on your PC, this command will come in handy:
Get-AppxPackage -alluser Taiba *xbox* | Remove-AppxPackage
Command-List to Uninstall the Bloatware
Let’s see all the commands that you can type in the PowerShell to uninstall the pre-installed apps from your Windows 11 PC:
- To Uninstall 3D Builder:
Get-AppxPackage *3dbuilder* | Remove-AppxPackage - To Uninstall Sway:
Get-AppxPackage *sway* | remove-AppxPackage - For Uninstalling Alarms & Clock:
Get-AppxPackage *alarms* | Remove-AppxPackage - For Uninstalling Calculator:
Get-AppxPackage *calculator* | Remove-AppxPackage - To Uninstall Calendar and Mail:
Get-AppxPackage *communicationsapps* | Remove-AppxPackage - For Uninstalling Get Office:
Get-AppxPackage *officehub* | Remove-AppxPackage - To Uninstall Camera:
Get-AppxPackage *camera* | Remove-AppxPackage - To Uninstall Skype:
Get-AppxPackage *skype* | Remove-AppxPackage - For Uninstalling Movies & TV:
Get-AppxPackage *zunevideo* | Remove-AppxPackage - To Uninstall Groove Music and Movies & TV apps through one command:
Get-AppxPackage *zune* | Remove-AppxPackage - If you want to uninstall Maps:
Get-AppxPackage *maps* | Remove-AppxPackage - To Uninstall Microsoft Solitaire Collection:
Get-AppxPackage *solitaire* | Remove-AppxPackage - If you want to uninstall the ‘Get Started’ program:
Get-AppxPackage *getstarted* | Remove-AppxPackage - To uninstall Money:
Get-AppxPackage *bingfinance* | Remove-AppxPackage - To uninstall News:
Get-AppxPackage *bingnews* | Remove-AppxPackage - To uninstall Sports:
Get-AppxPackage *bingsports* | Remove-AppxPackage - For uninstalling Weather this command will come in handy:
Get-AppxPackage *bingweather* | Remove-AppxPackage - Use this command to uninstall Money, News, Sports, and Weather apps together:
Get-Appxpackage *bing* | Remove-AppxPackage - To uninstall OneNote:
Get-AppxPackage *onenote* | Remove-AppxPackage - For Uninstalling People:
Get-AppxPackage *people* | Remove-AppxPackage - To Uninstall Your Phone Companion, use this command:
Get-AppxPackage *yourphone* | Remove-AppxPackage - To Uninstall Photos:
Get-AppxPackage *photos* | Remove-AppxPackage - For Uninstalling Microsoft Store:
Get-AppxPackage *windowsstore* | Remove-AppxPackage - To Uninstall Voice Recorder:
Get-AppxPackage *soundrecorder* | Remove-AppxPackage
These commands can uninstall a particular pre-installed app from the user account.
Other Commands to uninstall Bloatware
However, if you want to uninstall all the pre-installed apps from the current user account, using a single command, this is what you need to type in the Windows Powershell.
Get-AppxPackage | Remove-AppxPackage
- Next, if you want to uninstall the unnecessary pre-installed apps from all the user accounts on your PC, the following command will do the trick for you.
Get-AppxPackage -allusers | Remove-AppxPackage - Similarly, if you wish to uninstall all the inbuilt apps from a particular user account into which you are not logged in currently, use the following command:
Get-AppxPackage -user | Remove-AppxPackage - That’s not it, if you want to remove all the pre-installed unnecessary apps except a few apps that you might need in the future, it is also possible. In such a scenario, you need to type the following command in Windows Powershell.
- Let’s say you don’t want these unnecessary apps but want to keep a single app such as Calculator to use in the future, this is the command that you should use:
Get-AppxPackage | where-object {$_.name –notlike “*calculator*”} | Remove-AppxPackage.
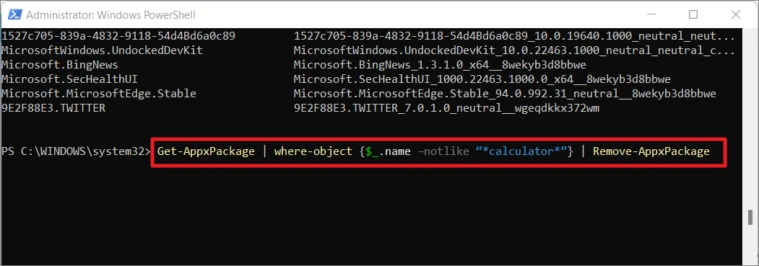
- This command will retain a single app and remove all other bloatware but if you want to retain more than one of these apps that you find useful, you will have to use a where-object {$_.name –notlike “*app_name*”} parameter for every app you don’t want to remove. Let’s see the example to make it clear:
Get-AppxPackage | where-object {$_.name –notlike “*calculator*”} | where-object {$_.name –notlike “*store*”} | where-object {$_.name –notlike “*zune.music*”} | Remove-AppxPackage
Restore the Hidden/Removed Built-in Apps
We have already made it clear that this method will not uninstall the apps permanently. It will only hide or remove the app. So if at any point you feel that you miss one or more of these apps, this bloatware is just one command away from being back on your Windows 11 PC. Let’s see what you need to do to get these pre-installed apps back.
- First of all, head to the Start menu of the Windows 11 PC and type Windows Powershell in the search bar.
- Now right-click the first search result and choose the ‘Run in Administrator Mode’ option from the context menu.
- When Windows Powershell will launch in Administrator Mode, you have to type the following command followed by the enter key.
Get-AppxPackage -AllUsers| Foreach {Add-AppxPackage -DisableDevelopmentMode -Register “$($_.InstallLocation)\AppXManifest.xml”}
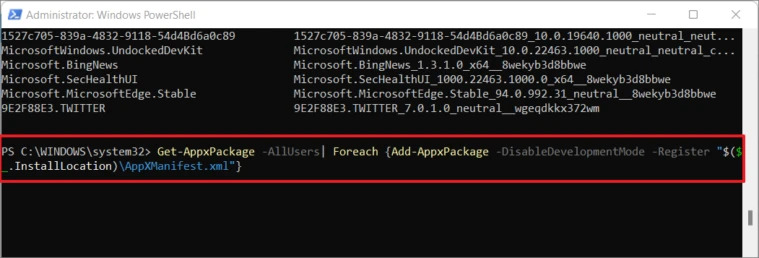
- This way all the pre-installed apps will be back for all the user accounts on PC using Windows 11.
Use DISM to uninstall bloatware from your Windows 11 PC
If you want to part ways with this unnecessary bloatware that is consuming your System’s resources, you can also take help from the ‘DSIM’ command. Deployment Imaging Service and Management or DSIM is a robust diagnostic tool that comes in handy to repair Windows Image files. That’s why this is the way by which you can remove these unwanted apps permanently from your PC and they won’t come back even when you’ll update your Windows 11 PC. Let’s see how to go about it:
- First of all, open the Windows Powershell and choose the Run as Administration option from the context menu.
- Now type the following command in the Windows Powershell
DISM /Online /Get-ProvisionedAppxPackages | select-string Packagename - Now you’ll see the list of all the packages on your Windows 11 PC. Here you need to look for the app that you want to uninstall and copy its packagename. Let’s say we need to uninstall ‘GamingApp’.
- Now type the following command to uninstall the bloatware from your PC:
DISM /Online /Remove-ProvisionedAppxPackage /PackageName:<PACKAGENAME> - You need to mention the name of the package you just copied in the place of
<PACKAGENAME>
Here’s what you need to type to uninstall ‘GamingApp’ from your Windows 11 PC: DISM /Online /Remove-ProvisionedAppxPackage /PackageName:Microsoft.GamingApp_2109.1001.8.0_neutral_~_8wekyb3d8bbwe
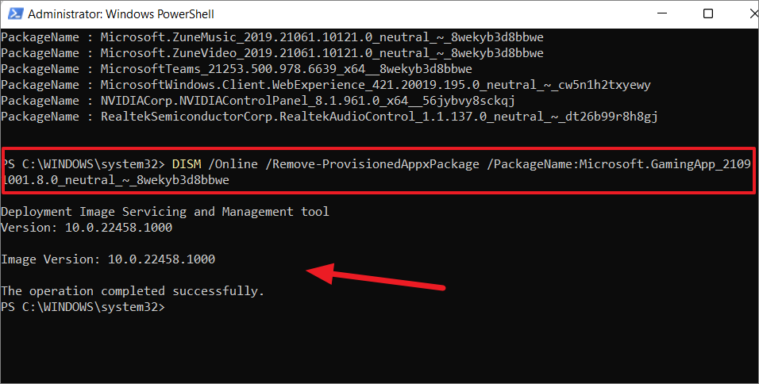
Now the Gaming app will be successfully uninstalled from your Windows 11 PC. For deleting all the bloatware from your PC, you need to follow the same method for each one of them. When you will execute the command, DISM will completely wipe the package from the Windows Image file.
Conclusion
Here we reach the end of our detailed guide on how to debloat Windows 11 PC. We have explained different ways to uninstall the apps from your PC. Uninstalling the app method will not work for all the unnecessary Windows apps. Using the ‘Remove-AppxPackage’ Command will temporarily disable these unwanted apps and you can always get them back by executing a command. If you want to remove this bloatware from the Windows Image file, the DSIM method will do the trick for you. Hope this helps, with this signing off!
Also Read: How To Enable God Mode In Windows 11


