


 Header Through Cloudflare")


Microsoft has officially announced Windows 11 and it will be released in Mid October. However, its Insider Builds have been released and all the Windows Insiders in Dev Channel can download it.
When you upgrade your PC to Windows 11, lots of temporary and unwanted files of Windows 10 are left behind. These files clutter your PC and eat up your disk space. As a result, your system’s performance is compromised. If your system is slow and laggy after you’ve upgraded to Windows 11, here’s what you need to do.
Also Read: How To Check If Your PC Can Upgrade To Windows 11?

Free Up Disk Space After Upgrading to Windows 11
In this guide, we will be explaining three methods in detail to free up the storage space of your PC after upgrading to Windows 11.
The first two ways listed here are almost the same and they let you get rid of the junk files. The last method of this guide explains how to trash all the temporary files created by different apps installed on your desktop.
So without wasting any time, let’s free up the disk space!
Using Windows Settings to Clean Up all the junk files
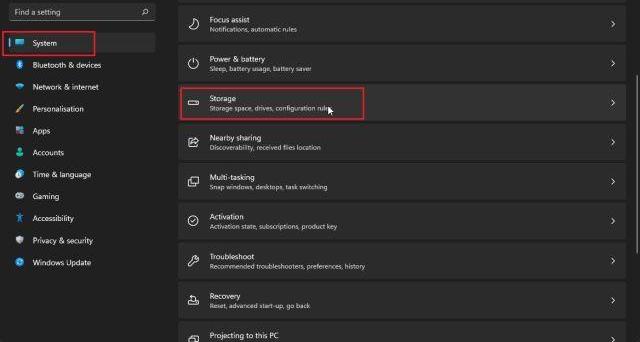
- First of all, Open the Settings on Windows 11 using the ‘Win + I’ shortcut.
- Here, go to the ‘System’ section and then ‘Storage’ settings.
- Now tap the ‘Temporary files’.
- Now your PC will take a while to analyze all the files on your disk and display all the folders which you can delete to create space on your disk.
- You can uncheck all the folders which may be important to you. For instance, you can uncheck the ‘Downloads’ folder because it might have some important files that you might need later.
- You should also look for the ‘Previous Windows Installation’ and ‘Windows Update Clean-up’ folders in among the list of folders. Make sure they are selected because these two folders occupy the maximum space on the disk.
- Once you have selected the folders of your choice, you can press the ‘Remove Files’ button.
Now all the unwanted and leftover files of the previous Windows 10 will be trashed and as a result, huge space will be created on your disk. If you want to create more storage space on your PC after upgrading to Windows 11, you can head to Storage in the Settings app and uninstall all the unwanted apps and programs.
Also Read: How To Zip And Unzip Files On Windows 11?
Free Up space using the in-built Clean Manager
- Open the Run Dialog box on your PC by pressing the Windows + R shortcut keys.
- Here, enter ‘cleanmgr’ in the search box and press the enter key.
- A pop-up will open and from the drop-down menu, you choose the drive you want to clean up.
- Select the C drive and press Ok to confirm. Now the Disk Clean Up tool will scan your ‘C’ drive to identify all the junk files clogging up your drive after you have upgraded to Windows 11.
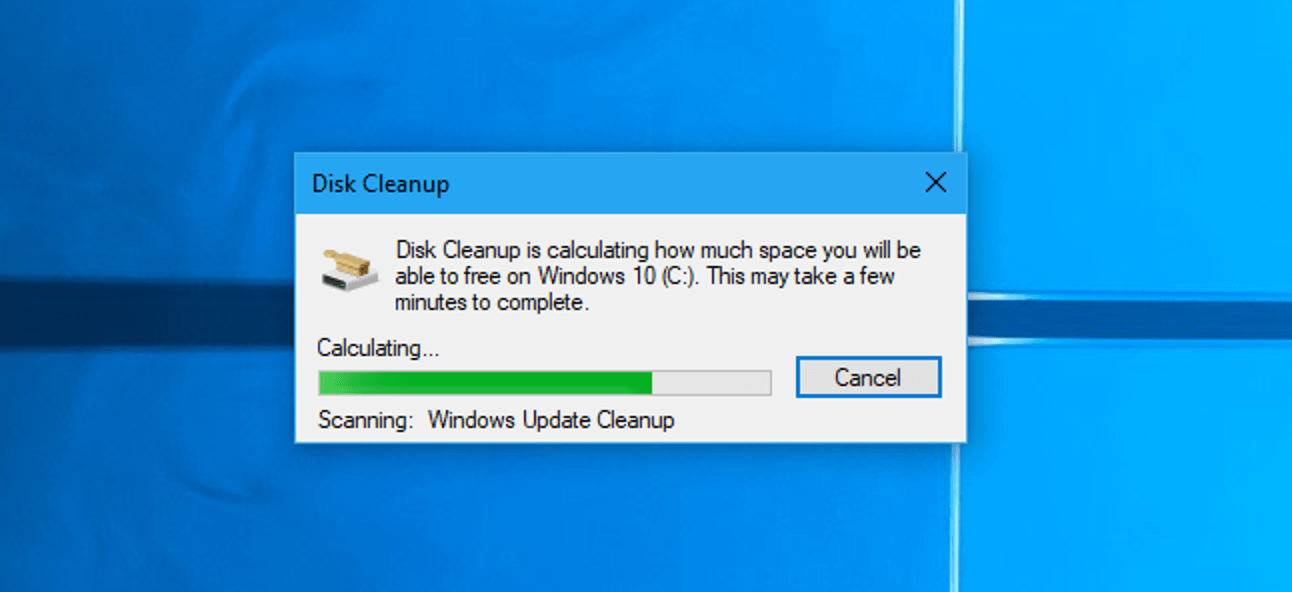
- After some time a pop-up will appear with all the unwanted files. Press the ‘Clean up system files button at the bottom.
- Make sure to select the ‘Previous Windows Installation’ and ‘Windows Update Clean Up’ folders in the pop-up menu.
- You can also select the other folders if you no longer need them.
- Press OK to delete these folders once you are done.
- Now all the files and folders that you had selected will be expunged from your PC. These files and folders were no longer needed since you have upgraded to Windows 11.
Note: You should remember that after cleaning these files if you want to downgrade to Windows 10, you can only do it by installing it manually from the USB drive.
Also Read: How To Set The Default Web Browser In Windows 11?
Delete all the temporary files stored on your PC
The above two methods delete the leftover files and folders of Windows 10 OS. But if you want to get rid of the temporary files created by different apps running on Windows 10, you should follow the steps below:
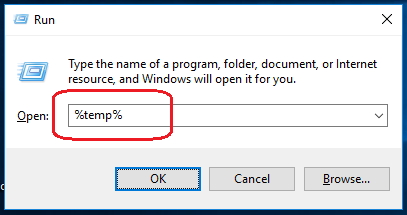
- Use the ‘Win+R’ shortcut to open the Run dialog box. Type %temp% in the search box and hit the Enter key.
- Now, you will be taken to the temp folder.
- Select all the files here and delete them.
- Some of the files in this folder might not be deleted. This is so because they are currently being used by some apps.
This method is mostly used to de-clutter your PC and create free space on the drive.
Conclusion
That’s it! These are the ways to get rid of unnecessary files and folders and free up space on your PC running on Windows 11. It is recommended to use the last method once in a while so that the temporary files do not hog your PC and it has enough free space. Hope this guide helps!
Must Read: How To Organize And Manage Your Digital Photos On Windows 11?


