


 Header Through Cloudflare")


Oracle ODBC or Open Database Connectivity driver helps in connecting Windows systems to other oracle networks. The set-up is not in-built in Windows 10 or any other version of the operating system, for that matter. Therefore, you need to install this set up separately and then connect it to other third-party networks.
Moreover, Oracle is a premier data management system for Windows. Installing the driver is complicated, especially if you consider yourself technically challenged. But it’s not impossible.
In this blog post, I have extensively discussed the methods that have come directly from experts in the field. In addition, I have also tried to add tips and answered the common questions that may arise in the process.
Also Read: How To Fix Bluetooth Mouse Not Working In Windows 10?
Step-By-Step Method To Download & Install ODBC Driver
Part 1: Install & Extract The Oracle Packages
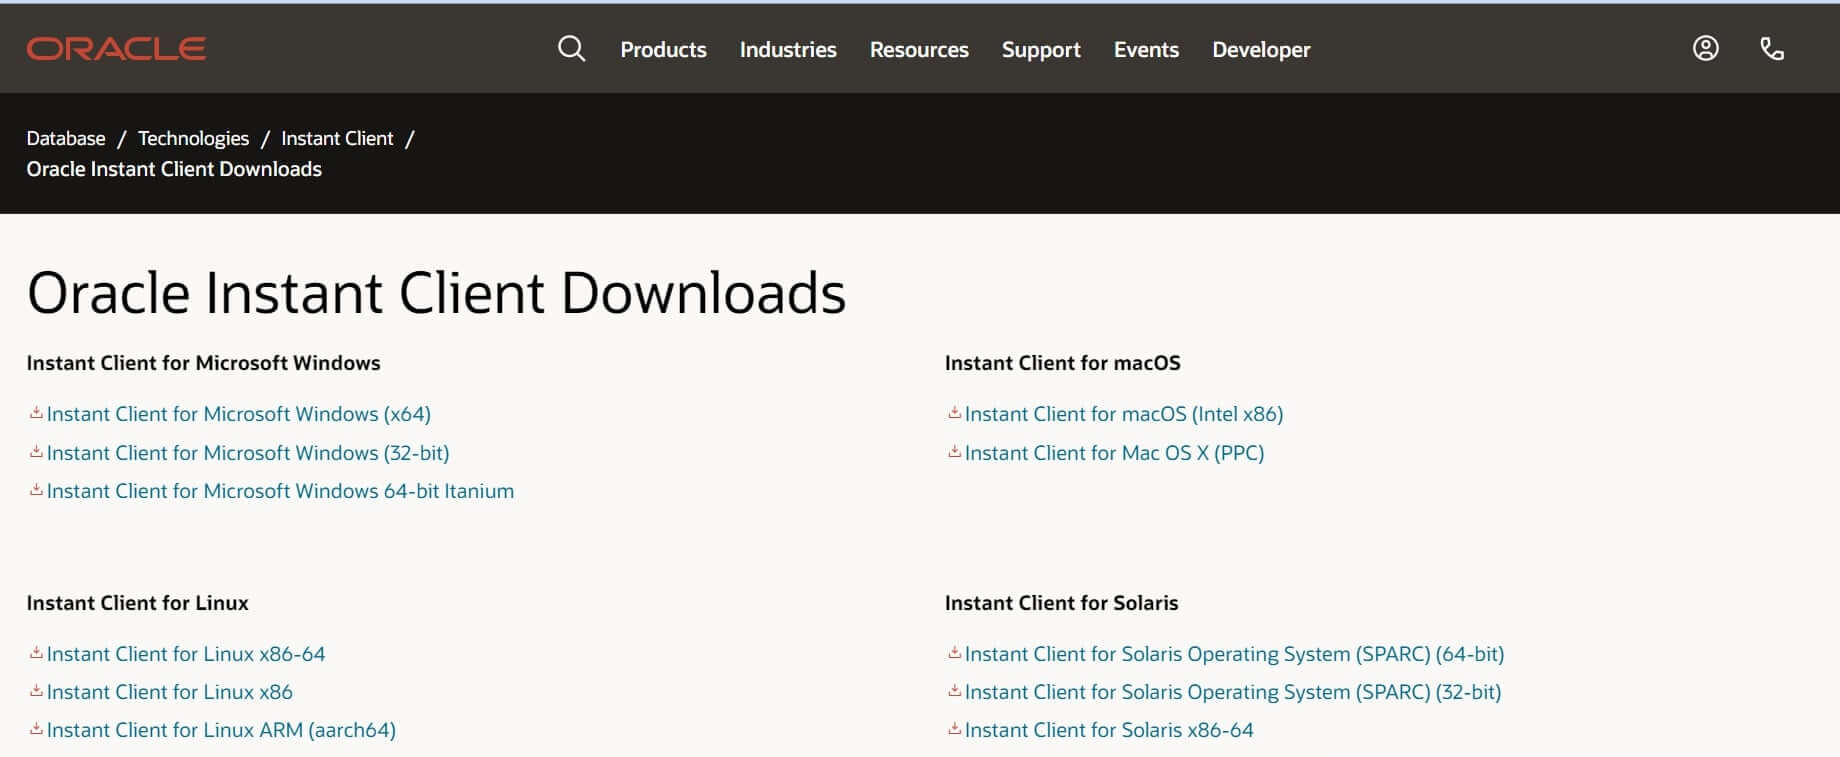
Step 1: From your internet browser, go to the Oracle Instant Client website.
Step 2: Depending on your PCs platform, select and click on Instant Client For Microsoft Windows 32-bit or 64-bit link.
Step 3: Go to Basic Package and click on the downloadable link.
Step 4: In the Window that appears, go down with your cursor and tap on the SDK package hyperlink. This will help you in downloading the file.
Step 5: Besides, you will also need to download the link for the ODBC package.
Step 6: Launch File Explorer and tap on the folder taskbar button for it.
Step 7: In File Explorer, click on C: root drive
Furthermore, Follow These Steps
Step 8: Within the C: drive, find a space and right-click on it. Then from the drop-down menu, select New and Folder.
Step 9: Rename the new folder as Oracle, which will give you the path C:\Oracle.
Step 10: Send the Oracle ZIP files into this new folder by selecting them and tapping on Move To. Within the File Explorer section, select Choose Location.
Step 11: Furthermore, you have to extract all the Oracle Zip folders. And to do that, choose all the files, and tap on the Extract All button. You can do this on File Explorer’s Compressed Folder Tools tab.
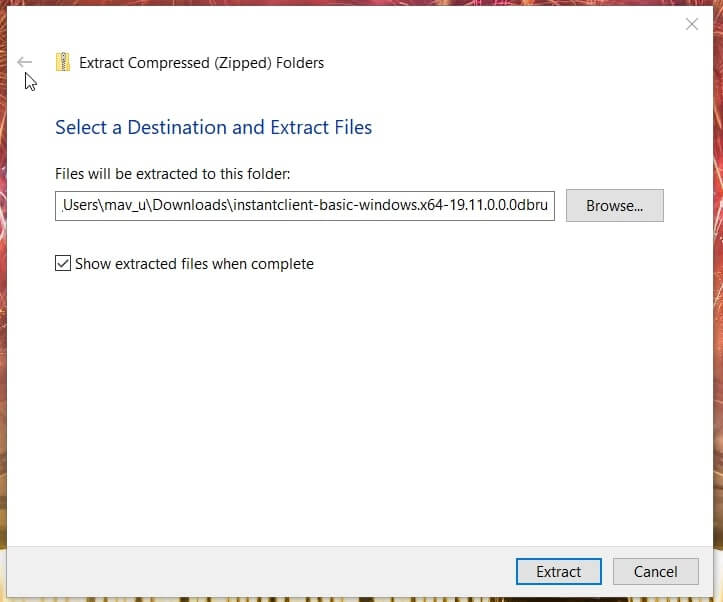
Step 12: To select the Oracle Folder, go to the Extract Compressed Window and click on the Browse button. Tap on Extract.
Step 13: Moreover, you can open instant client-basic-windows.x64-19.11.0.0.0 dbru folder and send instantclient_19_11 subfolder to the Oracle one.
Step 14: In addition, Delete the old instant client folder so that you end up with only one of them.
Extract all the instant client folders from ZIP folders and finally delete the instant client folder. This will make sure you do not have extra unnecessary subfolders. Moreover, experts recommend that you download the SDK package and save it in the instant_client.
Also Read: How To Review And Delete Your Alexa History And Recordings
Part 2: How To Add Oracle Client Directory Environment Variable
Now that you have downloaded the Oracle Package, you have to add it to the client directory. And if you have trouble doing that all on your own, follow our steps one by one.
Step 1: Simultaneously press the Windows button + S on your keyboard, which will prompt a search box to open.
Step 2: In the Search Text box, type Keyword System Environment Variables.
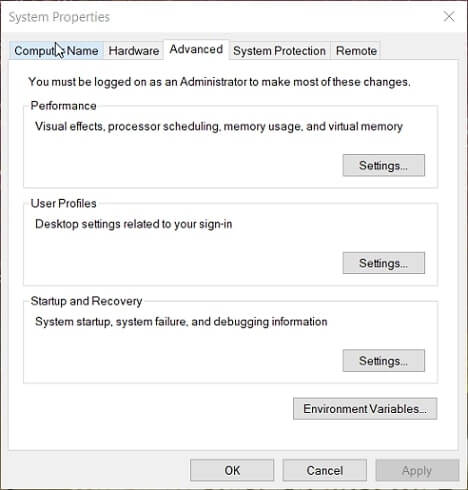
Step 3: Further, tap on Edit The System Environment Variables, automatically opening the Window we have shown below.

Step 4: Moreover, click on the option that says Environment Variables. Next, tap on the New in System Variable window.
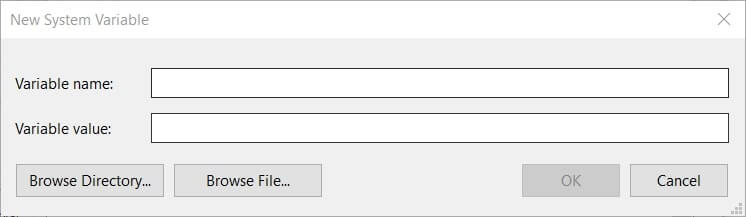
Step 5: Enter OCI_LIB32 in the variable name box. You also have to enter the Oracle folder path, which will look like this: C:\Oracle\Instantclient_19_11.
Step 6: To open the Window in the snapshot, double click on Path in System Variables.
Step 7: Tap on New and type the folder path in the Variable Value box. And click on Okay.
Part 3: Installation Of ODBC Oracle Client Package
The next part is to install the ODBC client by opening the instant_client_19_11 folder from the ODBC package in File Explorer. Moreover, right-click on the option odbc_install.exe and tap Run as Administrator.
Part 4: Setting Up Data Source Network
The fourth part is to set up a data source network or a DSN. To do this:
Step 1: Launch the Search Tool in Windows and type ODBC data sources.
Step 2: Click on ODBC data sources that will open a new window. Moreover, tap on Add from the User DSN system and open the Create New Data Source option.
Step 3: Furthermore, choose your Oracle ODBC driver and click on Finish. On the configuration window, fill out the details necessary.
Step 4: Check the Oracle Database Server Connection by clicking on Test Connection. To leave, click on Exit.
Also Read: How To Set Up 3 Monitors In Windows 10?
Part 5: Installing Visual C++ Libraries That Are Missing
Now we are in the last part, which is simple. To begin with, you can set up data sources with the ODBC data source for an Oracle Driver. However, you can only do this if you have not installed the visual C++ yet. Usually, an error message pops up. In this case, you can download Visual Audio 2017 and other redistribution packages.
Tap on the VC EXE file you downloaded, and this is the way to install the Oracle ODBC driver on Windows 10.
How To Install Oracle Instant Client ODBC On Linux And UNIX?
Step 1: On your Linux and UNIX operating systems, download and install the Oracle Client Package. And once again, unzip it in the directory. If you are using the RPM package on Unix, you can install it with yum.
Step 2: If the UnixODBC driver is not available, install it.
Step 3: Go to the Instant Client Directory and execute odbc_update_ini.sh.
Step 4: Depending on your locale, set an Oracle Globalization variable which will look like export NLS_LANG=JAPANESE_JAPAN.JA16EUC for the JA16EUC in Japanese.
For usage: odbc_update_ini.sh <ODBCDM_HOME> [<Install_Location><Driver_Name><DSN><ODBCINI>]
To understand this further, see this list of parameters and description.
- ODBCDM_Home: unixODBC driver manager home directory path
- Install_Location: The current Oracle instant client directory is the default path
- Driver_Name: It identifies the Oracle ODBC driver in the current residing Oracle Instant Client home. The name can be something like Oracle 19c ODBC Driver.
- DSN: Default name for DSN is Oracle ODBC-19c
- ODBCINI: This is the directory path .odbc.ini file which is the default users home directory.
How To Uninstall Oracle Client ODBC On Windows 10?
Step 1: In Windows 10, you can uninstall Oracle client ODBC by removing the Data source network. It is associated with the Oracle ODBC Driver, present in the ODBC data source administrator console.
Step 2: From the Instant client directory, execute odbc_uninstall.exe.
Step 3: Furthermore, you can remove all the files and directories one by one from the Client ODBC director.
Conclusion
Follow the steps in this article to download the Oracle Client Package and uninstall it when you don’t need it. If there’s any other way that’s easier to do in Windows 10, let us know in the comments below.


