In this how-to guide, we will have explained how to install RSAT on Windows 11 PC.
Remote Server Administration Tools (RSAT) is a set of tools in-built in a Windows operating system. It is used for managing the features, and role of people in the Server Administration process. Like any other version of Windows, Windows 11 also supports these Server. Management tools but are not a part of the Windows 11 operating system by default. It is included in the set of ‘Features on Demand – Optional Features’ of Windows 11 and you need to install and configure RSAT on Windows 11 before using it.
In an ideal scenario, the server administrators use several domain-joined Windows 11 PCs to elevate the admin experience and ease of use. However, this procedure can get a little complex if the admins don’t have an idea of installing the RSAT tools on Windows 11 PC using the online procedure.
Also Read: How To Fix No login Screen Issue On Windows 11
To help you out, in this comprehensive guide, we have explained the step-by-step process of installing RSAT tools on your Windows 11 PC.
Also Read: How To Reinstall Audio Driver On Windows 11 PC
Installing Windows 11 RSAT Tool: Getting Started
First of all, you should have access to your Windows 11 PC as the local administrator. This is essential because you cannot install the RSAT tool from the local accounts.
You will have to use the Microsoft update service to download these tools as a part of the optional features- Feature on Demand updates.
Besides, if you are currently using Windows 11 on Home PCs, unfortunately, you will not be able to install RSAT tools on your PC. It is only possible to install the RSA tools on domain-joined Windows 11 PCs.
Another important thing that you need to ensure is that all the security policies, proxy servers, and corporate firewalls allow the download of Feature on Demand via the Microsoft Updates on your Windows 11 PC.
In case your workplace does not allow for online updates and only allows offline downloads, there is a good chance that you might run into several complexities during the RSAT installation procedures on your Windows 11 PCs.
NOTE: In a challenging situation you may have to modify the Group Policy Editor. This will ensure that the Windows 11 PCs managed by SCCSM can download the Features on Demand (FOD) and language packs directly from Microsoft Updates. If you don’t know what a Group Policy Editor is, it is a feature you’ll find in the location ‘Computer Configuration\Administrative Templates\System’ which manages specific settings for optional Windows 11 components and component repair policies.
Keeping that aside, let’s see how to install RSAT tools on your Windows 11 PC.
Also Read: How To Track Internet Usage On Windows 11
How to manually install RSAT tools on Windows 11 PCs
While manually installing RSAT tools on your Windows 11 PC is a straightforward process, as mentioned above some complications are likely to occur.
Remote Server Administration Tools (RSAT) tool is a collection of several tools namely Active Directory User and Computers Management (DSA.MSC), Group Policy Management Editor (GPEdit.MSC), DHCP Server Tools, and more.
Now let’s see how to install Windows 11 PC manually as the first process. Later on, we will also explain how to install the RSAT tools via the PowerShell Command Line Tool of Windows Terminal on your Windows 11 PC.
- First of all, log in to your Windows 11 PC using the Administrator account.
- Now click on the Start button and type Settings in the search bar of the Start menu.
- Click on first search result to open up the Settings App on your Windows 11 PC.
- When in the Settings Window, click on Apps tile on the left sidebar and then move towards the right pane and click to open the Optional Features tile.
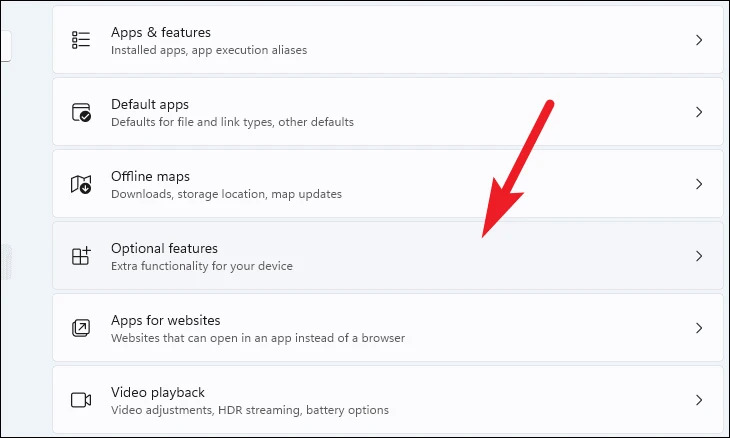
- In the optional features window, click on the ‘Add an option feature’ option located on the top.
- This will open up another Window; type RSAT in the search bar of the pop-up window and press the enter key. As soon as you’ll do it, several RSAT features will appear in the search result below. You can download these tools by just clicking on them.
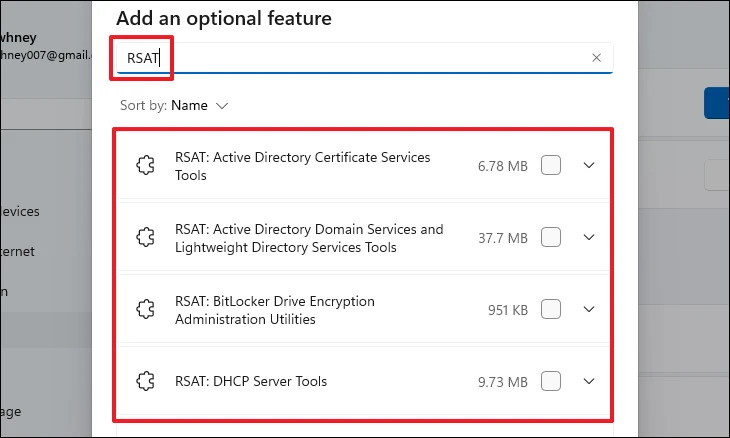
- However, you should refrain from downloading all the RSAT tools on your PC. Just go with those that you require as an administrator. Here we are downloading only two features- Active Directory User and Computers (DSA.MSC) and Group Policy Management Editor (GPEdit.MSC)
- Click on the View Features button located on the far edge of optional feature.
- When the RSAT search results appear, look for ‘Active Directory Domain Services and Lightweight Directory Services Tools’ and tick the checkbox preceding them.
- After this, click on the Next button present below and then the Install button.

- As soon as you do it, you will see that the installation process of these RSAT features will begin. This package of approx 5 MB will download directly as a part of Microsoft Update. When the package will finish downloading, Windows 11 PC will automatically download it without your intervention.
- To make sure that the RSAT Feature on Windows 11 PC, click on the history button located on the ‘Apps – Optional Features’ window.
Alternatively, you can also open up the Windows Powershell and type the following command to see if the ‘RSAT-DSA tool’ is installed or not. - You can confirm the installation of the from the See History button on the. You can run the following PowerShell command to confirm whether the. I have shared a table where all the RSAT features for Windows 11 are listed.
Get-WindowsCapability -Name RSAT* -Online | Select-Object -Property DisplayName, State
Also Read: How To Fix No login Screen Issue On Windows 11
Install RSAT tools via the PowerShell Command Line Tool of Windows Terminal
Since now we are familiar with the manual installation method of RSA tools on your Windows 11 PC, it’s time to know how to install the RSAT tools via the PowerShell tool of Windows Terminal. Here’s how to go about it:
- First of all, open up the Start menu by clicking on the Windows button.
- Now type Windows Terminal in the search bar of the Start Menu and right-click on the first search result.
- Now choose the ‘Run As Administrator option on the context menu. This will open up Windows Terminal with Administrator Privileges.
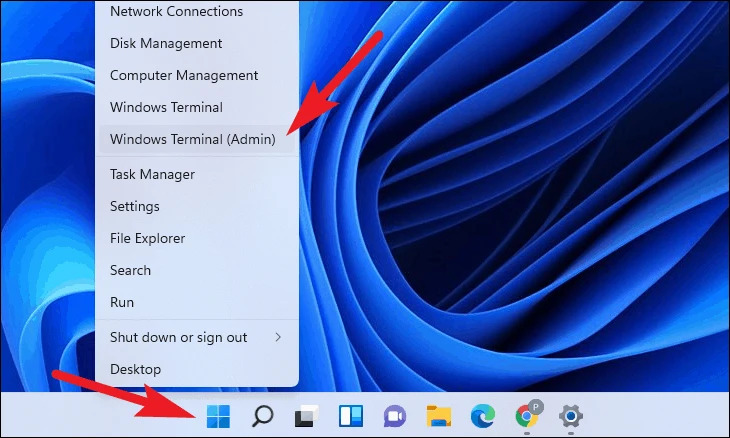
- When in the Windows Powershell Command Line Tool, copy-paste the following PowerShell command and press the enter key.
Get-WindowsCapability -Name Rsat.GroupPolicy.Management.Tools* -Online | Add-WindowsCapability -Online - This command will trigger the installation process of RSAT: Group Policy Management Tools on your Windows 11 PC.
- The ‘RSAT: Group Policy Management Tools’ will download from the Azure Virtual Machine on which it is hosted.
Depending on your internet speed, it may take a few minutes. As per our experience, the downloading procedure of RSAT: Group Policy Management Tools took more time than what the Windows 11 ISO took which was approximately 5GB.
How to Run RSAT Tools on Windows 11 PC
Now that the RSAT tools are installed, it is time to run them on your Windows 11 PC. Running RSAT tools on your Windows 11 PC is a very straightforward process. Let’s find out how to run the RSAT tools you’ve just downloaded on your Windows 11 PC.
- First of all, open the Start Menu on your Windows 11 PC by clicking on the Windows icon on the taskbar.
- Now type ‘RSAT tools’ in the search bar of your Windows 11 PC and double-click on the first search result.
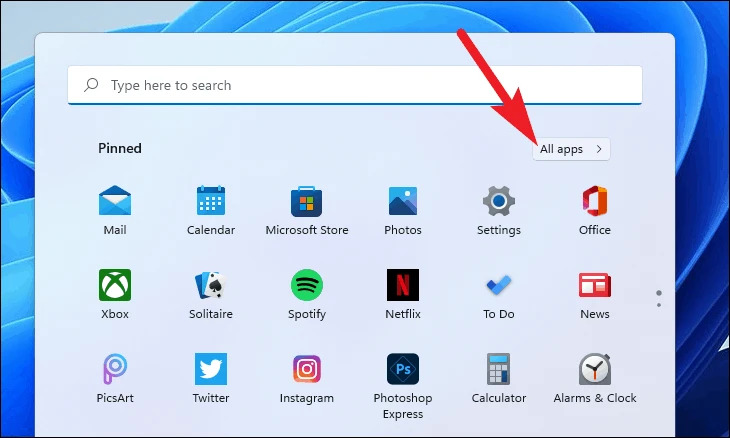
- Alternatively, you can go to Start Menu> All Apps > and keep scrolling until you reach Windows Tools.
- Now click on the RSAT tools icon mentioned here to launch them.
Conclusion
Here we reach the end of our detailed guide on how to install RSAT tools on your Windows 11 PC. We have explained the manual installation of RSAT as well as doing it via the Windows Powershell Command Line Tool. If you need any further assistance in installing the RSAT tools, we will be glad to help you out.


![The Apex Legends Digital Issue Is Now Live! Apex Legends - Change Audio Language Without Changing Text [Guide]](https://www.hawkdive.com/media/5-Basic-Tips-To-Get-Better-On-Apex-Legends-1-218x150.jpg)


