


 Header Through Cloudflare")


Apple’s iPad is the number one choice of all professionals out there. It has a long list of productivity apps such as QuickNotes or iWork- Apple’s office suite especially dedicated for working professionals.
While using the iPad for work-related purposes, we all need to record the entire process to do a task or capture the iPad screen to share with someone later. iPad supports the screen recording feature that lets you capture all the actions on the iPad screen. If you don’t know how to use this feature effectively, don’t worry; we are here to help. This step-by-step guide will explain how you can easily record your iPad screen while you do a task.
So without wasting time, let’s begin recording the screen of your iPad.

Add Screen Recording Control in the Control Center of iPad
To record the screen of your iPad, you need to enable the screen record option in the control center. Once enabled, the screen record button will always be available in the control center, and when you want to record the screen, you just have to swipe down and tap the screen recorder in the control center.
Follow the steps below to set up the screen record feature in the control center.
- Launch the Settings app on your iPad.
- Go to the Control Center in the left sidebar.
- Now you will see the list of all ‘Included Controls.’ These are the list of tools that are already present in the Control Center. These controls can be accessed directly by clicking the icon from the control center. Anyways, if you cannot see the Screen Recording control in the ‘Included Controls’ list, you will have to add it to the list of controls.
- To add the screen recording option manually, scroll down until you see the ‘Screen Recording’ option in the ‘More Controls’ list.
- Tap the green plus icon next to it.
- Now return to the top of the screen by scrolling up and enable the ‘Access Within Apps’ option. This option will let you use the screen recording tool within any app on your iPad.
Now the screen recording feature is available in the control center, and you can swipe down to access it whenever you want.
Also Read: How To Enable VPN Blocked By Your Router?
How to Screen Record on iPad
As the Screen Recording control is added to the Control Centre, you can begin recording the iPad screen. Screen Recording tool on iPad can also record the internal audit of the apps such as YouTube.
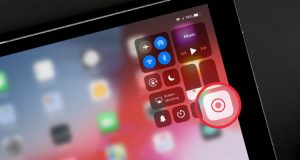
- First, you have to open the Control Center by swiping down the iPad screen from the top-right corner.
- Tap the screen recording control that we had just added in the control center.
- When you tap the screen recording button, you will see that the countdown icon has changed into countdown begin.
- Now close the control center by swiping up the screen. You will see that the screen recording has begun, and a red recording icon is present on the top right of the screen.

- Now you can do whatever you want to record in the Screen Recording.
- Once you are done with the screen recording, tap the red recording button. A pop-up will appear to confirm whether you want to stop the screen recording.
That’s it; you have successfully recorded the screen of your iPad. Go to the Photos app and look for the Screen Recordings folder to access the screen recording clip.
Also Read: XDA Basics: How To Record Your Screen In Windows 11?
How to Screen Record with Audio on iPad
Sometimes you might need to record the audio of the iPad along with the screen recording. This feature helps deliver the right message or information along with the recording clip for office presentations or school projects. For this purpose, the iPad allows you to record your voice using the microphone when you use the screen recording feature. To record your voice while screen recording the iPad, follow these steps:
- Open the Control Center by swiping down the iPad screen from the top-right corner.
Instead of tapping the screen recording control, tap and hold it unless a small menu pops up. - Now tap the ‘Microphone’ tool from the pop-up menu.
- The microphone will be enabled, and the icon will turn to red color.
- Now you can use the iPad’s microphone for voice-over when you record your iPad’s screen.
- You can begin recording the screen as usual, and an orange icon will appear near the red recording icon on the top right of the screen, which will indicate that the microphone is active.
That’s it! Now you can record your iPad screen along with the voice-over. You can use this feature to record presentations or narrations.
To turn off the recording, tap the red recording button. A pop-up will appear to confirm whether you want to stop the screen recording.
Read: 8 Best Screen Recorder for Mac
Easily Record Your iPad’s Screen.
So you can see how effortlessly you can record your iPad’s screen for various purposes. You can also edit these recordings from Apple’s photos app before sharing them with your friends or colleagues. iPad also records the internal audio during the recording process, which is a pretty cool feature if you are a game addict or love to watch movies.
Also Read: How To Record Meetings On Google Meet Without Permission?


