


 Header Through Cloudflare")


From what Microsoft gave us in the preview program, Windows 11 looks great. However, the question remains that can we also record our screen on the new upgrade? Screen recording in the times of remote working is an exceptionally important feature.
All android phones and iOS devices have it. So whether you are a digital creator who has to record your screen for your viewers frequently or a coder trying to share your method with a fellow coder, screen recording helps save plenty of time and comes in handy in many cases.
You cannot always explain technicalities, as well as you can show them. In the future, screen recording will be a great tool to increase efficiency and productivity in the workplace and educational institutions. Windows 11 is still working on getting around the whole feature, but it looks like you can figure out a way to record your screen on Windows 11.
Read: Windows 11: What’s New In Upcoming Windows Version?
Also Read: How To Customize The Taskbar In Windows 11?
How To Record Screen For Games In Windows 11?
Gaming is a growing industry, so it is no surprise that so many users want to give it a try. And it’s only natural that you’d like to show off your skills to your friend. To do that, you can opt for Xbox gaming in Windows 11 and follow these steps.
Step 1: Unfortunately, the screen recording cannot record the whole desktop or File Explorer. You can, however, be able to record the entire screen on Xbox. In the Xbox application, click on the game or app you want to record.
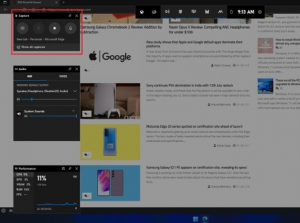
Step 2: To get the default Xbox game bar, press Windows Key + G.
Step 3: When the recording tool appears on the screen, great. If not, find and click on the Capture button that resembles a webcam. The option is located on the top right corner of your desktop screen.
Step 4: From the tools, you can choose from various options like screen recording, screenshot, and microphone recording.
Step 5: Click the record button. It should not be hard to locate as the circular dot inside a circle is located right on the bar. When the recording starts, the Xbox bar will disappear, and the screen will be adjusted. You can alter options from recording on a microphone to switching it off from time to time.
Step 6: Once you have recorded what you needed to, click on stop Recording. A pop-up notification will tell you that the recording is saved. Click on it to watch. There are options for sending the recording to your friends.
Step 7: During this process, you can also click on the Windows +G buttons anytime for the Xbox bar to open up. On the left side of the screen, click on the widgets, tap on the gallery to view your recordings.
Quick Tip: You can access the Xbox screen recording by pressing Windows+Alt+R as a shortcut. Use the duplicate keys to stop too.
Want to know: Keep This In Mind Before Updating Your PC With Windows 11
Click to know: Microsoft Reveals- How Windows 7 Users Can Upgrade to Windows 11
How Can I Record Game On Auto Mode?
It is difficult to guess exactly when you will need to turn on the screen recording to capture a specific part of the play. However, the steps below will assist you through the process.
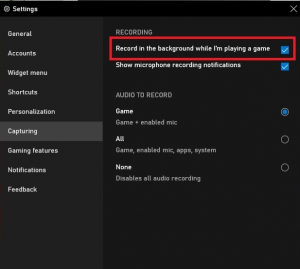
- In the Xbox Game bar, go to Settings and tap Capturing from the options.
- Find and click “Record in the background while I am playing a game.
- Now, every time you play, it will start recording in the background.
- To enable this feature for other apps, go to General and tick mark on ‘Remember this is a game.’
- Saving a specific part of the game you enjoyed, is doable too. Get the Xbox game bar and select Record the last 30 seconds button.
- To enable the shortcut for the same, press Windows + Alt+ G.
Read: How to downgrade Windows 11 to Windows 10
Which Third-Party Application Is Good For Windows Screen Recording?
There are plenty of options in the market, but one of the inexpensive and safest ones is the Share X. Follow the simple steps to do so.
- Go to the official website of Share X, download and install the application on Windows 11.
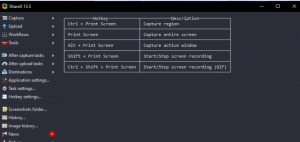
- Click on Run after installing the app. Share X will provide you with a list of hotkeys to start screen recording.
- Many of those hotkeys might overlap with Windows shortcuts.
- You can change these by going to Hotkey Settings from the side panel.
- Change the keys as per your need.
- For screen recording, click on Shit+ PrtSc.
- Click on the hotkeys to start recording for any screen or tab you like.
Conclusion
Using these tools, you can record your screen when needed. However, since Microsoft has already taken a huge leap with Windows 11 and Windows 365 cloud computing, one can expect a full-fledged feature for screen recording is on its way.
Also Read: Windows 365 Brings Windows 11 To iOS, iPads, Apple Laptops, And Mac


