


 Header Through Cloudflare")


Are you struggling to take a screenshot in your MacBook Air M2?
The all-new MacBook Air, with its futuristic M2 chip, is the most efficient laptop in the mid-level price range. With 2TB of storage space and 24GB of unified RAM, users can take their productivity to another level. Taking screenshots, for example, has become easier with different ways to suit different users. Screenshots are vital as they help us collaborate and get clarity on ideas, feedback, and so on.
If you are unable to take a screenshot on your MacBook Air, it can hamper your productivity and efficiency. In addition, if you are just getting started with your brand new MacBook Air, it can be a daunting task to do take a screenshot.
This blog discusses the several ways you can take a screenshot without a hiccup and have a seamless experience throughout the process.
So let’s get started.
5 Ways to take a screenshot in MacBook Air M2
Here are five ways in which you can take a screenshot in your MacBook Air M2.
Step 1: Click on the search bar.
Step 2: Type ‘Quick time’, and it will come up on the screen.
Step 3: Open quick time and click on File.
Step 4: The drop-down menu will open several options. Click on New screen recording, and few different options will open at the bottom of the screen.
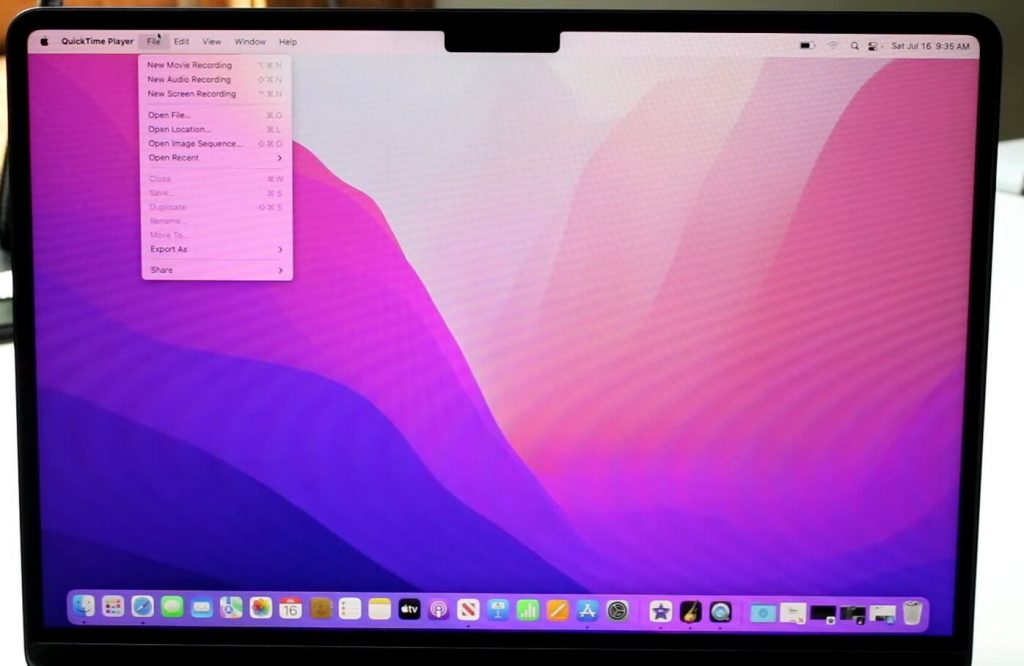
Step 5: When you hover your cursor on the icons, pop-up texts will come up. Click on capture entire screen and it will take a screenshot of your entire screen.
Further, you can crop the screen in select places if you need. You can also go to the Quick time player, click on File, select new screen recording, and this time click on Capture a selected window on display.
Second: Take a screenshot in MacBook Air M2 with Keyboard
Step 1: Click on the command button, shift, and number four on your keyboard.
Step 2: You have to tap on all three at the same time, and your cursor will change to a different icon.
Step 3: Now, you can select a portion of the screen to take a screenshot and continue doing it as many times as you need.
Third: Take screenshot on M1 MacBook with Keyboard shortcuts
Step 1: First, take a screenshot of the entire screen.
Step 2: Secondly, click on Shift + Command + 3 all at the same time.
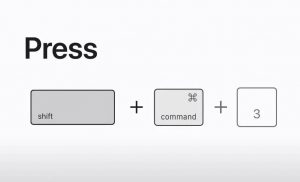
Step 3: As soon as you do it, the screenshot will appear as a thumbnail in the bottom right corner of the screen. It will automatically get saved on your Mac’s desktop by default.
Fourth: Take a screenshot of a window on MacBook Air M2
Step 1: Press Shift + Command + 4, followed by the space bar.
Step 2: It will change the cursor to a camera icon which you can move to an area you want to capture. Check for the highlight to confirm that is selected.
Step 3: Using your trackpad or mouse, take a screenshot by clicking on it. The screenshot will be saved to your desktop in the same way mentioned above.
Step 4: Another way to save the screenshots is to tap on the Control button while using these shortcuts. This time they will get saved to your clipboard.
Pro Tip: Use the Screenshot toolbar
You can also take screenshots using the screenshot toolbar in addition to keyboard shortcuts. It helps to record your screen and change screenshot settings.
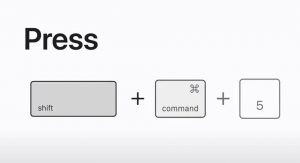
Step 1: To open, press Shift + Command + 5.
Step 2: By default, the tools will appear at the bottom of the screen, which you can move around if you want. There are controls for taking a screenshot on the left-hand side.
Step 3: You can capture the entire screen, a single window, or a portion of a screen. Further, there are tools to record your entire screen or to record a portion of your screen.
Step 4: You can view your customization options, click on the Options menu.

Step 5: From the setting options, you can choose a screenshot timer or to change your save location.
Frequently Asked Questions
1# Will the MacBook Air Get the M2 Chip?
In June 2022, Apple released its upgraded version of the MacBook Air with the M2 chip. While the earlier MacBook with the M1 chip continues to be in the stores, the 2022 Air is surely a bargain. They removed the classic tapered design and replaced it with a uniform and flat body like the Pro.
2# Is the MacBook Air M2 Good?
Apple confirms that the latest M2 MacBook Air is 20% faster and better in terms of performance in comparison to its predecessor. However, experts warn buyers to stay away from the base MacBook Air which may not be as great as the company claims it to be. They recommend users to go for the 512 GB model that uses an NAND chip and is up to 50% faster.
Conclusion
Screenshots are important in our day-to-day lives, especially after the pandemic, as more workplaces and schools shifted to a hybrid model. From collaboration on projects and clarity, screenshots are a savior. It can be a dilemma for a new Mac user to get around with it, especially the M2 version of the MacBook Air. Try out the five ways discussed in this blog, and let us know in the comments below which one worked out best for you.


