


 Header Through Cloudflare")


Isn’t it boring to keep clicking on the Chromebooks screen to complete your tasks? This job can be done even without touching your keyboard or mouse because an Auto Clicker can do this for you. Chromebook was introduced for the speed and for the easy usage for the user and for their comfort with a certain amount of advanced features Auto clicker is one of them.
It is a handy tool that makes continuous clicks while the user is playing games or reading a document or when using any other application which requires continuous clicks so that the screen does not turn off. With the help of an auto clicker, you can also focus on what the user is doing which helps in keeping the physical mouse aside. In this tool, there is no limit on how many times the cursor keeps tapping it only helps you in focusing on the task or work the user is involved in.
There is no kind of limitation on clicking as it is designed as the algorithm of the tools which is to make how many ever clicks are required automatically which helps in the completion of the task. Here are some ways which are helpful on how you can Automatically click objects on your Chromebook. You are eligible to set the Cursor on how you can automatically take the step when the cursor stops its moment for a certain amount of time being or a certain period.
Here is the explanation of how you can customize or set the Cursor for the automatic clicks in Chromebook. This can also be useful for that kind of user with Motor Impairments.
Also Read: How To Easily Install VPN Application On Chromebook
Here are some benefits of how Auto Clicker helps in Chromebook:-
- Most of the auto clickers are completely free of cost that is available on different websites or stores. In all the cases almost all stores will be updating their database regularly, which helps the user in finding the updated and perfect tool which will lead to the continuous clicking of the cursor regularly.
- Many tolls have been saved by the toolbar at the top of the user’s system. From here you are allowed to track your Drag and clicks.
- The tools here are multipurpose and work with almost all of the applications that have been in your system or been installed and even through the web pages.
- It helps you in performing more varieties of tasks at the same time. Moreover, the tool helps you in performing complicated tasks without any trouble.
- Auto clicker in Chromebook is an EASY TO USE tool which works with Converse. Therefore it is an easy tool for beginners.
- This tool is the best way you can save your energy and time as well from which you can set your mouse aside from physical use and only when it is required.
Now here are some ways on how you can enable or turn on automatic clicks in Chromebook:-
- Open Chromebook
- At the bottom right side select the time or you can also click some buttons like ALT + SHIFT + S on the keyboard.
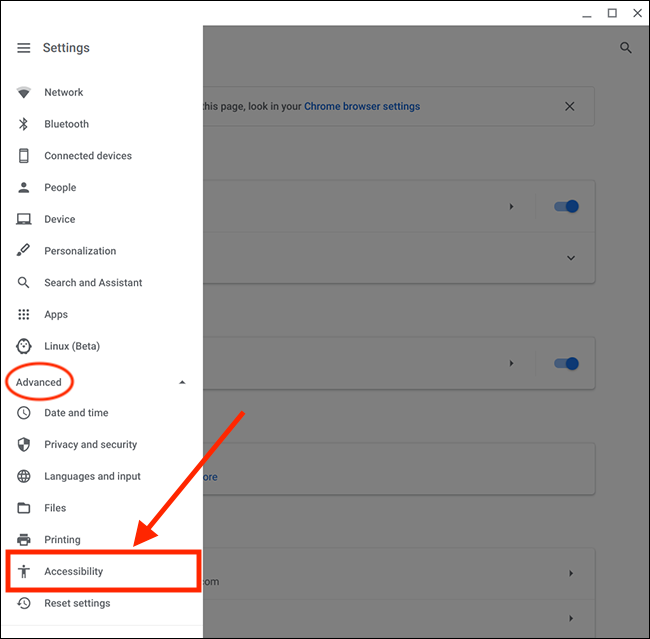
- Now you need to open the “Settings” and now you have to click on the “Advanced” option given there.

- Now from the “Accessibility” option, you need to select “Automatically Click” and the mouse cursor stops.
- Now you are eligible to customize the Auto Click setting and this is not mandatory. You can customize it only if you want to set it up according to your needs and wants.

These are the 4 options that will be available if you are interested in customizing.
- Delay Before Click
- Stabilize Click Location
- Revert To Left-Click After Action
- Movement Threshold
Delay Before Click – This feature helps you on customizing how much time you want your Chromebook to pause before starting the program automatically.
Stabilize Click Location – This setting helps you to keep the ring in the same location or the same place until you move the mouse cursor away or distract the cursor.
Revert To Left-Click After Action – This setting helps you automatically return to left-click after another program. Like right-click or double-click.
Movement Threshold – If you want to select in a certain range or when you want to adjust the size of the ring this setting can be helpful.
And here is a TIP when you want to click a certain place just place the cursor on the word and it keeps on clicking it.
Also Read: How to Install Chrome OS Flex on Windows PC, Laptop, and MacBook
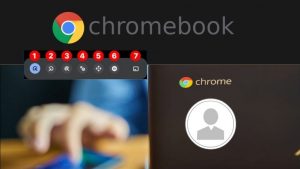
Types of Different Clicks:-
Once you turn on Auto Clicker, you are eligible to customize your clicks and the actions.
- From the bottom right, choose the action from the menu.
- ⬉ Left Click
- ⬈ Right Click
- ↟ Double Click
- ⚨ Click and Drag
- ✥ Scroll
- ⚁ Toggle menu position

- Where you need to perform the Action. Further, if you need to stop Automatic Clicks, you need to select NO action which means PAUSE.
Scroll the Hover of the Mouse
- Go to Scroll ✥ from the Automatic Clicks section.
- Therefore, you can see a menu appearing with a scroll option on the screen.
- Go to the scroll option and point to whatever you want to select:-
- ⇐Left
- ⇒Right
- ⇑Top
- ⇓Bottom
- ✖Close
- Whatever action that needs to be performed should be pointed by the Scroll option.
Hope this article helps you in learning How To Turn On Automatic Clicks In Chromebook. If you have any issue or suggestion share with us in the comment section. Happy Reading!
Also Read: NordVPN Review: 8 Pros And 3 Cons Of Using NordVPN


