


 Header Through Cloudflare")


In this step-by-step guide, we have explained how to MacOS Ventura USB installer for Hackintosh using OpenCore on Windows PC.
Though Hackintosh is not a mainstream computer, they are used by professionals to run the macOS Software. The main reason why users prefer Hackintosh over Mackintosh is its cheap cost. Generally, the Hackintosh PC can be created using the PC parts that resemble Mac Pro specifications at a cost is just 1/3rd of what the original Mac Pro is priced at.
In this guide, explain how can you install the latest macOS Ventura on Hackintosh using OpenCore on a Windows PC. While you can create a bootable USB installer on macOS itself, it does not mean you cannot do it on Windows PC. While it may not be as straightforward as doing it on Mac, you can create a USB installer using OpenCore.

To create the macOS USB Installer for Hackintosh, we have used OpenCore 0.7.6 and Windows 10.
So, without wasting any time, let’s get started.
Steps to Create a macOS Monterey USB Installer using OpenCore
Before we proceed with the installation, it is recommended to go through the checklist mentioning the things you require:
- A USB flash drive with 16 GB or more
- Internet connection
- A Windows 10 PC or laptop
Let’s proceed with the steps.
Install Python on your Windows PC
To create the macOS USB Installer for mackintosh, it is mandatory to install Python on your Windows PC. If you do not have it already, you can install it from the link given below.
https://www.python.org/downloads/windows
After installing Python, proceed to the next step.
Download OpenCore 0.7.6
As mentioned before, we are using OpenCore 0.7.6, the latest version for this guide. So, let’s see the step-by-step process of installing the OpenCore 0.7.6 package below.
- Follow the link given below to download the OpenCore package on your Windows PC.
https://github.com/acidanthera/OpenCorePkg/releases/download/0.7.6/OpenCore-0.7.6-RELEASE.zip
- After the download, extract the zip file so that you can access all the sub-folders.
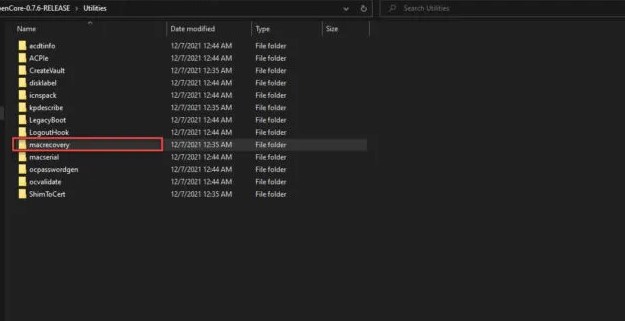
- Next, access the Utilities folder and look for the macrecovery folder. Now you have to copy the path for the macrecovery folder from the address bar on top.
- Now search for the command prompt on your Windows PC and launch it in Administrator Mode.
- Type the cd command and the path to the macrecovery folder.
- Next, you have to copy-paste the following command in the command prompt window.
python ./macrecovery.py -b Mac-E43C1C25D4880AD6 -m 00000000000000000 download
As soon as you will press the enter key, it downloads process will be initiated.
When the process gets completed, you would have successfully installed the macOS Ventura installation files on your PC.
Note: The process will take some time but upon completion, you would have either got the BaseSystem or RecoveryImage files on your PC.
Format the USB Drive
Before we can use the USB drive it is essential to format it. Here are the steps to format it as FAT 32 using Disk Management.
- Access the Context menu of the Start Button by right-clicking it.
- Choose the Disk Management option.
- All the partitions and disks will be visible here. Look for your USB in the bottom half.
- In case you have created multiple partitions on USB, right-click each of the partitions and choose the Delete Volume option.

- Right-click anywhere and choose the create a new simple volume. Choose FAT32 from the drop-down, and its space should at least be one gigabyte or more. Name the partition as “EFI”.
Finally, press the Format button to format the USB drive.
Copy the macOS Ventura Installation files on the USB
After formatting the USB drive, it’s time to copy the macOS Ventura Installation on your USB drive. Here’s how to proceed:
- Access the root of the USB drive, and create a new folder with the name com.apple.recovery.boot.
- Now you have to copy the following two files located in the macrecovery folder and then paste them into the com.apple.recovery.boot folder you’ve just created on the USB.
basesystem.checklist
BaseSystem.dmg
Copy the EFI folder
Next, it’s time to locate the OpenCorePkg folder that downloaded before on your PC and open it.
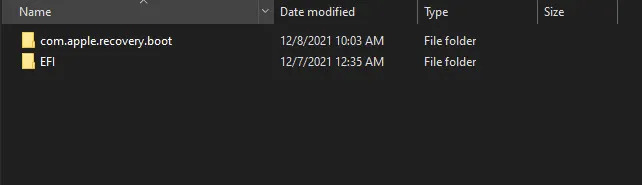
Now copy the EFI folder into the USB drive. Make sure that the EFI folder appears alongside the com.apple.recovery.boot folder.
Wrapping Up
Those are all the steps that it takes to create a macOS Ventura USB installer for Hackintosh using OpenCore on Windows 10. If you found this article to be of some help, do not forget to share it with others. With this, signing off.


doesn’t work; you always have to get a configuration file for opencore. follow the dortania guide, it’s much more detailed and accurate, and it also has troubleshooting help. https://dortania.github.io/OpenCore-Install-Guide
Very good post. I definitely love this site. Thanks!