


 Header Through Cloudflare")


What is Disk Utility?
Disk utility is a built-in manager present in the Mac that can be accessed with or without booting the Mac, partitioning, repairing, and erasing storage of the internal disk and external storage. You can also access the disk utility through the Recovery mode. Your Mac’s hard disk can be partitioned without the need to create or load any other extra bootable device.
With the help of disk utility, you can solve the errors of the disk or also organize the disk. Disk utility helps in so many things such as encrypting the password to the drive and adding up the password to that, mounting and unmounting the disk, erasing, formatting and also managing the internal and external disk, and much more.
Accessing the Disk utility:
It is very easy to access the Disk Utility on the macOS Ventura, you just need to press Command+Space together to open it. This will open the Spotlight Search. In the search bar type Disk Utility and press Enter.
One more way to access the disk utility is by clicking on the Launchpad icon which is present on your dock, now click on the other folder option and select the Disk utility option.
In the latest version of the Mac, if it has an operating system installed you will be able to boot and reboot the Mac. Press command+R together. This will boot the Mac into recovery mode and now you can select the Disk Utility option.
Partition Drives and Format Partitions using Disk utility:
When you open the Disk utilities, you will be able to see all the internal drives present, special image files that are DMG files, USB, and other external drives. In the left sidebar, you can all the mounted volumes.
At the top right corner of the window, you can see the View option, click on that. Under the View, option select Show up all the devices. This will show all the internal drives and all the partitions of it.
Click on the Parent drive and select the Partition to manage the partitions. This will help you to adjust the partitioning of the layout scheme like renaming the partitions, resizing, creating, deleting, and also reformating the partitions as per your wish.
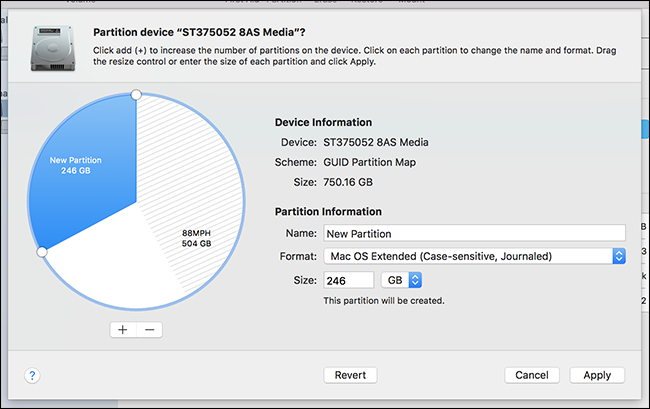
Make sure to backup everything before doing this. If you want to repartition the system drive, you can do it from the Recovery Mode. There is one exception that is APFS ( Apple’s new file system) which is the default in the solid-state drives. It contains all kinds of tricks such as you can see two drives in the same finders, you do not need to manage all the storage spaces for each volume.
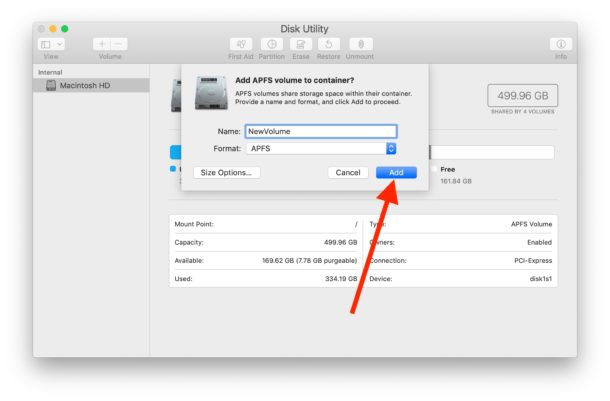
If you want to create a new APFS volume in macOS Ventura, just click on your system drive. Select the option Edit, Under the Edit select Add APFS in the menu bar. You will get a prompt box, enter the name of the volume and click on the ok.
How to find if the disk is at fault using the Disk Utility
First Aid Feature helps you to identify the errors in the file system and fixes the problem. If there is also a problem with external storage or with the drive inside your Mac (macOS Ventura), First Aid will help you to find it. First Aid undergoes many checks and it finds out if there is an issue in the disk. Now let us check out how to run First Aid on your Mac to check if there is any fault:
Open the Disk Utility in your Mac. On the sidebar select the drive in which you are facing an error Or under the View select Show all the devices. Click on the First Aid option present above the window,
When you click on the First Aid option, you will get a pop-up box select the Run option in the box. Now Disk utility will check if there are any errors in the volume.
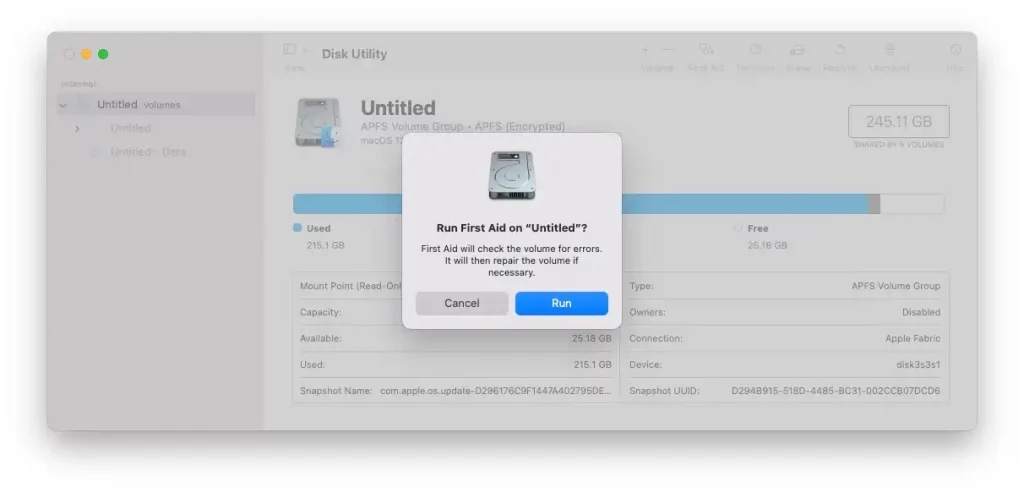
If it finds any issue or error, the Disk utility will try to repair and fix the issue. If Disk Utility returns that the Disk is Ok then it means that there is no error or no issues with the disk.
How to create Disk images using Disk Utility
Disk Utility has the ability to create the disk image of the contents present in the folder which you can easily make an archive or also transfer to another mac.
To create a disk image, go to disk utility and click on the File menu option present at the top of the screen. You will a dropdown menu, in that select the New image option to create blank disk images or disk images containing the contents of a folder. This will be in the format of .DMG files.
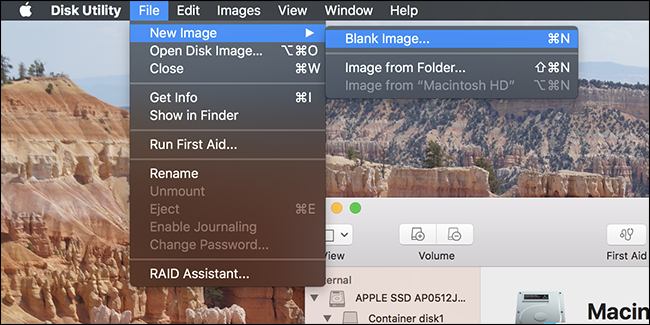
Now you will be able to mount the images file and load the files into it. The creation of the encrypted disk image to store the files is very useful. After creating the disk image, you can also upload this encrypted DMG file into the cloud storage or also save that in the unencrypted removable drives.
Hope this article helps you to know about Disk Utility On mac and how it works on macOS Ventura


