


 Header Through Cloudflare")


Apex Legends is one of the most famous battle royal games ever. It has been more popular lately but it was a fantastic game from the start. Since streamers, content creators have created more gameplay and content from it. It has allured more following. So this time, people playing the game are always looking for things they can do better, especially in the performance department. The players, especially the competitive ones, want their PCs and games to be configured correctly to enjoy the game with the highest possible FPS and smoothness that they can have so that they always have a competitive advantage.
In this article, I will show you precisely the best configuration on Apex Legends that can improve your gaming performance in a big way.
In-game Display and Graphics settings.
As much as I want to dwell deep enough on all the graphics settings available for Apex Legends. There is always only one rule in these settings. That is that you set all the in-game settings at the lowest. It may cause you to lose the fantastic visuals of Apex Legends. In return, you will have more FPS, boosted performance, and better visibility. Some settings may affect your gameplay when changed.
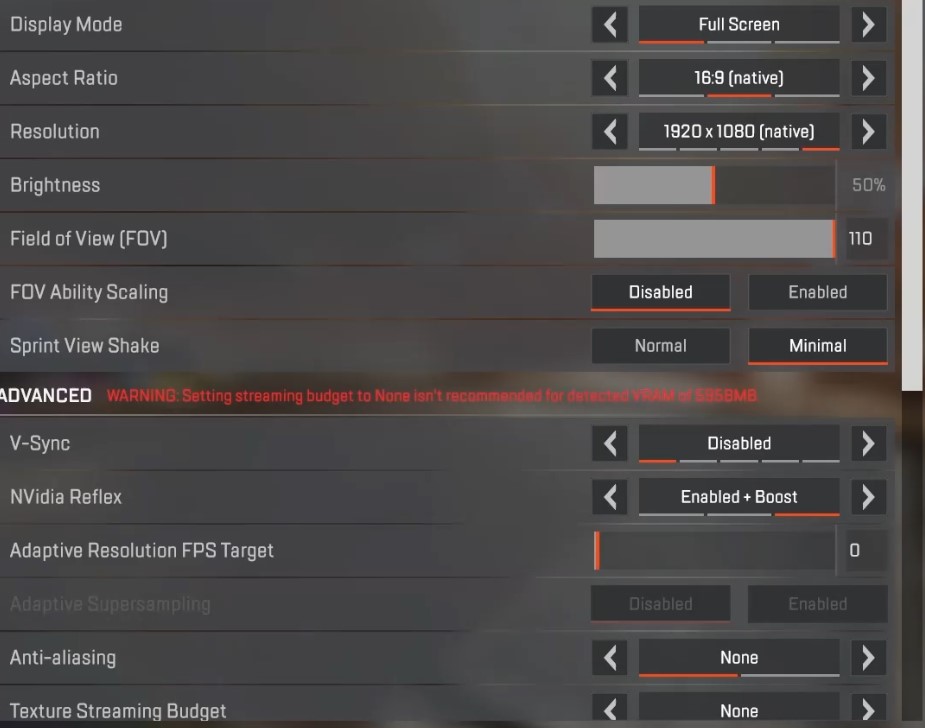
Take note of the following:
- Display Mode: This should always be on Full Screen so your computer allocates all its power on the main full-screen game.
- Aspect Ratio: This depends on you, but if you are a new player, stay on the aspect ratio of your monitor or something you are used to. The default value for this would be 16:9
- Resolution: The resolution has one of the impacts capable of changing your FPS drastically. For most users, the highest resolution of their monitor should be the resolution they choose. If you want more FPS, you can lower this down. Beware, you might experience blurriness or pixelation if taken too low.
- Brightness: Does not affect your FPS
- Field of View (FOV): affects your FPS very marginally. This should be user preferenced and not be taken from this article.
- V-SYNC: This one should always be off to avoid frame rate capping and introduced latency
- NVIDIA Reflex: Only available to those who have an NVIDIA graphics card. Make sure this is set to Enabled + Boost. This allows your graphics card to perform some technological advancement on the game, making it smoother and more responsive to your actions.
For the rest of the settings. I would not go 1-to-1 but suggest turning all of them to the lowest—just a basic rule for optimization.
Also Read- Apex Legends – Change Audio Language Without Changing Text [Guide]
Overclocking
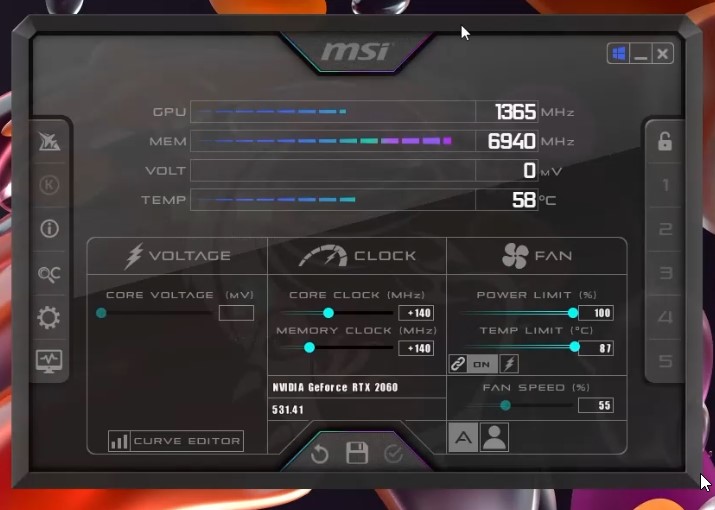
There are many different ways to overclock your computer. But what is overclocking? The gist is that you can increase the number of clocks on a specific part of a specified computer part you have, for example, in this case. We will be overclocking our graphics card with MSI Afterburner. Once we open up the program, we can add clock speed to the core clock and memory clock, which then, in turn, gives us more performance from our graphics card. So how do we do it?
To do it, follow the steps below:
#1. Download MSI Afterburner (MSI Afterburner is a famous GPU overclocking software that is very intuitive to use.) The official link of the site is https://www.msi.com/Landing/afterburner/graphics-cards. Press download and install it as any other software.
#2. Once downloaded, open the application. You can then start adding MHz on your clock or increasing the clock speeds for both the core and memory clock. What you need to do here is experiment. Only increase with increments of 5 or 10. No, this program will not break your graphics card. It can crash your system when you overload the overclock. Still, it will just revert to normal once your computer has restarted.
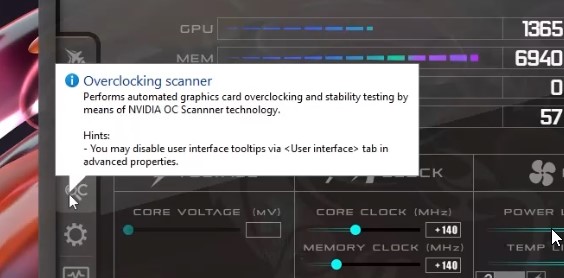
#3. Suppose you need more time to do it manually or want to save yourself some trouble. Just use the Auto Overclock feature of the program, which will allow you to press the scan button, and it will do all the testing, incrementing, and adjusting for you.
Now that we got that done. We are now ready to move on to the next steps of optimizing apex legends.
Also Read- ‘Connection to server timed out’ Error In Apex Legends: Issue Solved
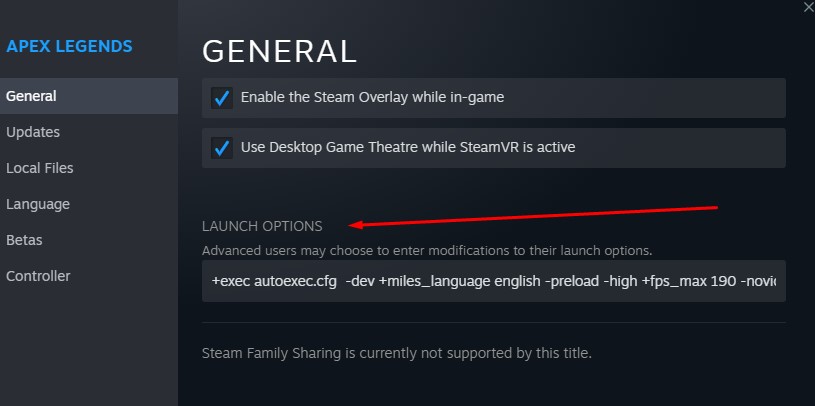
Launch Options.
Launch Options allow you to preload a command or prompt so that Apex Legend executes it before the game even runs. Below is a code of my daily Launch options, and I will explain to you what each command does.
+exec autoexec.cfg -dev -preload -high +fps_max 0 -novid -fullscreen -dxlevel95Before I tell you what those commands do, let me first show you how to go into the Launch Option screen.
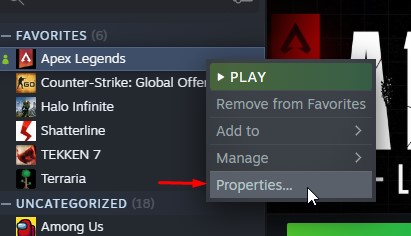
#1. Open Steam. Head over to the library, then apex legends.

#2. Right-click Apex Legends, then head over to properties. From there, you will see the launch options.
Okay, now let me have the time to show tell what each command does.
- +exec autoexec.cfg: This allows you to execute your Autoexec file. Later in the Auto Config Files, you’ll see more of what to put in the autoexec.cfg config.
- -dev: Disables certain consumer-build things, which gives you faster, more fps.
- -preload: This preloads the data or files needed for the game to run. Less hitching when this is added to your launch options
- -high: Set Apex Legends to Hihg on process priority.
- +fps_max 0: Disables FPS cap.
- -novid: Removes the intro video of Apex Legends. Basically, it just fastens up your opening.
- -fullscreen: Make sure Apex Legends is running on Exclusive Fullscreen.
- -dxlevel95: OPtimized DirectX usage for Apex Legends.
All those commands allow your Apex Legends to perform on Apex quality (no puns intended).
Also Read- How To Gain Performance By Overclocking Graphics Card
Auto Config Files
There are files that you can just use to replace your current apex legends settings. Those files include lowering to the lowest possible settings with Auto executing of commands that enable performance boost on Apex Legends.
Below, I will provide a list of commands to insert on the autoexec.cfg and videoconfig.txt. This is what I use, and if you will, watch the video provided as an accompaniment to this article. You will see that most of the performance boost came from this.
Also Read- Best FPS Games To Play On PS5
Where do I see my autoexec file?
To find autoexec.cfg. Open the directory where you installed Apex Legends. Usually on your C drive -> Program Files -> Steam -> Steamapps -> common -> Apex Legends -> cfg.
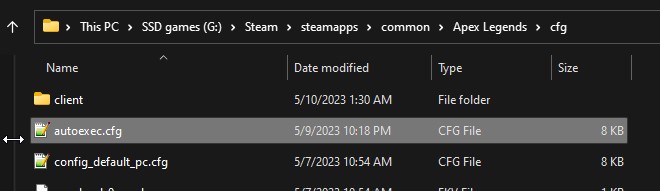
From there, you can simply paste the codes I will be placing below. Though, make sure that there are no duplicates on your current autoexec to avoid game confusion.
fps_max 0
cl_drawmonitors "0"
ai_expression_frametime "0"
anim_3wayblend "0"
bink_materials_enabled "0"
bink_preload_videopanel_movies "0"
building_cubemaps "1"
cl_SetupAllBones "0"
cl_aggregate_particles "1"
cl_allowAnimsToInterpolateBackward "0"
cl_always_ragdoll_radius "0"
cl_anim_detail_dist "1"
cl_anim_face_dist "1"
cl_bones_incremental_blend "1"
cl_cull_weapon_fx "0"
cl_decal_alwayswhite "1"
cl_detaildist "0"
cl_detailfade "0"
cl_disable_ragdolls "1"
cl_drawmonitors "0"
cl_drawshadowtexture "0"
cl_ejectbrass "0"
cl_forcepreload "0"
cl_gib_allow "0"
cl_idealpitchscale "0"
cl_jiggle_bone_framerate_cutoff "0"
cl_lagcompensation "1"
cl_minimal_rtt_shadows "1"
cl_muzzleflash_dlight_st "0"
cl_new_impact_effects "0"
cl_particle_fallback_base "-1"
cl_particle_fallback_multiplier "-1"
cl_particle_limiter_max_particle_count "10"
cl_particle_limiter_max_system_count "10"
cl_particle_limiter_min_kill_distance "1"
cl_particle_max_count "0"
cl_particle_snoozetime "0.166667"
cl_phys_maxticks "0"
cl_phys_props_enable "0"
cl_predict "1"
cl_predictweapons "1"
cl_ragdoll_collide "0"
cl_ragdoll_force_fade_time "0"
cl_ragdoll_force_fade_time_local_view_player "0"
cl_ragdoll_force_fade_time_on_moving_geo "0"
cl_ragdoll_maxcount "0"
cl_ragdoll_self_collision "0"
cl_show_splashes "0"
cl_showfiredbullets "0"
cl_showpos "0"
cl_simdbones_slerp "1"
cl_smooth "0"
cl_threaded_bone_setup "1"
cl_use_simd_bones "1"
csm_cascade_res "0"
csm_coverage "0"
csm_enabled "0"
csm_quality_level "1"
csm_renderable_shadows "0"
csm_rope_shadows "0"
csm_world_shadows "0"
disp_dynamic "0"
dlight_enable "0"
dodge_viewTiltMax "0"
dof_enable "0"
dof_overrideParams "0"
dvs_enable "0"
engine_no_focus_sleep "0"
env_lightglow "0"
exec usersettings.cfg
flex_rules "0"
flex_smooth "0"
fog_enable "0"
fog_enable_water_fog "0"
fog_enableskybox "0"
fog_volume "0"
func_break_max_pieces "0"
g_ragdoll_fadespeed "10000"
g_ragdoll_lvfadespeed "10000"
host_sleep "0"
host_threaded_sound "0"
hud_setting_adsDof "0"
hud_setting_minimapRotate "1"
hud_setting_pingAlpha "0.400000"
hud_setting_pingDoubleTapEnemy "1"
hudchat_new_message_fade_duration "1"
lightmap_ambient "0"
lightmap_realtimelight "0"
lightmap_realtimeshadows "0"
m_acceleration "0"
map_settings_override "1"
mat_antialias "0"
mat_antialias_mode "0"
mat_autoexposure_override_min_max "1"
mat_backbuffer_count "0"
mat_bloom_max_lighting_value "0"
mat_bloom_streak_amount "0"
mat_bloom_wide_amount "0"
mat_bloomscale "0"
mat_bumpmap "0"
mat_colcorrection_disableentities "1"
mat_colorcorrection "0"
mat_colorcorrection_editor "0"
mat_compressedtextures "1"
mat_debug_tonemapping_disable "1"
mat_depthbias_shadowmap "0"
mat_depthbias_tightshadowmap "0"
mat_depthfeather_enable "0"
mat_depthtest_force_disabled "1"
mat_diffuse "1"
mat_disable_bloom "1"
mat_disable_lightmap_ambient "1"
mat_disable_lightmaps "1"
mat_disable_lightwarp "1"
mat_disable_model_ambient "1"
mat_dof_enabled "0"
mat_dynamic_tonemapping "0"
mat_enable_ssr "0"
mat_envmap_scale "1"
mat_envmapsize "0"
mat_envmaptgasize "0"
mat_fastspecular "1"
mat_filterlightmaps "0"
mat_filtertextures "0"
mat_force_bloom "0"
mat_forceaniso "0"
mat_fullbright "1"
mat_fxaa_enable "0"
mat_global_lighting "0"
mat_hdr_enabled "0"
mat_hdr_level "0"
mat_hide_sun_in_last_cascade "1"
mat_instancing "1"
mat_light_edit "1"
mat_local_contrast_scale_override "0"
mat_maxframelatency "0"
mat_mip_linear "0"
mat_motion_blur_enabled "0"
mat_motion_blur_falling_intensity "0"
mat_motion_blur_falling_max "0"
mat_motion_blur_falling_min "0"
mat_motion_blur_forward_enabled "0"
mat_motion_blur_percent_of_screen_max "0"
mat_motion_blur_rotation_intensity "0"
mat_motion_blur_strength "0"
mat_parallaxmap "0"
mat_picmip "4"
mat_queue_mode "2"
mat_reducefillrate "1"
mat_reduceparticles "1"
mat_screen_blur_enabled "0"
mat_screen_blur_override "1"
mat_shadercount "0"
mat_shadowstate "0"
mat_specular "0"
mat_sun_highlight_size "0"
mat_use_compressed_hdr_textures "1"
mat_vignette_enable "0"
mat_vsync "0"
mat_vsync_mode "0"
model_fadeRangeFraction "0"
modeldecals_forceAllowed "0"
monitor_mat_sharpen_amount "0"
mp_decals "0"
mp_usehwmmodels "-1"
mp_usehwmvcds "-1"
muzzleflash_light "0"
nb_shadow_dist "0"
not_focus_sleep "9999999999999"
particle_cpu_level "0"
particle_dlights_enable "0"
particle_gpu_level "0"
pertrianglecollision "0"
projectile_faketrails "0"
projectile_filltrails "2"
prop_active_gib_limit "0"
pvs_yield "1"
r_DrawBeams "0"
r_DrawDisp "0"
r_PhysPropLighting "0"
r_WaterDrawReflection "0"
r_blurmenubg "0"
r_createmodeldecals "0"
r_decals "0"
r_ditherAlpha "0"
r_ditherFade "0"
r_drawbatchdecals "0"
r_drawbrushmodels "0"
r_drawentities "0"
r_drawopaquerenderables "0"
r_drawparticles "0"
r_drawscreenspaceparticles "0"
r_drawsky "0"
r_drawsprites "0"
r_drawstaticlight "0"
r_drawstaticprops "0"
r_drawtranslucentrenderables "0"
r_drawworld "0"
r_dynamic "0"
r_dynamiclighting "0"
r_fastzreject "-1"
r_forcecheapwater "1"
r_jiggle_bones "0"
r_lightmap "0"
r_lightstyle "0"
r_modeldecal_maxtotal "0"
r_norefresh "1"
r_particle_lighting_enable "0"
r_particle_lighting_force "0"
r_particle_low_res_enable "1"
r_particle_sim_spike_threshold_ms "0"
r_particles_cull_all "0"
r_queued_ropes "1"
r_rimlight "0"
r_rootlod "2"
r_ropetranslucent "0"
r_shadowrendertotexture "0"
r_sse_s "0"
r_threaded_particles "1"
r_threadeddetailprops "1"
r_txaaEnabled "0"
r_updaterefracttexture "0"
r_updaterefracttexture_allowmultiple "0"
r_visambient "0"
r_vismodellighting "0"
r_visualizetraces "0"
r_volumetric_lighting_enabled "0"
r_waterdrawreflection "0"
r_waterdrawrefraction "0"
r_waterforceexpensive "0"
r_waterforcereflectentities "0"
ragdoll_sleepaftertime "0"
rope_averagelight "0"
rope_collide "0"
rope_rendersolid "0"
rope_smooth "0"
rope_solid_minalpha "0"
rope_solid_minwidth "0.1"
rope_subdiv "0"
rope_wind_dist "0"
rui_overrideVguiTextRendering "1"
shadow_capable "0"
shadow_default_filter_size "0"
shadow_depth_dimen_min "0"
shadow_depth_upres_factor_max "0"
shadow_enable "0"
shadow_filter_maxstep "0"
shadow_maxdynamic "0"
shadow_maxspotshadows "0"
shadow_multisampled "0"
shake_offsetFactor_human "0"
showfps_enabled "0"
showfps_heightpercent "0"
showfps_mouse_latency "0"
showfps_smoothtime "0"
showfps_spinner "0"
showhitlocation "0"
showmem_enabled "0"
shownet_enabled "0"
showsnapshot_enabled "0"
sleep_when_meeting_framerate "0"
sleep_when_meeting_framerate_headroom_ms "0"
setting.cl_ragdoll_self_collision  "0"
setting.csm_enabled  "0"
setting.r_lod_switch_scale  "0.35"
sort_opaque_meshes "0"
sprint_view_shake_style "1"
ssao_blur "0"
ssao_downsample "0"
ssao_enabled "0"
sssss_enable "0"
staticProp_max_scaled_dist "1500"
static_shadow "0"
static_shadow_res "0"
stream_cache_high_priority_static_models "1"
stream_cache_preload_from_rpak "1"
stream_drop_unused "1"
stream_enable "0"
stream_memory "1"
stream_mips_use_staging_texture "0"
stream_picmip "4"
tf_particles_disable_weather "1"
tracer_extra "0"
tsaa_blendfactoroverride "1"
tsaa_curframeblendamount "0.05"
tsaa_numsamples "4"
tweak_light_shadows_every_frame "0"
viewmodelShake "0"
viewmodelShake_sourceRollRange "0"
viewmodel_selfshadow "0"
violence_ablood "0"
violence_agibs "0"
violence_hblood "0"
violence_hgibs "0"
vphysics_threadmode "1"
vsm_ignore_face_planes "1"
We could go over all the commands that I have listed to be pasted on your autoexec. But that would take forever. Basically, everything, every single command that the code includes, allows your game to run more smoothly with better visibility which is a plus.
Where do I see my videoconfig file?
It does not matter where you installed Apex Legends for this one it is usually saved at C:\Users\Username\Saved Games\Respawn\Apex\local
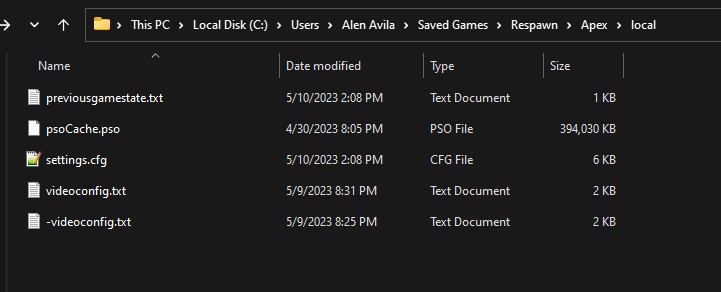
from there, you would have access to the videoconfig.txt.
Here you can also just replace it with the videoconfig code I will provide below.
"VideoConfig"
{
	"setting.cl_gib_allow"		"0"
	"setting.cl_particle_fallback_base"		"3"
	"setting.cl_particle_fallback_multiplier"		"2"
	"setting.cl_ragdoll_maxcount"		"0"
	"setting.cl_ragdoll_self_collision"		"0"
	"setting.mat_forceaniso"		"1"
	"setting.mat_mip_linear"		"0"
	"setting.stream_memory"		"3000000"
	"setting.mat_picmip"		"0"
	"setting.particle_cpu_level"		"0"
	"setting.r_createmodeldecals"		"0"
	"setting.r_decals"		"0"
	"setting.r_lod_switch_scale"		"0.35"
	"setting.shadow_enable"		"0"
	"setting.shadow_depth_dimen_min"		"0"
	"setting.shadow_depth_upres_factor_max"		"0"
	"setting.shadow_maxdynamic"		"0"
	"setting.ssao_enabled"		"0"
	"setting.ssao_downsample"		"3"
	"setting.dvs_enable"		"0"
	"setting.dvs_gpuframetime_min"		"1"
	"setting.dvs_gpuframetime_max"		"1"
	"setting.defaultres"		"1680"
	"setting.defaultresheight"		"1050"
	"setting.fullscreen"		"1"
	"setting.nowindowborder"		"0"
	"setting.volumetric_lighting"		"0"
	"setting.mat_vsync_mode"		"0"
	"setting.mat_backbuffer_count"		"1"
	"setting.mat_antialias_mode"		"0"
	"setting.csm_enabled"		"0"
	"setting.csm_coverage"		"1"
	"setting.csm_cascade_res"		"64"
	"setting.fadeDistScale"		"1.000000"
	"setting.dvs_supersample_enable"		"0"
	"setting.gamma"		"1.000000"
	"setting.configversion"		"7"
}
Be sure that you take your time changing the “setting.defaultres” “1680” & “setting.defaultresheight” “1050”. Change the values of 1680 and 1050 depending on your normal resolution. This is usually set as 1920 by 1080.
This is the ultimate guide to taking your Apex Legends performance to the peak. Hopefully, you have learned a thing or two about this guide. Be sure to comment below about how much FPS you have gained after applying all the tips and tricks for your configs. Thank you for reading, and happy playing!


