


 Header Through Cloudflare")


![[Interview] The Future of Screen Experiences ②: From Watching to Understanding With Vision AI Companion](https://www.hawkdive.com/media/samsung-tvs-and-displays-vision-ai-companion-interview_thumb932-218x150.jpg "Exploring Vision AI Companion: Transforming Screen Experiences for Users")


Thumbnail previews are super helpful. A Thumbnail preview is a miniature representation of a file. So, you don’t need to open every file to check if you are selecting the right one. There may be various reasons for Windows not allowing this feature to work. In this article, we will be discussing the best 6 best ways to fix the Thumbnail preview not showing on Windows 11.
With Thumbnails, you see the content of a file without actually opening it. So, it comes in handy when you want to select multiple files at once. Many users after updating to Windows 11 have reported the problem of thumbnail preview not showing. So, in this article, we will be discussing how to fix thumbnail preview not showing on Windows 11.
Also Read: Steam Overlay Not Working In Windows 11? Try These Fixes
Fix Thumbnail Preview not showing on Windows 11
- Enable Thumbnails-Windows Explorer
- Restart Files Explorer
- Delete Thumbnail cache
- Change Default App type
- Advanced System Settings
- SFC scan option
Now, let us discuss these ways to fix thumbnails not showing on Windows 11 in detail:
Enable Thumbnails in Windows Explorer Options
The first and the most obvious thing you can do is to check if the thumbnails are enabled in the Files explorer options. This is the best method to get over the specified issue. So, to do this, you just need to follow a few simple steps which are given below:
1. Open Files Explorer Options on your PC. Just click on the Windows icon in the taskbar.
2. Now, type Files Explorer options in the search bar on the top. Under best match, click on Files Explorer options.
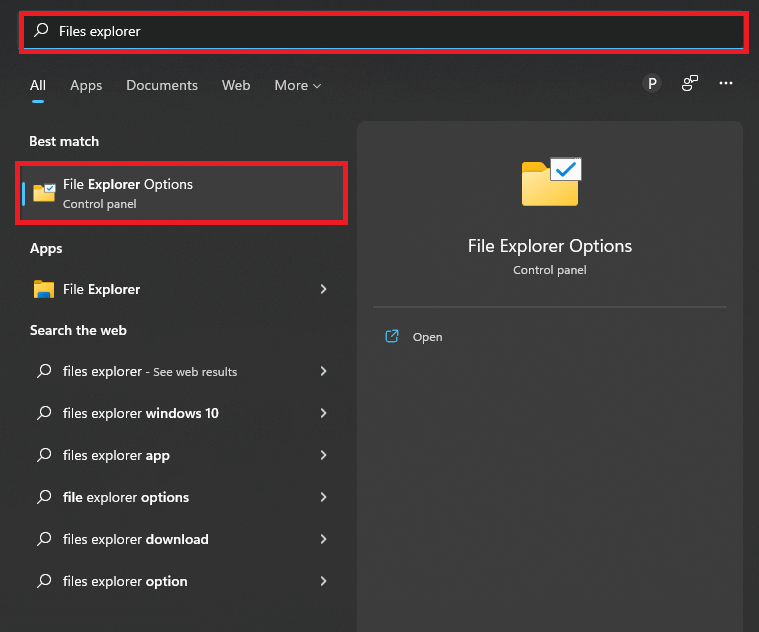
3. The Files explorer options window will open up.
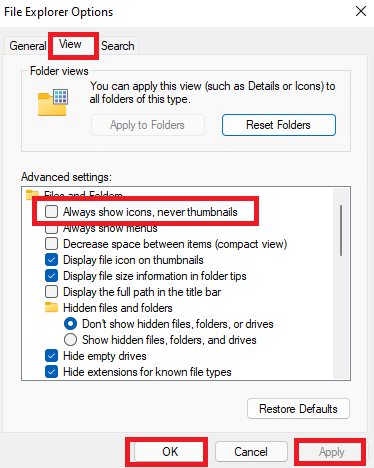
4. Now, open the View tab as shown below in the screenshot.
5. Untick the box next to ‘Always show icons, never thumbnails.’
6. Click on Apply and then OK.
That’s it. You have successfully enabled thumbnails preview in Windows 11. If this trick does not resolve your issue, move on to the next trick given below.
Also Read: How To Find Wi-Fi Network Security Key Password In Windows 11
Restart Files Explorer
Another great way to fix thumbnail preview not showing on Windows 11 is to restart Files Explorer. Restarting software or an app can solve many issues. It refreshes the system and fixes minor bugs or errors.
So, if thumbnail previews are not appearing, you may definitely try restarting Files Explorer. So, below is how to do that:
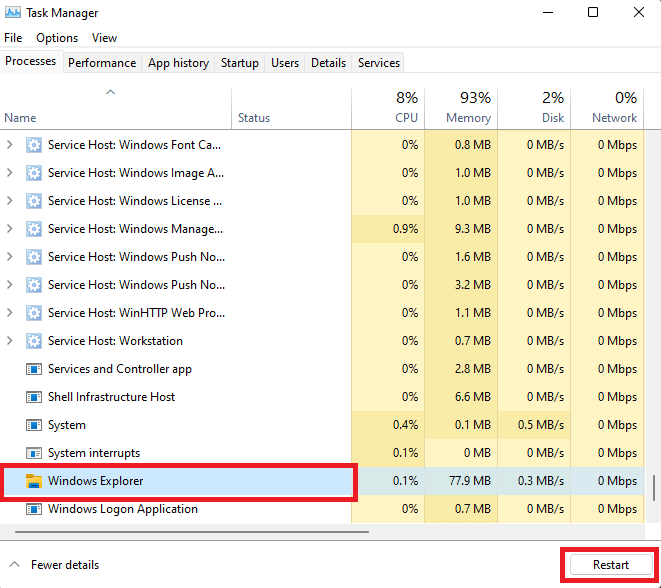
- Open Task Manager on your PC. Just press Ctrl+ Alt+Delete key combination. Select Task Manager from the options.
- The Task Manager will open up immediately.
- Scroll down and locate Windows Explorer.
- Click on Windows Explorer.
- Tap the Restart option on the bottom-right corner.
( See Screenshot below)
If Thumbnail preview does not appear even after restarting Windows Explorer, kindly move on to the next trick given below.
Also Read: How To Run Troubleshooters In Windows 11
3. Delete Thumbnail Cache
Another trick to fix the issue of thumbnails not showing on Windows 11 is to delete the thumbnail cache. A major issue behind this issue may be the corrupt thumbnail cache. So, below is how to clear thumbnail cache to get over this problem:
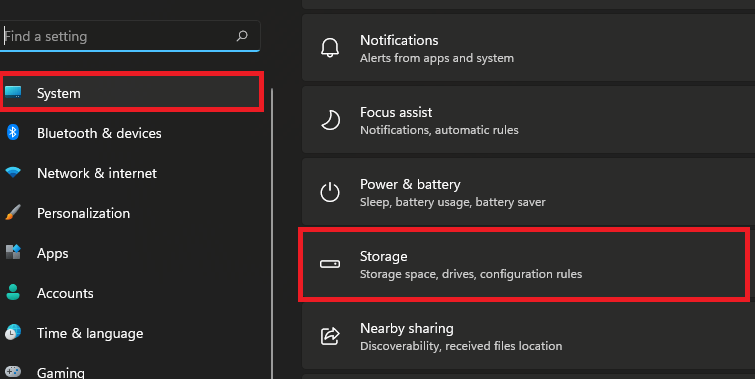
1. Open the Settings on your device. For this, just press the Windows+I key combination. Else, go to the Start menu by clicking on the windows icon on the taskbar. Now, search Settings in the search bar on the top.
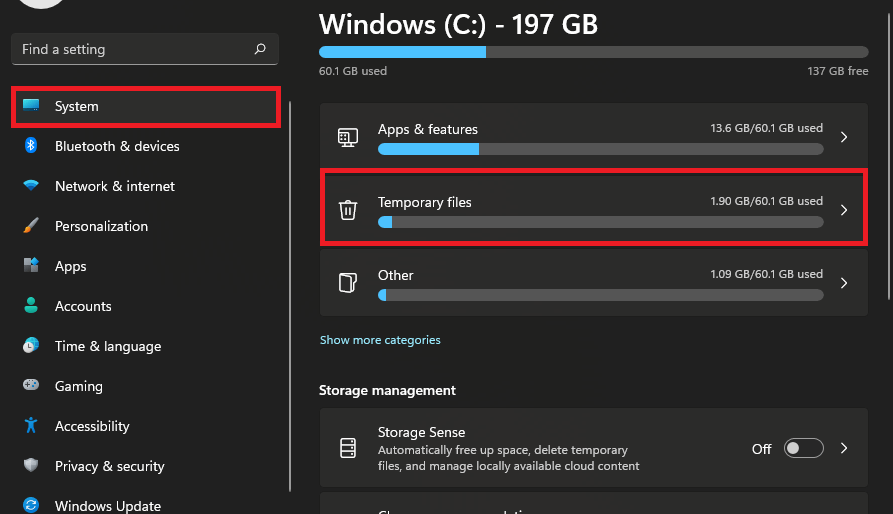
2. Click on the System option on the left side.
3. Next, click on the Storage tile on the right as shown below in the screenshot.
4. Click on Temporary files on the right-pane.
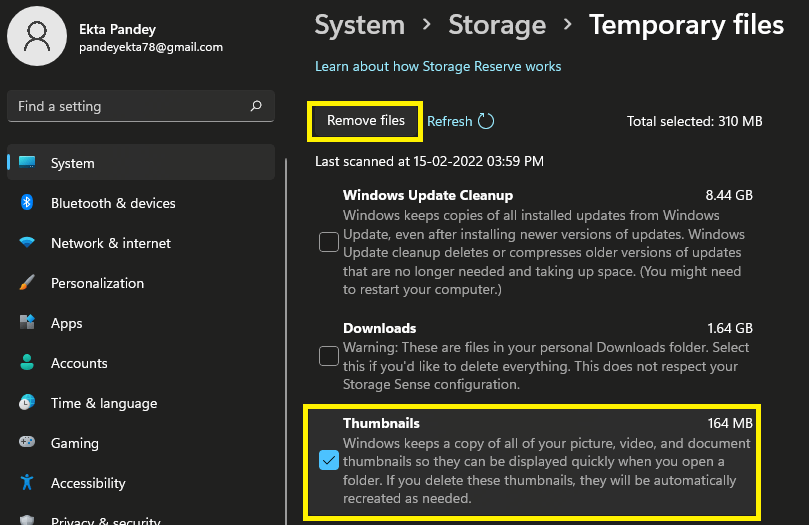
5. Tick the box next to Thumbnails and click on Remove files.
6. Now, just reboot your PC and your issue will be fixed.
If this method did not work, we have some more solutions for you. So, keep on reading to get more solutions to fix thumbnails not appearing on Windows 11.
4. Change default App type
Sometimes, we see the thumbnail preview only for a few file types. So, if this is the case with you, you may need to change the default app type. Steps to do this are given below:
1. Navigate to the file for which the thumbnail is not showing. Right-click on it.
2. Select Open with from the context menu.
3. Now, click on Choose another app option as shown below in the screenshot.

4. Choose a different application.
5. Tick the box next to ” Always use this app to open files“.

6. Tap OK and the changes will be saved.
Also Read: Unable To Get Out Of S Mode In Windows 11? Try These Fixes
5. Advanced System Settings
Another way to overcome the issue of thumbnail preview not showing on Windows 11 is to change Advanced System settings. Below is how to do it:
- Open the start menu by clicking on the Windows icon on the taskbar.
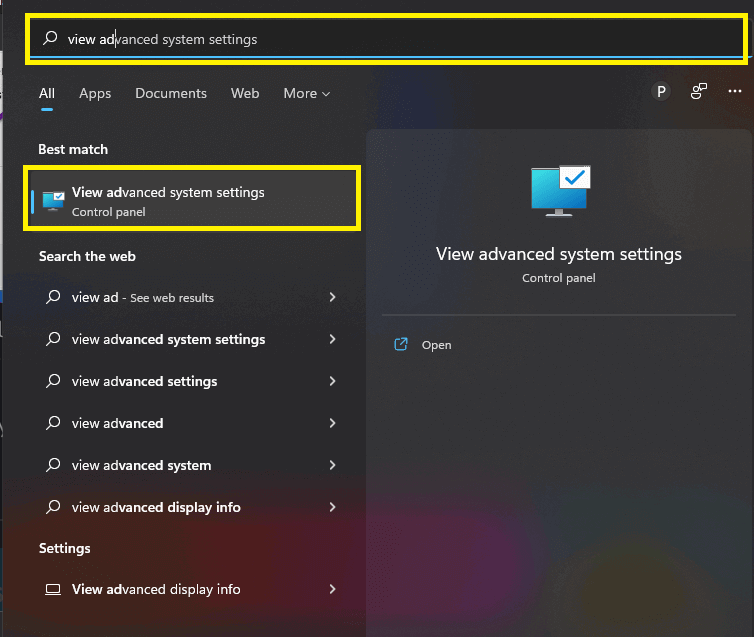
- Search View Advanced system settings in the search bar.
- Under best match, click on View advanced system settings.
- Now, click on the Advanced tab on the top, and tap Settings under Performance.
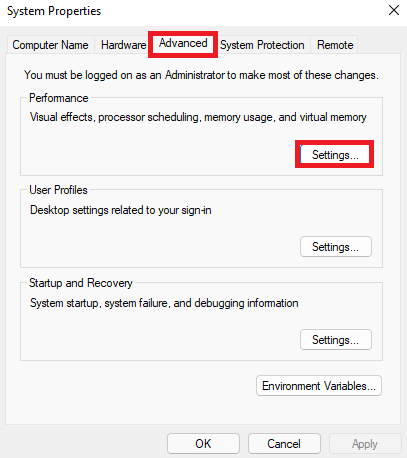
- Under Custom in the Visual effects tab, tick the box next to ‘ Save taskbar thumbnail previews’ and ‘Show thumbnails instead of icons. ‘
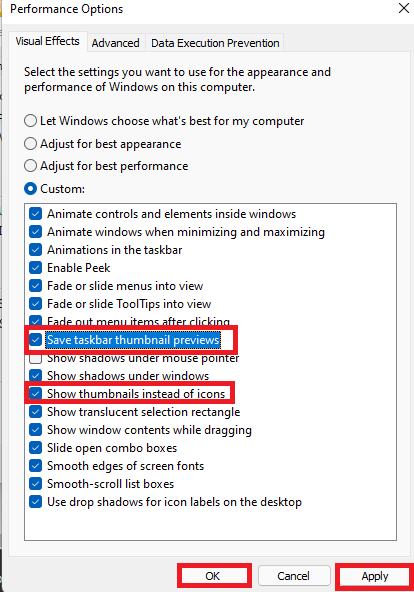
- Click on Apply and then OK.
That’s it. It is one of the best ways to get over the issue of thumbnail preview not showing in Windows 11.
6. SFC scan option
If none of the methods above seem to work in your case, you need to run an SFC scan. A major reason behind thumbnail preview not working on Windows 11 may be a corrupted system file. So, the best solution to this problem is to run an SFC scan.
[ System File Checker(SFC) tool helps in checking and repairing the corrupted system files in Windows.]
1. Right-click on the Windows icon on the taskbar.
2. Select Windows Terminal(admin) from the options available on the screen.
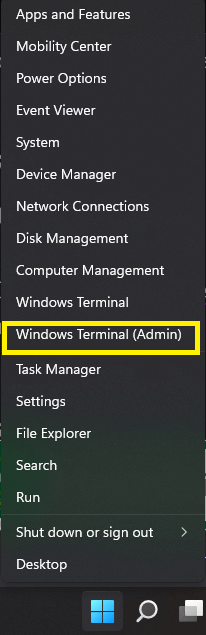
3. Now, Tap yes to the User Account Control prompt.
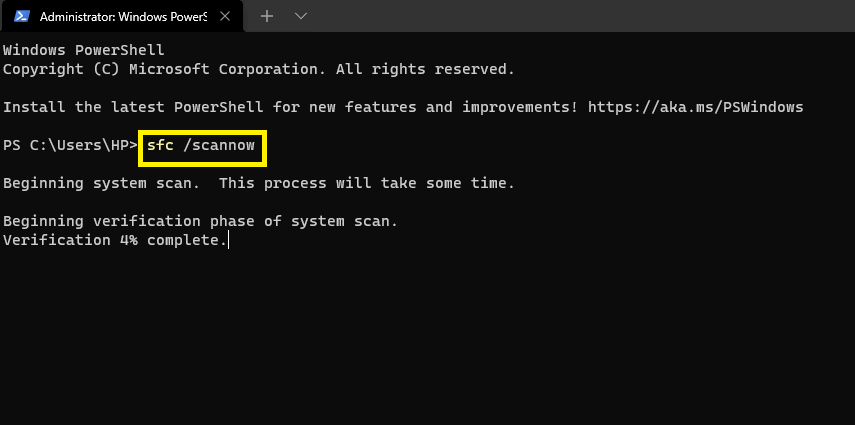
4. Then, enter the command sfc /scannow as shown in the screenshot. Wait until for the verification to complete 100%.
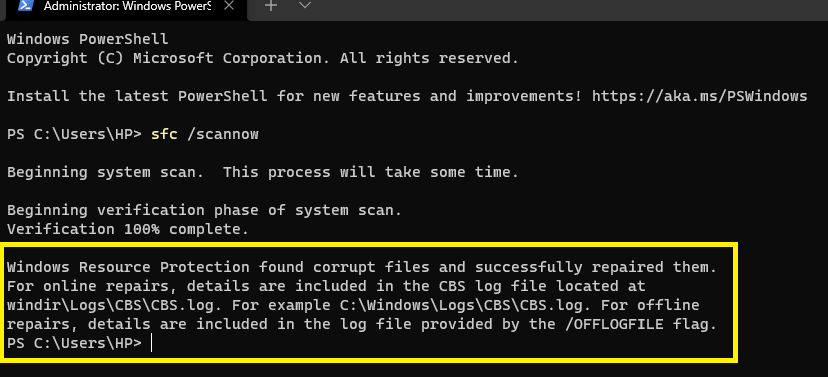
5. After successful completion of the scan, you will get a message as shown below in the screenshot.
6. Now, close the program and restart your PC.
Also Read: How To Fix Wireless Display Install Failed Error In Windows 11?
CONCLUSION
So, that’s all for now. There are the 6 best ways to fix thumbnails not showing on Windows 11. You can try these tricks and get over this issue. Many users have faced this problem after upgrading to Windows 11. So, in this article, we have covered the 6 best possible ways to eliminate this problem. If you face any issues while performing the steps, do let us know in the comment section. We would love to help you.


