


 Header Through Cloudflare")


![[Interview] The Future of Screen Experiences ②: From Watching to Understanding With Vision AI Companion](https://www.hawkdive.com/media/samsung-tvs-and-displays-vision-ai-companion-interview_thumb932-218x150.jpg "Exploring Vision AI Companion: Transforming Screen Experiences for Users")


Try the troubleshooting methods listed below to resolve the Windows Troubleshooter not working in Windows 11 issue.
Windows 11 is infamous for running into one or the other problem from time to time. Microsoft has included a wide list of troubleshooters that assist you in dealing with such problems. But the problem worsens when the Windows Troubleshooter starts to malfunction or encounters the error when it begins to run.
If you are unable to use the Windows 11 Troubleshooter, you are at the right place. In this article, we have put down the different methods that can help you fix the underlying problems why the Windows 11 Troubleshooter is Not Working. So, let’s get started.
Also Read: How To Restore Classic Start Menu In Windows 11
Check the Path set for Temp Folder
If Windows 11 cannot locate the temp folder on your PC, the troubleshooter will not be able to execute properly. So, you should ensure that the path for the Temp folder is set correctly.
- Press the Windows key and search for the ‘edit the system environment variables’ option.
- Go to the Advanced tab and press the Environment Variables button.
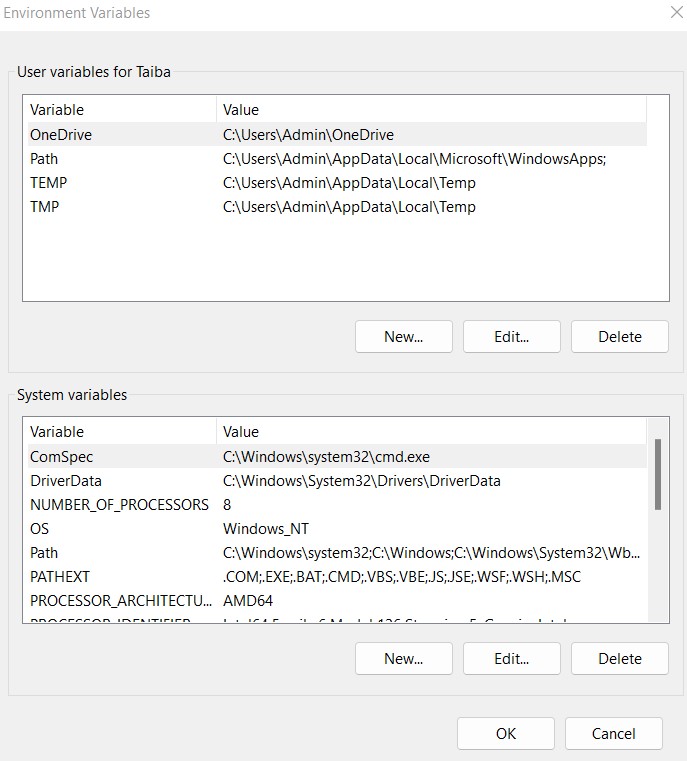
- Here, ensure the path for the temp folder is set as C:\\WINDOWS\TEMP.
- If the path is different, double-click on TEMP and set the value as %SystemRoot%\TEMP, and press the OK button.
Also Read: 6 Best Ways To See Wi-Fi Passwords In Windows 11
Restart Cryptographic Service
For the Windows 11 troubleshooter to work, the cryptographic Service should run in the background. If the service does not run, you need to run that service manually.
- Launch the Run dialog box using the Windows + R shortcut key.
- Type services.msc in the text box and press Enter.
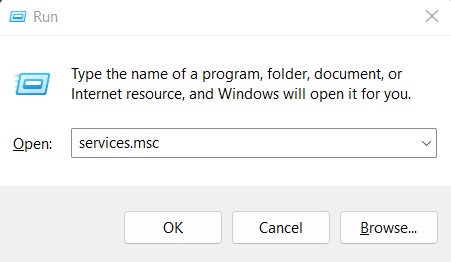
- Look for Cryptographic Services in the list.
- Right-click on the service and select Restart or Start whichever is applicable.
Also Read: How To Show Drive Letters Before Or After Drive Name In Windows 11
Run SFC and DISM Scan
- Next, it’s time to run the SFC and DSIM scan.
- To run the SFC scan, launch Windows Terminal.
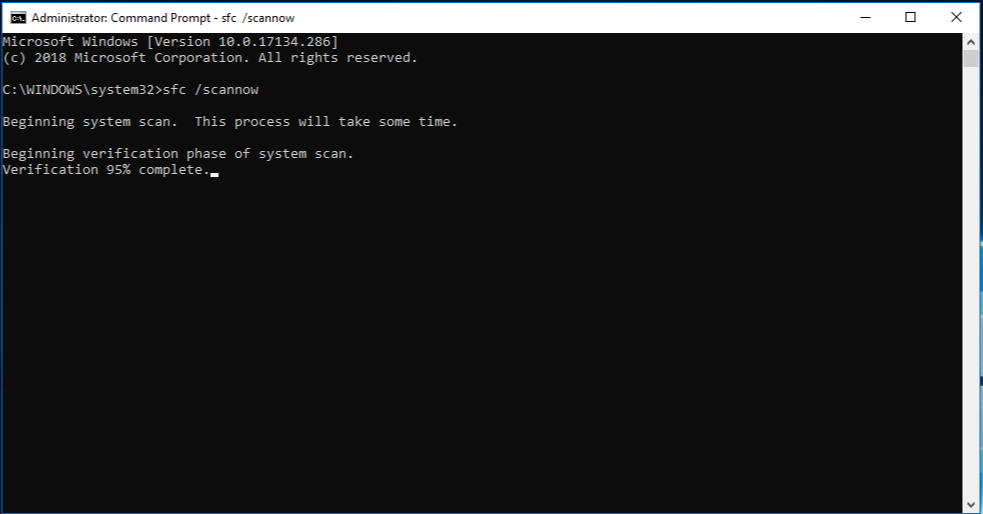
- Then, type the following command followed by the Enter key.
SFC /scannow - Now, execute the following commands one by one.
1. DISM /Online /Cleanup-Image /CheckHealth
2. DISM /Online /Cleanup-Image /ScanHealth
3. DISM /Online /Cleanup-Image /RestoreHealth
Check Group Policy
If the Windows troubleshooters still do not work, it may be because it is disabled from the Group Policy editor. Let’s enable it from the administrator account.
Note: Group Policy Editor is a part of only Windows Pro, Enterprise, and Education editions.
- Launch the Run dialog box using the Windows+R shortcut key.
- Type gpedit.msc in the text box and press the enter key.
- In the Group Policy Window, choose Computer Configuration > Administrative Templates > System > Troubleshooting and Diagnostics > Scripted Diagnostics from the left sidebar.
- Here, you need to make sure that all the three settings are set either to the Enabled or Not configured option.
- In case any entry is assigned Disabled status, you should double-click it and assign either Enabled or Not configured option.
- Finally, press the Apply button.
Also Read: How To Alter Windows 11 Mouse Scrolling Preferences
Run Disk Cleanup
If the problem is not yet resolved, you need to run the Disk Cleanup to get rid of the corrupt temporary files. Here’s how to begin:
- Launch the Search menu and search for disk cleanup.
- Choose C: drive from the drop-down menu.
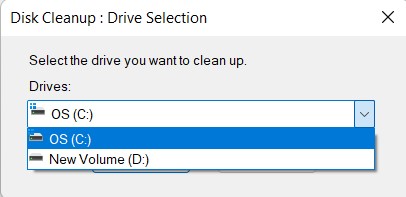
- Select the unwanted files and press the OK button.
- On the pop-up menu, confirm the action.
Also Read: [Fixed] Snap Layout Not Working In Windows 11
Run Troubleshooter in Clean Boot State
To prevent the third-party apps from interfering with the Windows troubleshooter, you should switch your PC to a clean boot state.
- Press the Windows key and type system configuration in the search box and press the Enter key.
- Go to the Services tab and tick the checkbox for the Hide all Microsoft services option.
- Press the Disable all button and go to the Startup tab.
- Choose the Open Task Manager option, choose all the third-party programs, and press the Disable button.
- Disable all the third-party apps and then reboot your PC in the clean boot state.
- If the troubleshooter runs, then some third-party app is interfering with the working of troubleshooters.
Also Read: How To Change Mouse Speed Easily And Quickly In Windows 11
Check Logs
If you are still clueless about the underlying cause behind the problem, you should check the troubleshooting reports, logs & other data. For this, you need to navigate to the following locations.
%LocalAppData%\Diagnostics: It contains folders for the previously run troubleshooter.
%LocalAppData%\ElevatedDiagnostics : It contains folders for each troubleshooter which was Run as Administrator.
1. Applications and Services Logs/ Microsoft/ Windows/ Diagnosis-Scripted/ Admin
2. Applications and Services Logs/ Microsoft/ Windows/ Diagnosis-ScriptedDiagnosticsProvider/ Operational
3. Applications and Services Logs/ Microsoft/ Windows/ Diagnosis-Scripted/ Operational
Here you are likely to find some clues about the cause behind the problem.
Perform the System Restore
If none of the methods listed above work, then there is nothing more you can do than perform the system restore. System Restore will revert all the recent changes made to your Windows 11 PC and restore the previous state.
- Use the Windows+S shortcut key to launch the search and search to create a restore point and press the Enter key.
- In the System Protection window, press the System Restore button.
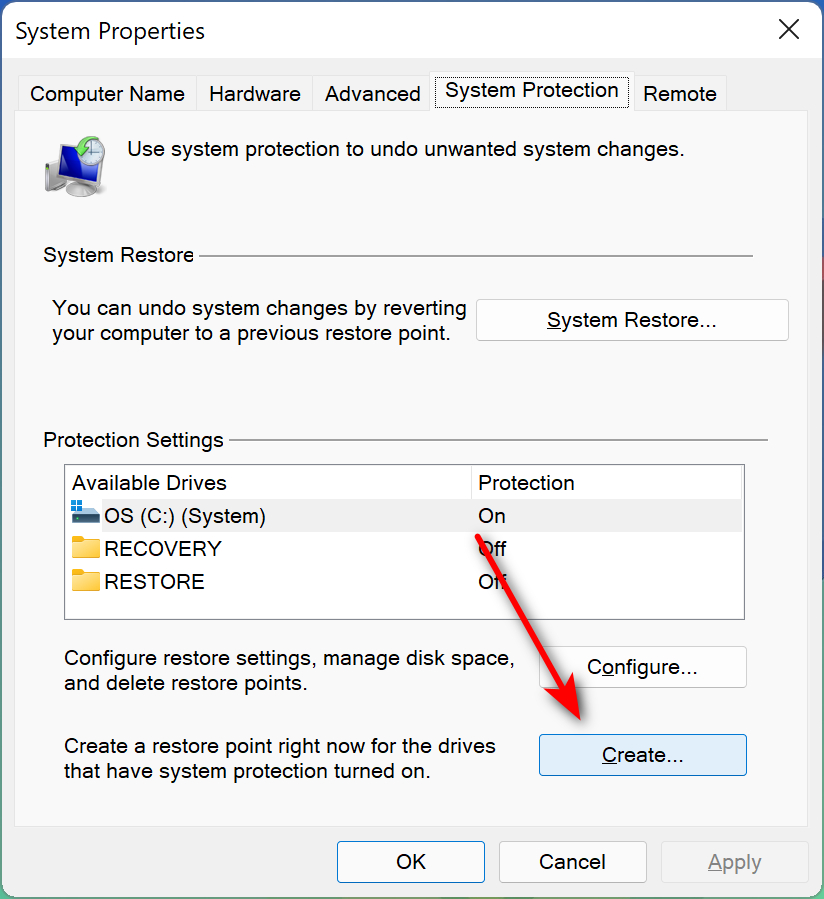
- Here, choose the recommended restore point if you are not sure which one to choose, and press the Next button.
- Once the system is restored to the previous checkpoint, press the Finish button.
Also Read: 15 Best Registry Hacks For Windows 11
Conclusion
That’s all in this troubleshooting guide. Hope you were able to resolve the problem that was preventing the Windows 11 troubleshooter not working. Which of the method listed here worked for you? Let us know in the comments.


