My CD/ DVD drive on my iMac is going crazy. Soon after I put a CD or DVD in the drive, it spits it back out. it sounds as though it is trying to read the disc, but fails. My drive was working normal earlier today, then it went crazy. I thought its my CD / DVD drive which is faulty and needs to be replaced so I plugged in a USB CD / DVD drive to my Mac that I had purchased long time ago. When I inserted any DVD in the external CD / DVD drive it did the same thing- ejected it.It keeps ejecting the CD / DVD automatically.Then I thought it must be a software problem so I did a research and found various troubleshooting steps to fix it. I am going to share the complete troubleshooting for this “CD / DVD keeps ejecting on Mac” issue which could be result of various reason like dust on lens,OS X issue, hardware fault.
What to do if CD / DVD Drive on my Mac keeps ejecting every CD / DVD
1. Run Disk Utility and Repair Disk Permission
Before starting any troubleshooting, I would recommend you to repair disk permissions as it solves hundreds of problems. A permission allows one application to “talk” with another application and so OS X wants permissions and ownership to be accurate and enabled to function properly. Sometimes these permissions on system files differ from what it should be and this is what we repair using Disk Utility. Disk Utility lets you verify and repair Mac OS X disks and permissions issues.To repair Disk permissions follow the below mentioned steps.
- Choose Go > Utilities.
- Double-click Disk Utility.
- Select the volume in the left pane for which you want to repair permissions.
- Click the First Aid tab.
- Select the volume to which you want to install the Adobe application, and then click Repair Disk Permissions.
 |
| CD / DVD Drive on my Mac keeps ejecting |
2. Delete the following configuration file to create a fresh copy
Your Mac store the information of the every CD you put into the CD / DVD drive in a file called CD Info.cidb. Similarly some other files contains info about the settings and configuration of the drive and disk. Deleting them will allow OS X to create a fresh copy of them.Delete the following files from your Mac.
- ~/Library/Caches (your local Library directory).
- /System/Library/Extensions.mkext.
- /System/Library/Caches/com.apple.kernelcaches (a directory).
- /System/Library/Caches/com.apple.romextensions (a directory).
- CD Info.cidb (from ~Home/Library/Preferences).
Some of the files or directory might not exist on your Mac so don’t worry about it if it isn’t there. Restart your Mac after you do this so OS X will rebuild some of the files.
3. Reset the NVRAM/PRAM and SMC
A small amount of your computer’s memory, called “non-volatile random-access memory” or NVRAM, stores certain settings in a location that OS X can access quickly. The settings that are stored in NVRAM depend on the type of Mac you’re using, and the types of devices connected to it.
Power related settings can be controlled by the System Management Controller (SMC) on your Mac. If you are experiencing issues with powering on your computer, sleep, wake, charging your Mac notebook battery, or other power-related symptoms, you might need to reset the SMC instead.
You can find reset instructions for both here:
Reset NVRAM and PRAM
Shut down the computer.Press the power button to turn it back on and immediately after pressing the power button, hold down the Command(Apple), Option, P, and R – all the four keys together on the left hand side of the keyboard and keep them hold until you hear 3 loud buzzing (or Chimes).Let go off the keys after 3rd buzzing sound and let the computer be restarted normally.
Resetting the System Management Controller (SMC).
4. Delete the Finder’s preference files
Some people have reported successfully fixing Optical CD/DVD Drive on Mac or SuperDrive issues by deleting the Finder’s preference files (don’t worry, the Finder will automatically make new ones). You’ll want to delete two files: “com.apple.finder.plist” and “com.apple.sidebarlists.plist”. Both of these files are located in Users > [Your User] > Library > Preferences. You can choose whether you want to move the files to a new location (or simply append “.old” or something similar to the file names) or delete them, either way should work. Once you’ve deleted both preference files (“Com.apple.finder.plist“.sidebarlists” one might not exist, that isn’t necessarily a problem), you’ll need to relaunch Finder. You can accomplish this by restarting your Mac or by bringing up the force quit menu with Command + Option + Esc (if you go this route, simply select Finder and click Relaunch.
Didn’t fix your issue? Try 4.
5. Clean the SuperDrive’s slot with compressed gas/ Vaccum Cleaner
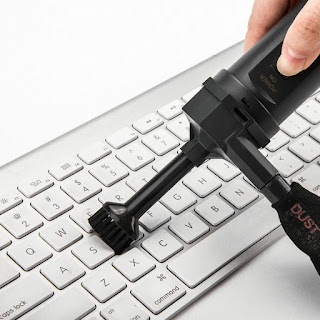
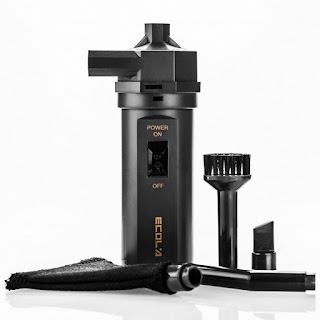
Your CD / DVD drive on your Mac might have got dust in its lens so clean the dust out. I bought this air duster Ecola Vacuum Cleaner ( for Keyboard,Notebook,Computer,Car etc. Compressed Air Duster ) just for $15 from Amazon, It can vacuum out dust and dirt from the chink of the keypad of calculator,telephone,computer,car and so on so give it a good spray into the CD / DVD drive slot on your Mac and this will resolve the problem.To do this first Shutdown your computer and get a can of compressed air. Place the tip of the nozzle attachment where it is aiming inside the drive and give it a couple of quick blasts to blow out any dust particles that may be causing you issue. Power up the system and give it another try.
I found this working for one of my customers once.
 |
| CD / DVD Drive on my Mac keeps ejecting |
 |
| CD / DVD Drive on my Mac keeps ejecting |
Note: – If the CD/DVD in your optical disk drive or SuperDrive has stuck in the tray then follow the steps mentioned here to eject it.
If your Mac’s CD/DVD drive is not working, its malfunctioning, creating screechy noise or if the drive is broken and makes angry noises when it spins up, the noise is becoming a problem when using your computer in class or if you want to disable the CD/DVD drive on your Mac completely for security reasons then here is the solution for disabling the CD/DVD drive on your Mac completely.
Read this post- How to disable Faulty CDDVD Drive on Mac?
Important Update ( Date updated : Sep 17th, 2017) :
Starting from Mac OS X El Capitan Ver 10.11, Apple has introduced a new featured called ” System Integrity Protection” ( SIP, also known as Rootless) which prevents anyone from editing, deleting or moving any system protected files including kernel extensions( kexts) or hardware drivers. If you need to edit or delete them you must disable or turn the SIP feature off.
So above mentioned steps may not work on your Mac until you disable it.
To Disable System Integrity Protection:
- Reboot your Mac in Recovery Mode
- Open Terminal from Utilities menu at the top.
- Type the following command.
csrutil disable


![The Apex Legends Digital Issue Is Now Live! Apex Legends - Change Audio Language Without Changing Text [Guide]](https://www.hawkdive.com/media/5-Basic-Tips-To-Get-Better-On-Apex-Legends-1-218x150.jpg)


I am sure this paragraph has touched all the internet viewers,
its really really pleasant post on building up new weblog.
If you are going for best contents like myself, just pay a quick visit this web page everyday
since it presents quality contents, thanks
I am glad to ƅe a visitor of this stark web site, tһanks
for thiѕ rare іnformation!
Hello There. I found your blog using msn. This is a really well written article.
I will be sure to bookmark it and come back to read more of
your useful information. Thanks for the post.
Great web site you have got here.. It’s difficult to find quality writing
like yours nowadays. I really appreciate individuals like
you! Take care!!
Thank you for sharing with us, I believe this website genuinely stands
out :D.