


 Header Through Cloudflare")


In this article, we are putting down different ways through which you can enable the Hyper-V feature in Windows 11.
Windows’ 11the iteration is the most extensive Windows has even been and it is loaded with tons of features that make computing a piece of cake. One such very useful and advanced feature is Hyper-V. Hyper-V feature was introduced by Microsoft to help users run a virtual operating system on their Windows 11 PC.
It lets you set up virtual machines on your PC without the need for any additional hardware and software support. This comes in handy to run multiple operating systems on a simple machine if need be. Besides, it is also possible to create virtual hard drives, switches, and other tools for each virtual machine individually.

Generally, enabling this feature is a complex task and not for novice users. But if you are interested in this, you’re at the right place. In this article, we have explained the different ways by which we can enable the Hyper-V feature in Windows 11.
Also Read: How To Enable God Mode In Windows 11
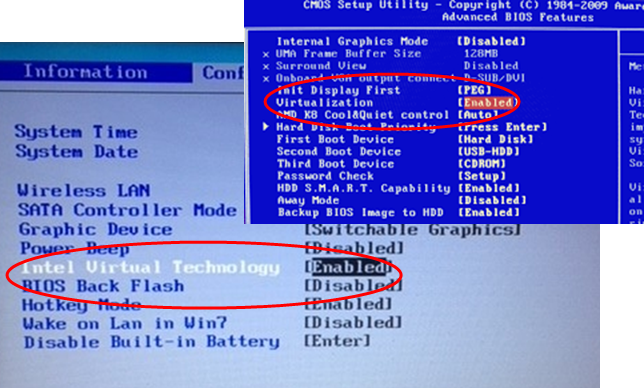
Enable Hardware Virtualization in BIOS
To enable the Hyper-V feature, it is essential to enable Hardware Visualization in your BIOS otherwise, the Hyper-V and its component will remain disabled. If you have not enabled this feature on your Windows 11 PC before, here is how you can enable the feature easily.
Note: The steps to enable Hyper-V on your PC can differ from PC to PC depending on the interface, terms and keyboards, and other manufacturing customizations. Referring to the company’s manual or the official website can help know the exact steps for your PC.
- First of all, you need to shut down your PC completely and then power it now.
- Now when the screen lights up, hit the Esc key to access the startup menu.
- Next, press the F10 key to enter BIOS Setup.
- Now go to the Advanced tab and then choose the Device Configurations option located under Device Settings.
- Next, keep scrolling and look for the ‘Visualization Technology (VTx)’ option, and check the box next to enable Hardware Visualization.
- Choose the Save button from the bottom and press Yes to confirm the action.
- Exit BIOS and wait to apply the changes and let the Windows 11 boot on your PC.
Now that the Hardware Virtualization is enabled on your PC, let’s see how to enable Hyper-V from Control Panel, Command Prompt, and Windows PowerShell.\
Also Read: How To Fix Driver Power State Failure Error In Windows 11
How to enable Hyper-V from Control Panel
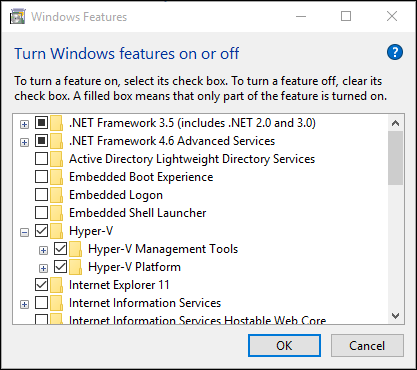
- Firstly, access the Start Menu and then search for the ‘Turn Windows features on or off option.
- Launch the feature from the search result and then look for the ‘Hyper-V’ option in the Windows Features.
- Now double click on the option to expand it and access its several options.
- Check the box preceding both the options listed here and then press the OK button to apply the changes.
- Your Windows PC will take a few minutes to process the request and apply the changes. Once the changes are applied, a prompt will appear asking you to reboot your PC. Press the Restart Now button given at the bottom.
- Once the system reboots, the Hyper-V feature will be enabled on your PC.
Also Read: How To Change Size Of Desktop Icons In Windows 11
Enable Hyper-V feature from Command Prompt
If you are one of those users who like Command Prompt to execute tasks over the Graphical User Interface, then follow the steps given here:
- First of all, type Windows Terminal in the search bar of the Start Menu and then highlight the relevant search result and choose the ‘Run as administrator option from the right panel.
- Choose Yes from the prompt that appears on the screen.
- Now click on the downward arrow on the right and then choose Command Prompt option.
- Now type or copy-paste the following command and then hit the Enter key to execute it.
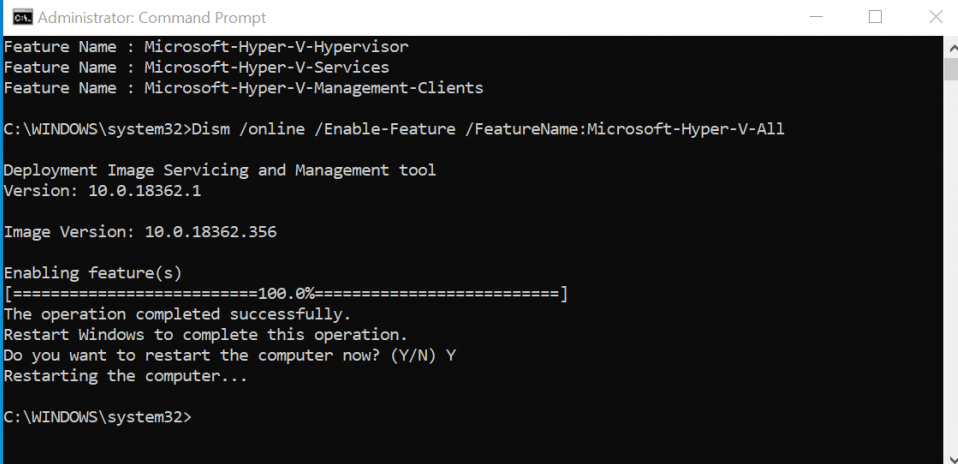
- DISM /Online /Enable-Feature /All /FeatureName:Microsoft-Hyper-V
- Now Windows will begin enabling the Hyper-V feature and you can monitor its progress from the Command Prompt itself.
- Once the Hyper-V feature is enabled successfully, you will have to reboot your Windows. Press the Y key to reboot your Windows PC.
- Once the PC reboots completely, you will find that the Hyper-V feature is enabled on your PC.
Also Read: How To Fix Wi-Fi Disconnecting Problem In Windows 11?
Enable Hyper-V from Windows PowerShell
Similar to the Command Prompt, you can also enable Hyper-V from Windows PowerShell.
- To launch Windows PowerShell, type PowerShell in Windows Terminal and then run it in Administrator Mode as discussed above.
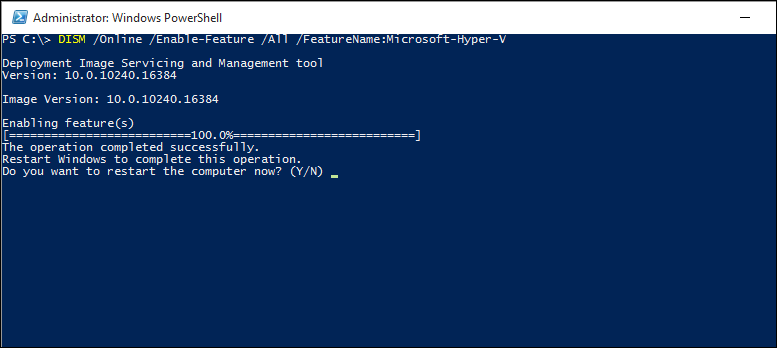
- When in the PowerShell window, type the following command or simply copy-paste it.
- Enable-WindowsOptionalFeature -Online -FeatureName Microsoft-Hyper-V -All
- Once done, press the Enter key and Windows will proceed to enable this feature on your PC and you can see the same on your screen.
- Once done, reboot your PC as in the above methods.
Also Read: How To Switch Users In Windows 11
Conclusion
That’s all the ways through which you can enable Hyper-V on your Windows 11 PC. Remember, rebooting your PC will take more time as Windows will be busy installing relevant files and apps on your PC. Hope this helps!


