


 Header Through Cloudflare")


In this article, we will explain 6 methods that can fix slow LAN speed on Windows 11.
Whether you are attending an online meeting or playing an online multiplayer game, a stable internet connection is a must for a perfect online experience otherwise it is bound to be ruined. Apart from these, a slow internet connection can even put a brake on the files you are downloading and waste your precious time.
The biggest culprit of a slow internet connection when you migrate to LAN from Wi-Fi is a malfunctioning router. But if you’ve recently switched to Windows 11, there can be several underlying reasons. Since the internet connection speed is dependable on several factors, it’s hard is figuring out the exact cause of this problem. To help you out and fix a slow LAN speed on Windows 11, we have put down some tried and tested methods that can boost your connectivity speed.
Also Read: How To Enable Or Disable Quick Access Feature In Windows 11
Migrate to a Different DNS
When you face slow LAN speed issues, the first thing you should do is switch to a different DNS address. Doing so will improve your connection speed. There are several DNS service providers right now namely Google public DNS (8.8.8.8 and 8.8.4.4), Cisco OpenDNS (208.67.222.222 and 208.67.220.220), Cloudflare DNS (1.1.1.1 and 1.0.0.1), and more.
It is highly recommended to avail the Google Public DNS for better connectivity as it has the least probability of going offline or facing issues. Although you can always switch to any other DNS and see if this improves your network speed. Here’s how to change the DNS:
- Head to the Settings App on Windows 11 using the ‘Windows + I’ shortcut. You can also search for it in the Start menu of Windows 11.
- When in Settings Window, choose the ‘Network & internet’ section from the left pane and then ‘Ethernet’ from the right side of the window.
- Next, press the Edit button for the ‘DNS server assignment’ option. This will bring up a dialog box named ‘Edit DNS settings’.
- Now expand the drop-down menu and choose the ‘Manual’ option.
- As soon as you do it, you will see two switches for ‘IPv4’ and ‘IPv6’. Turn on the ‘IPv4’ toggle and you’ll see two boxes named ‘Preferred DNS’ and ‘Alternate DNS’.
- Here you can enter the DNS you intend to use. For instance, if you want to use Google Public DNS, mention ‘8.8.8.8’ inside the ‘Preferred DNS’ textbox and 8.8.4.4 inside the ‘Alternate DNS’ textbox.
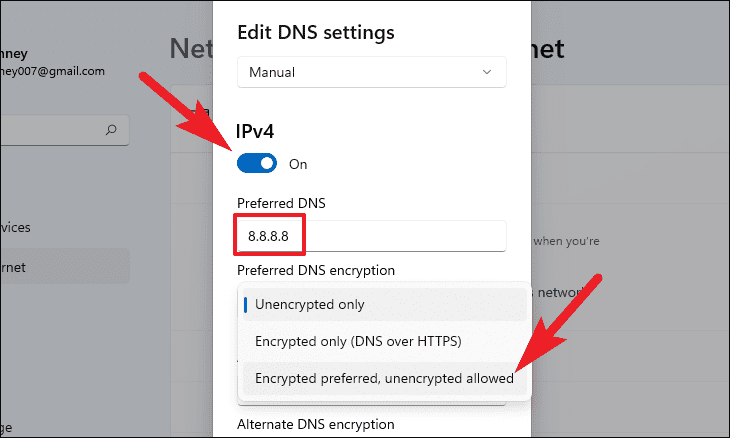
- Next, modify the ‘Preferred DNS encryption’ settings and choose ‘Encrypted only’ or ‘Encrypted Preferred, Unencrypted Allowed’.
- After this, press the ‘Save’ button to apply the changes.
Also Read: How To Fix ‘Can’t Connect to this Network’ error in Windows 11
Tweak the Speed and Duplex Settings
If you configure the Speed and Duplex settings wrongly your LAN speed will surely be restricted. Consider the following example; if you have opted for 100Mbps bandwidth but the Speed and Duplex only allow 10Mbps speed, then your network speed will be crammed up to only 10Mbps. Hence, it is essential to ensure that your Speed and Duplex settings are rightly configured. Here’s how to go about it:
- First of all, head to the Start Menu and type Settings in the Search bar. Now choose the relevant search result to open the Windows 11 Settings Window.
- Next, choose the ‘Network & internet settings from the left panel and then ‘Advanced network settings’ option from the right pane.

- Now click to open the ‘More network adapter options’. This will open a new pop-up named ‘Network Connections’.
- Next, right-click your Ethernet Adapter to bring up the context menu and choose the ‘Properties’ option.
- This will open up a new window; now press the Configure button near the Adapter name.
- You will be taken to the Properties Window. Here move to the ‘Advanced’ tab and keep scrolling until you reach the ‘Speed & Duplex’ property in the ‘Property:’ list.
- Now click on the property to highlight it and then choose the ‘100 Mbps Full Duplex’ value in the drop-down menu of the value text. This value will work if your bandwidth is approximately 100Mbps. However, if your bandwidth is greater than 100 Mbps, then choose the ‘1.0 Gbps Full Duplex’ option here.
Also Read: 7 Ways To Take Screenshot In Windows 11
See if any Windows Update is pending
Another probable reason for a slow connection speed via LAN can be a pending Windows Update. If any window update is ready for download and you’re avoiding doing so for a long time, it can also cut down your internet speed. Here’s what you need to do:
- Use the Windows + I shortcut to bring up the Settings Window on your PC.
- When in the Settings Window, choose the ‘Windows update’ tile from the left pane and then press the ‘Check for updates’ button on the right.
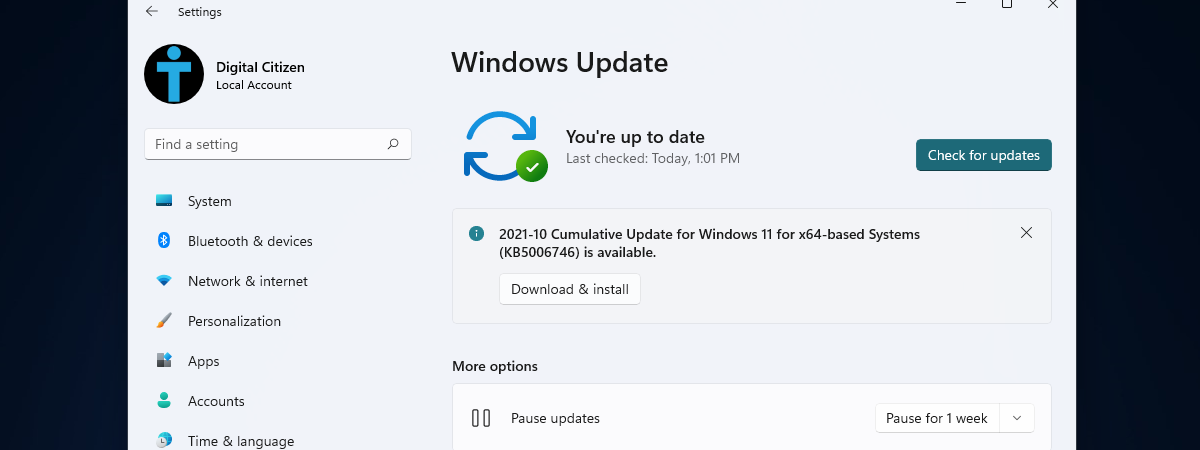
- This will force Windows to automatically scan if any update is pending.
- If Windows finds any update, it will download and install it automatically. You will have to restart your PC after the update finishes installing.
- Now go back and see if the LAN speed is restored to normal.
Disable the Windows Update Services
A windows update service keeps running in the background and is in charge of providing the windows update released by Microsoft to your Windows 11 PC. While this service should be enabled always and should not be turned off, sometimes you ought to disable it for reasons such as slow internet speeds.
This is because Windows Update has a bad reputation for consuming your bandwidth significantly. Thus, you can turn off this service, when you cannot afford any network interruptions in scenarios such as when you are playing your favorite online multiplayer game. Here’s how to do it.
- First of all, bring up the Run dialog box on your Windows 11 PC.
- Now type ‘services.msc’ in the command line and press the Enter key.
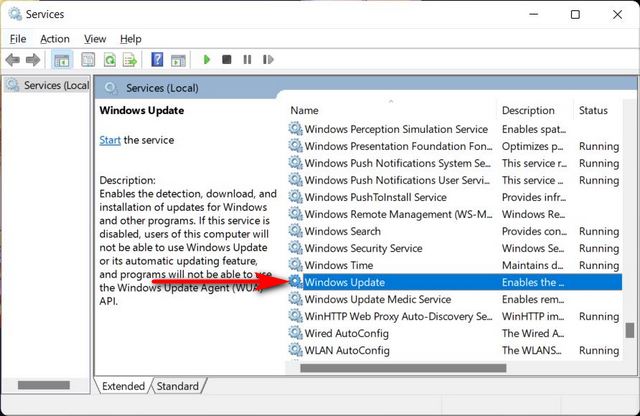
- This will take you to the Services window of your Windows 11 PC. Now keep scrolling the list until you find the Windows Update service within it.
- Next, double click on this service to bring up its properties window.
- When in the Properties window, look for a ‘Stop’ button present under the Service Status.
- Now click on this button and this will stop the service and it will no longer run in the background.
- After doing this, you also need to prevent this service from automatically starting itself.
- To do this, choose the ‘Disabled’ option from the dropdown menu for Startup type.
- After performing the above changes, press the OK button to apply the changes.
Uninstall the VPN Client
You can also experience a slow internet connection speed if you use a VP service that connects to the internet. This issue gets intense if you use the service from the free VPN client. This is because disabling or turning off these VPN clients is not enough, they can still run in the background and consume network bandwidth and resources significantly.
Hence to avoid a slow LAN connection speed, it is essential to uninstall the VPN client from your Windows 11 PC. Here’s how you can do so successfully.
Microsoft gives you two ways of uninstalling any software from your Windows 11 PC. It is possible to uninstall the software from the Settings Menu itself or go can go to the Control Panel and uninstall a specific app. I prefer uninstalling any application from the Settings menu itself. Let’s see how to make it happen.
- First and foremost, use the ‘Settings+I’ shortcut to quickly bring up the Settings Menu.
- When you’re in the Settings menu, choose the ‘Apps’ tab from the left pane of Windows Settings and then choose the ‘Apps & features’ option from the right panel.
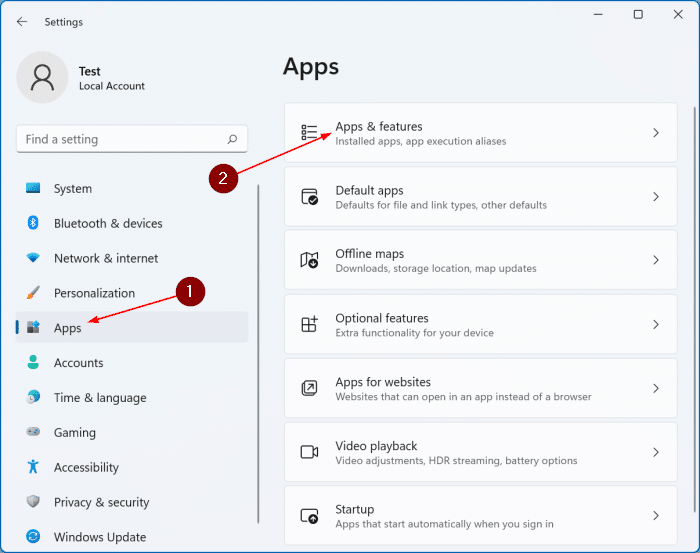
- Here keep scrolling until you reach the list of all the apps installed on your PC. Now you need to look for the VPN client in the list that you intend to uninstall.
- When you find it, click on the three vertical dots near it. Now choose the ‘Uninstall’ option from the flyout menu.
- A pop-up will appear to confirm the action.
- Click the Uninstall button here to remove the VPN client from your Windows 11 PC.
Update your Network Driver
If the issue is not yet fixed, there is a good chance that the driver for the network adapter present on your Windows 11 PC’s motherboard is obsolete. This can be a probable cause why you are getting slow LAN speed on your PC. To quickly eliminate this reason, you need to update your network drivers. Here’s how to update your network drivers from the Device Manager of your Windows 11 PC.
- First of all, use the Windows+R shortcut to bring up the Run dialog box on your Windows 11 PC.
- Now type ‘devmgmt.msc’ in the command line and press the Enter key. This way you will directly reach the Device Manager Window.
- Now scroll down until you reach the ‘Network Adapter’ option listed here. Click on it to expand the menu and see all the network adapters.
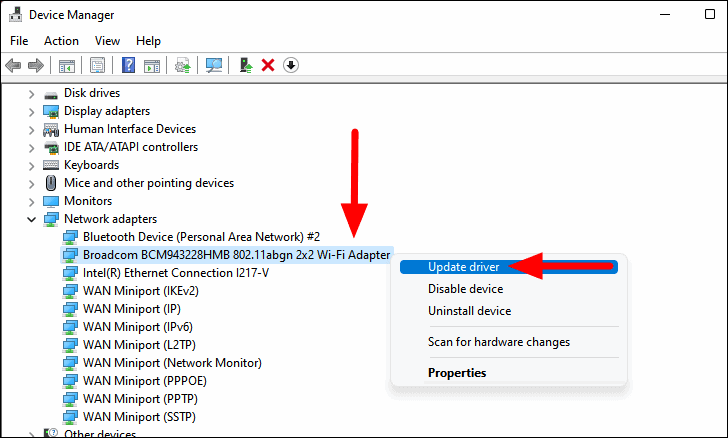
- Next, right-click to bring up the context menu of the active network adapter and choose the ‘Update driver option.
- Now a new window will open up on your PC. Choose the ‘Search automatically for drivers’ option here.
- Wait until Windows look for driver updates and installs them.
Conclusion
Here we reach the end of our troubleshooting guide on How to fix slow LAN speed on Windows 11. Since it is a very common issue that is triggered by some wrong settings, they can be fixed easily using the above methods. Which of the above solution resolved the issue? Let us know in the comments.
Also Read: How To Fix Bluetooth Audio Delay In Windows 11


