


 Header Through Cloudflare")


Are you experiencing issues while connecting to websites and apps on Windows 11? The underlying cause of the problem can be the erroneous network configuration. You should start by wiping off the temporary files of Windows and delete the app cache. You should also try to restart your modem and router and see if it helps.
If it still does not make any sense, you need to flush the DNS cache on your Windows 11 PC.
Flushing DNS on your Windows PC is easy to achieve the process. In this article, we will explain four easy-to-do ways to flush the DNS cache on your computer. But first, let’s have a quick overview of DNS cache.
Also Read: How To Share Files Via Nearby Sharing In Windows 11
What is DNS Cache?
Your PC maintains a file that includes the names of all hosts and IP addresses that you’ve ever visited via any web browser.
It also contains the website cache and so that the website is loaded faster when you attempt to open it the next time. These caches are mostly found on the host computer as on the Internet Service Provider Server.
Generally, these cache files are updated automatically when the PC connects to the internet. However, there are times when the IP address of the webpage is modified but hasn’t been updated yet. This can cause issues while loading that webpage or website.
This is where DNS cache flush comes into play. It deletes all the obsolete information so that the PC retrieves the new data related to that website.
Also Read: How To Install Windows 11 On An Unsupported CPU?
Flush DNS Cache using Command Prompt
- First of all, you need to launch the Command Prompt Window in Administrator Mode.
- To do this, type ‘cmd’ in the search bar of Windows 11. Right-click the Command Prompt from suggestions and select ‘Run as Administrator’.
- Now you need to enter this command: ipconfig /flushdns. You can also copy-paste the command for ease.
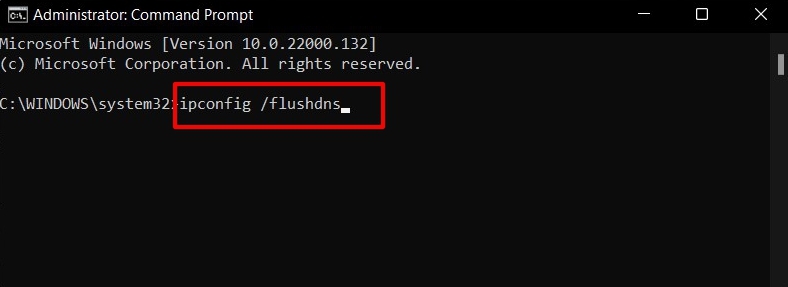
- Finally, press the Enter key. After a few seconds, you’ll get a pop-up saying the operation was successful.
Flush DNS Cache in Windows 11 using Windows Powershell
Another easy way to Flush DNS Cache on Windows 11 is by using the Windows Powershell in admin mode. Read below to know how to do it:
- First of all, open the Windows Powershell in Admin Mode on your Windows 11 PC. If you don’t know how to do it, simply type ‘Powershell’ in the Search bar and right-click the ‘Windows Powershell’ from the suggestions, and choose ‘Run as Administrator Mode’.
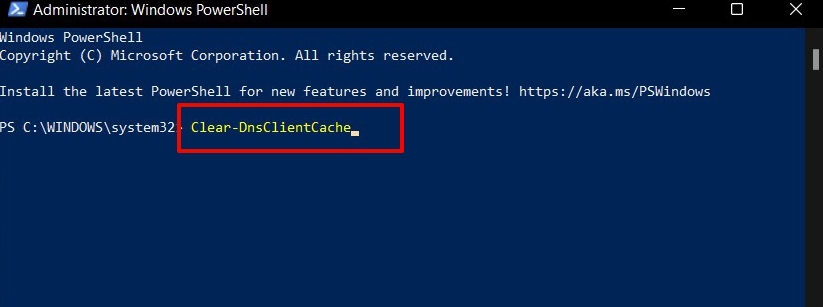
- Now type the ‘Clear-DnsClientCache’ in the PowerShell window. You can also copy-paste the command from here. Now hit the enter key. This process will clear the DNS cache on your PC running on Windows 11.
Also Read: How To Check If Your PC Can Upgrade To Windows 11?
Using a Run Command to flush DNS cache in Windows 11
You also have a shortcut way to easily clear the DNS cache without using the Windows Powershell or Command Prompt method. Yes, you guessed it right! You can clear the DNS cache right from the Run dialog box. So this makes it the easiest and hassle-free way to perform the task. Let’s see how to do it:
- Launch the Run dialog box on Windows 11 PC using the shortcut key – Windows + R key.
- After the dialog box appears, type the ‘ipconfig /flushdns’ command in the command box and press the enter key.
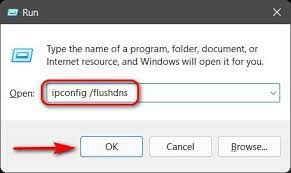
- Now the ‘Run’ command will flush the DNS cache on your PS. Easy Peasy!
Using the Batch File method to clear DNS cache on Windows 11
Using a batch file to sweep the DNS cache is an automated way of performing the task.
For this, you need to create a batch file on your Windows 11 PC.
Download and run a batch file to flush the DNS cache on your PC.
Let’s take an overview of the batch file:
A batch file is made up of a group of commands and you just need to run the file to execute the commands at fixed intervals. However, these files can also be run voluntarily to execute the batch file commands on Windows 11.
Read: How to Free Up Disk Space After Upgrading To Windows 11
Clear DNS cache on Google Chrome
Several Windows apps and browsers such as Google Chrome have their own in-built DNS caches. These cache files are different than the DNS caches maintained by your operating system.
So apart from clearing the DNS caches for the operating system you also need to clear the DNS for Google Chrome explicitly. Follow the steps below to do it:
- First and Foremost Go To Google Chrome browser on your computer.
- Now type the following path in the URL bar: chrome://net-internals/#dns.
- You can also copy-paste the URL.
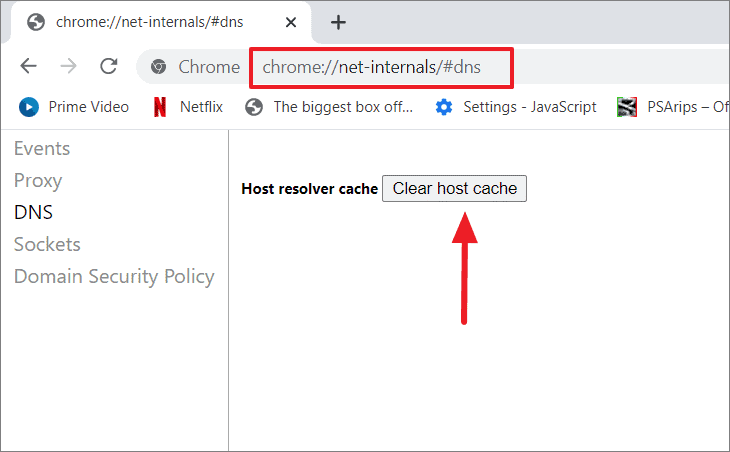
- Next, press the enter key on the Windows 11 keyboard.
- Now you will be taken to the DNS tab of Chrome’s ‘net internals’ webpage.
- Now press the ‘Clear Host Cache’ tab to clean up the DNS resolver cache of Google Chrome.
Must Read: Windows 11 Installation Assistant: How To Upgrade For Free?
Conclusion
These are the four ways to clear the DNS cache on your Windows 11 PC. Besides you also know how to clear the DNS resolver cache on Google Chrome. As you can see, resolving the DNS cache on your Windows 11 PC does not require any professional expertise.
So, proceed further and flush your DNS to fix connectivity issues on your Windows 11 PC. Good Luck!


