


 Header Through Cloudflare")


![[Interview] The Future of Screen Experiences ②: From Watching to Understanding With Vision AI Companion](https://www.hawkdive.com/media/samsung-tvs-and-displays-vision-ai-companion-interview_thumb932-218x150.jpg "Exploring Vision AI Companion: Transforming Screen Experiences for Users")


After the release of Android 12 and Android 12L, Google has no plans to stop there. The Beta version for the upcoming version of Android(Android 13 beta) has been announced by Google. And its public beta is being rolled out from now for some eligible Pixel Phones.
In this article, we will be discussing Android 13 Beta, and how to download/install it on your Phone.
Also Read: The First Details About ANDROID 14 Is Revealed By Google
Content
- What is Android 13 Beta?
- List of Smartphones eligible for Android 13 Beta
- What do you need to get started installing Android 13 Beta?
- Installing beta
1. What is Android 13 Beta?
Public beta tests are released prior to a software’s official launch, and they typically follow developer beta tests.
To begin with – at least in the first beta – there aren’t many massive changes. And given how big a refresh Android 12 was on the design side, we wouldn’t necessarily expect a major overhaul this year.
It’s not the final build, however, as that won’t arrive until this autumn.
Google offers developer and public betas to collect feedback from developers and everyday users, respectively. In these early phases, when the software is still in development, Google also uses betas to iron out potential issues and to give developers ample time to update their apps.
Because of that, we don’t recommend you use the Android 13 public beta on your primary phone. Instead, use a secondary device. If you choose to install the software, be aware that it will be a bit ropey and apps might not work. Hopefully, that will all be worked out before the final release.
Also Read: How To Run Android 12L On Your Windows 11
2. List of Smartphones eligible for Android 13 Beta
The following Pixel phones will receive the Android 13 update directly from Google. This time around, Google is dropping support for Pixel 3a and 3a XL. Check out the complete list of supported Android 13 Pixel devices below:
- Google Pixel 4
- Google Pixel 4 XL
- Pixel 4a
- Google Pixel 4a (5G)
- Google Pixel 5
- Pixel 5a (5G)
- Google Pixel 6
- Google Pixel 6 Pro
- Pixel 6a (likely to launch with Android 13)
Also Read: Google Pixel 6 will beat Samsung with Two Features
3. What do you need to get started installing Android 13 Beta?
- A compatible Pixel 4/4a or later device and a USB cable to connect it to your computer
- Compatible Pixel phones include the Pixel 4, Pixel 4 XL, Pixel 4a, Pixel 4a 5G, Pixel 5, Pixel 5a, Pixel 6, and Pixel 6 Pro.
- The Android SDK installed on your machine with ADB and Fastboot command successfully working.
Also Read: How To Sideload Android Apps In Windows 11
4. Installing the beta
4.1 Installing Update through Settings
1. Visit Google’s Android 13 Beta program website and sign in with your Google account. You will now see a list of all your eligible devices under the “Devices” section. Click on the “Opt-in” button present below your device’s name to enroll in the beta OTA update. You can also opt-out of the beta program later from this page.
2. After enrolling in the beta program, wait for a few minutes for the OTA to reach your Pixel phone. You can manually check for updates from Settings > System > System Update.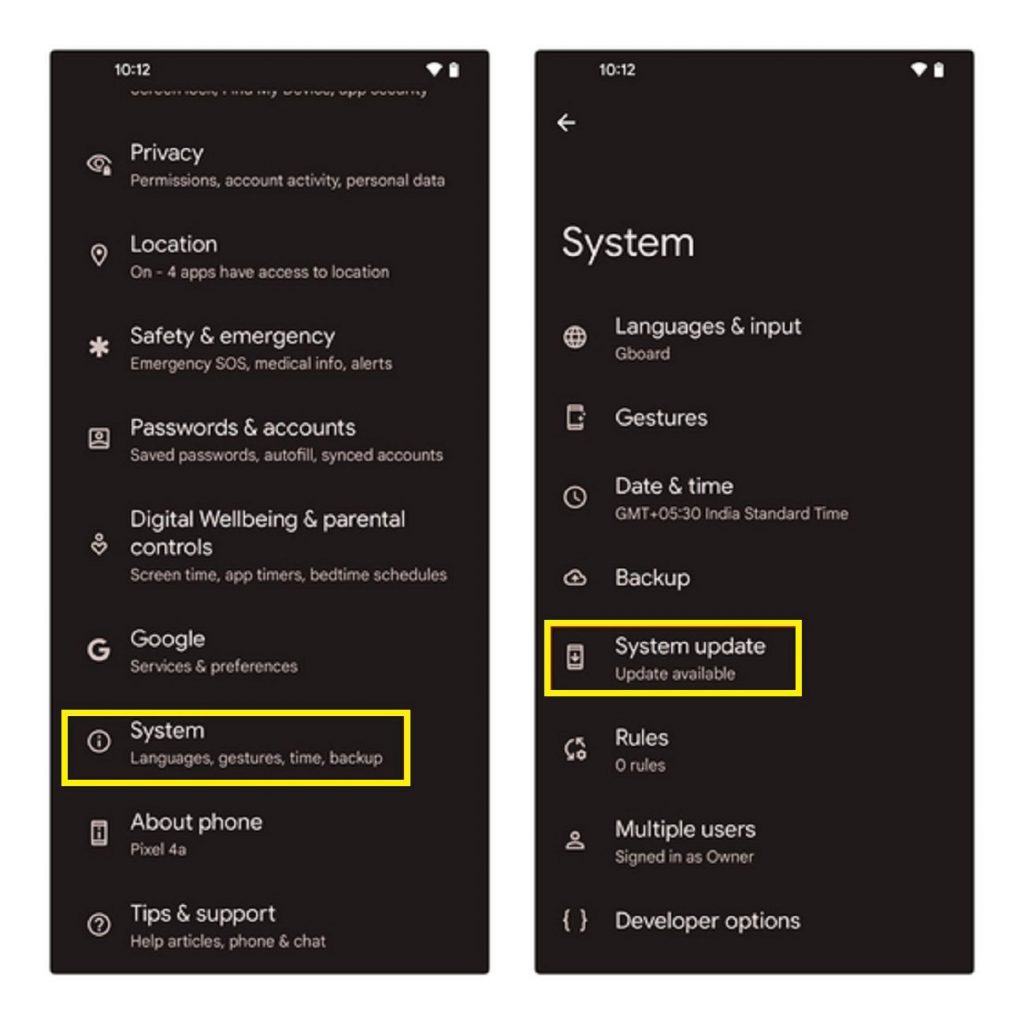
3. Once the update arrives, download it and wait for the installation process to complete. Restart the phone after the update to start using Android 13 beta on your Pixel phone.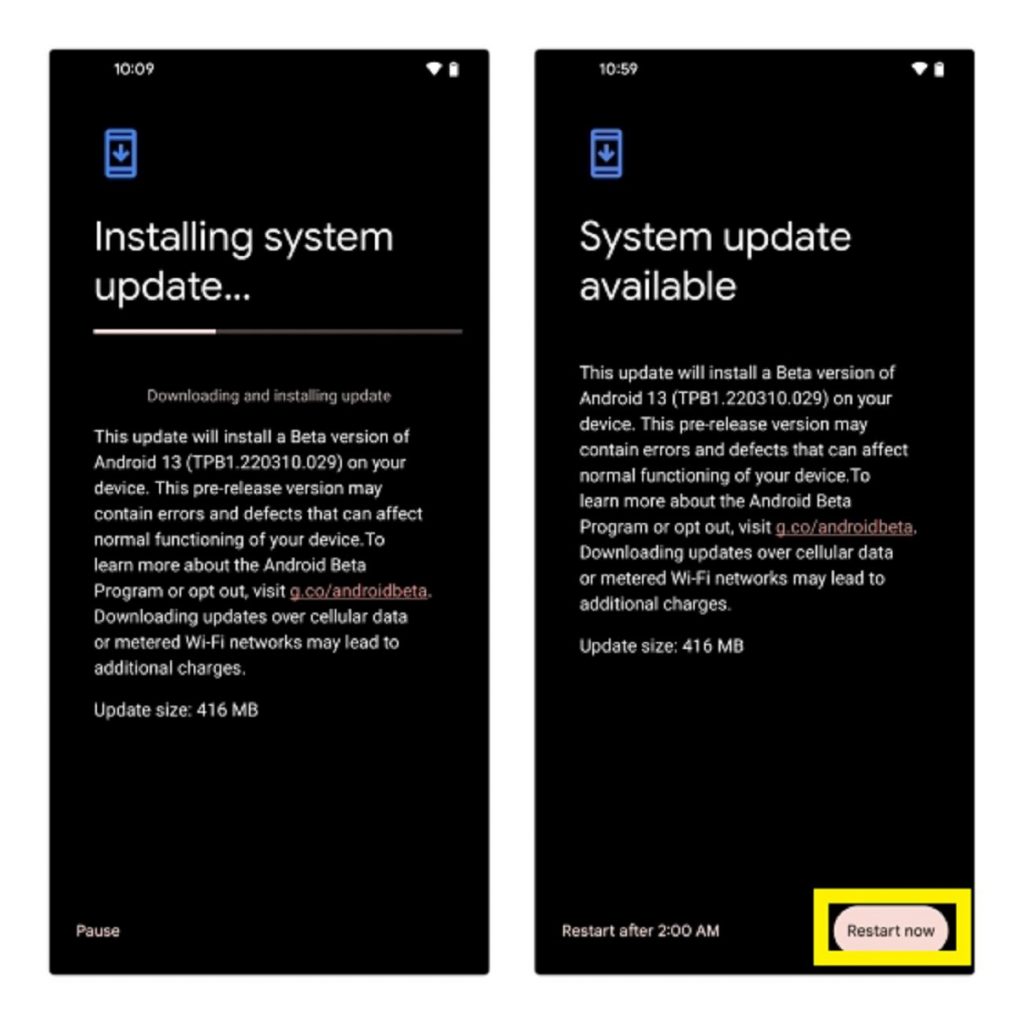
Also Read: How To Set Google Voice On Android
4.2 Sideload Android 13 Beta OTA Image
Download the proper files to install Android 13
Before you get things going, you’ll need to download the appropriate OTA image for your smartphone via your computer. Factory images are available too but can require the device to be wiped completely, which isn’t the case for OTA images. Furthermore, installing via an OTA image means you’ll automatically get new betas over the air. Our instructions below also reflect the OTA process.
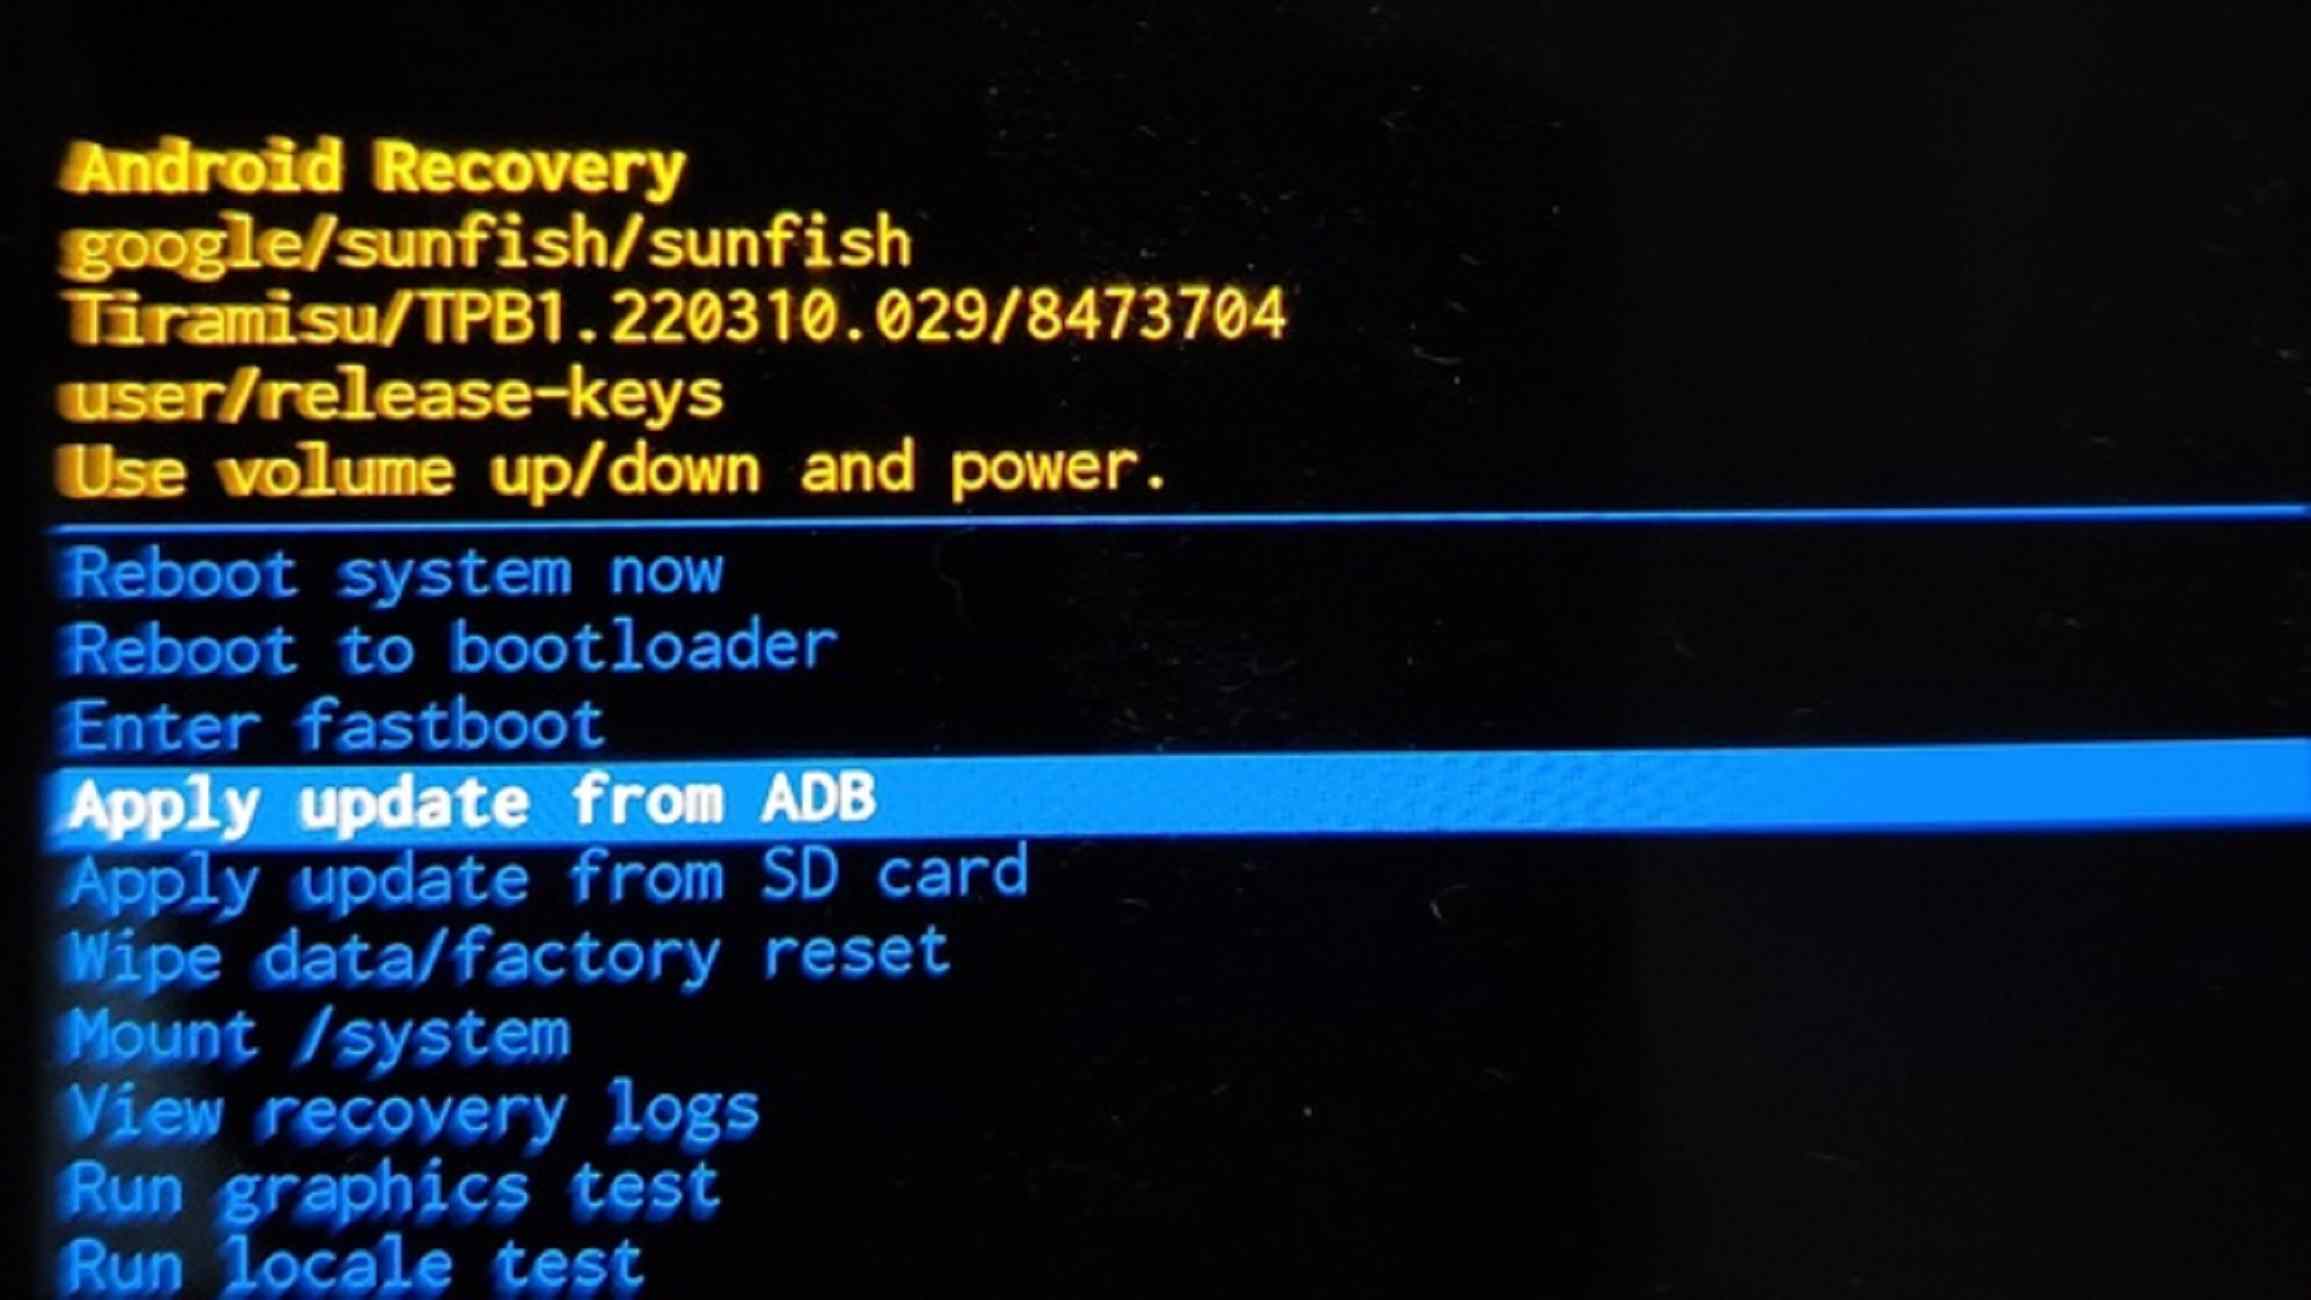
Boot into Recovery Mode
Once you’ve downloaded the file, you need to reboot your phone into Recovery Mode to apply the OTA image. Then, you’ll be ready to install the Android 13 beta.
- First, shut off your phone.
- Next, hold down Power and Volume Down buttons at the same time.
- The bootloader menu will now show up. Use volume buttons to scroll down to Recovery Mode.
- Select Recovery Mode by clicking the power button.
- You’ll be presented with an Android robot with an exclamation mark on it. Now you’ll press the power button and volume up button for about a second.
- Release the volume up button will send you fully into recovery.
- Next, use the volume buttons and scroll down to Apply update from ADB. Push the power button to select the option.

- Lastly, you’ll see a blank screen telling you how to sideload an OTA.
Get Your PC ready
Now that your phone is ready, it’s time to make the magic happen.
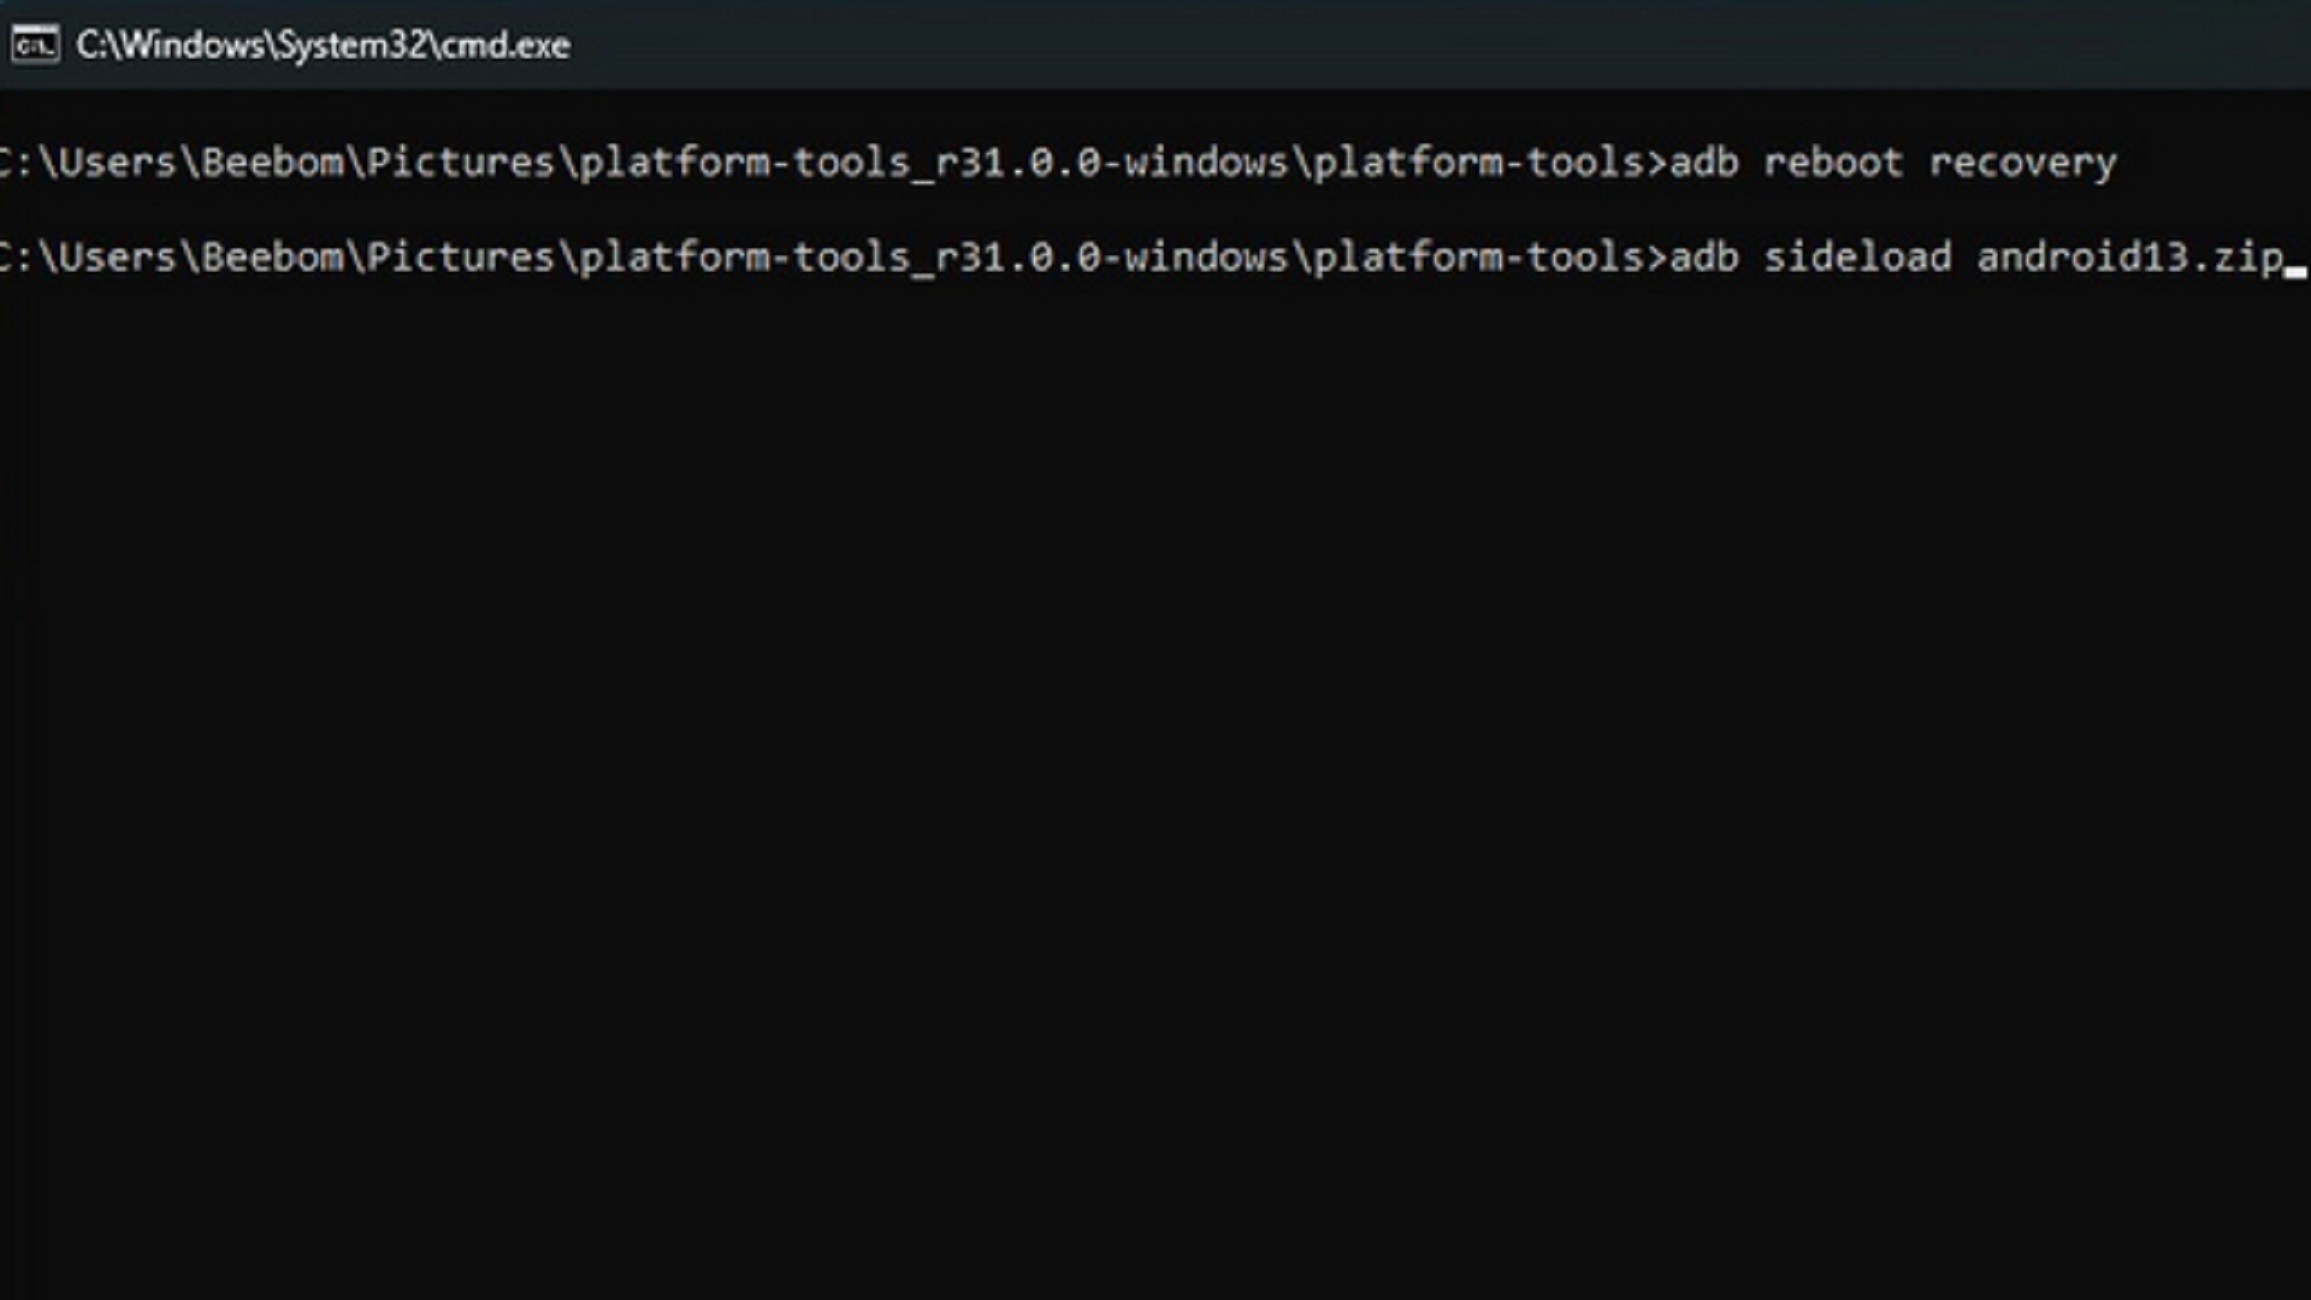
- Connect your handset to your PC via USB cable. Remember, your PC needs to have ADB tools installed.
- On Windows, enter Command Prompt. On Linux or Mac, you’ll want to use Terminal.
- For Windows users, make sure you navigate to wherever you’re storing the folder.
- Next, you must enter ADB sideload for Windows or ./adb sideload for Mac/Linux.
- Now you’ll want to enter the name of the .zip folder from before and hit enter.

image credit: beebom.com - Once completed, your phone will return to Recovery Mode, and you can remove the USB cable.
- Go to Reboot Now with the volume keys and press the power button.
That’s it. If everything went okay, you were able to install Android 13 successfully.
4.3 Install Android 13 Beta using Android Flash Tool
Another method to install the Android 13 beta is using the Android Flash Tool. To get started, check if you have enabled USB Debugging and OEM unlocking on your phone from Settings > Developer Options. Once that’s done, follow the steps below:
- Connect your Pixel phone to your PC. If you are on Windows, you might need to download and install Google USB Drivers. Up next, visit Android Flash Tool’s website and click on “Get Started”.
- You will now see a pop-up that urges you to allow access to ADB keys. Click on “Allow ADB access” and authorize the USB debugging prompt from your Pixel phone.
- Click on “Add new device” to link your Pixel phone to the Flash Tool.
- A prompt will now appear in your browser’s top-left corner. Pick your Pixel phone and click on “Connect” to connect your device.
- Choose “Android 13 Beta 1” as the target build from the list of available builds.
- By default, Android Flash Tool wipes your phone and relocks your bootloader. Tapping the pencil icon next to the build number offers you the option to tweak the settings. Finally, click on “Install build” to start the installation process.
If everything goes well, you will see the “Install Complete. The build has been successfully installed. It is now safe to unplug your device” message in the Flash Tool. Your phone should now be running Android 13 Beta.


