


 Header Through Cloudflare")


")
Upgrading the RAM/removing or installing memory in your Mac can provide a significant boost to performance. And equipping the machine to run demanding software in the future.
On older models, this is actually a very simple procedure. And if you use third-party RAM from companies such as Crucial you’ll find the cost quite affordable too. Modern Macs are a different story, and there are plenty of pitfalls you need to avoid – which is why we’ve put together this guide.
Unfortunately, most modern Macs don’t allow you to upgrade the RAM yourself.
Recent MacBook Pro and MacBook Air models have the RAM soldered to the motherboard. Some newer iMacs technically have user-upgradeable RAM, but doing so requires the extensive teardown of the machine. We wouldn’t recommend trying this unless you’re extremely experienced with electronics and your machine is already out of warranty.
Also Read: Monterey Installation Stuck In Loop: Fixed
Selection of Right RAM
However, you’ll find a variety of sites that make finding the right sticks of RAM for your model easy.
The first place you should stop is Other World Computing’s Mac RAM page. This allows you to select your Mac model to find compatible RAM. You’ll see the Macs each kind of RAM works in, along with easy videos on how to replace it. The company even offers trade-in value for your old RAM.
As an alternative, have a look at Crucial’s memory hub. Here you can either enter your computer info or download a scanner tool that checks for you. You’ll then see a page containing SSDs and RAM that is guaranteed to work on your machine.
Ensuring Mac RAM Compatibility
When buying RAM, compatibility with your system is vital. Not every type of RAM will work in every Mac computer, so it’s important to make sure you buy a component that’s suitable. Otherwise, you could go through all the effort to upgrade the RAM and end up with an unusable computer.
This is why we recommend buying from a store that specializes in Mac RAM upgrades. You might be able to shop around and get a better price for RAM found on the above sites. If you do so, make sure you search by SKU so you don’t end up buying something that’s slightly different.
Also Read: How To Install RAM And SSD In Windows Laptop?
Note: There are different instructions for remove or install memory of every different models of Macbook. So you should be sure which model you are using. Because some models of MacBook have non-removable memory.
Remove or install memory in MacBook Pro(13-inch) models
Removing or installing memory
Note: Let your Mac cool for some time if you have been using it.
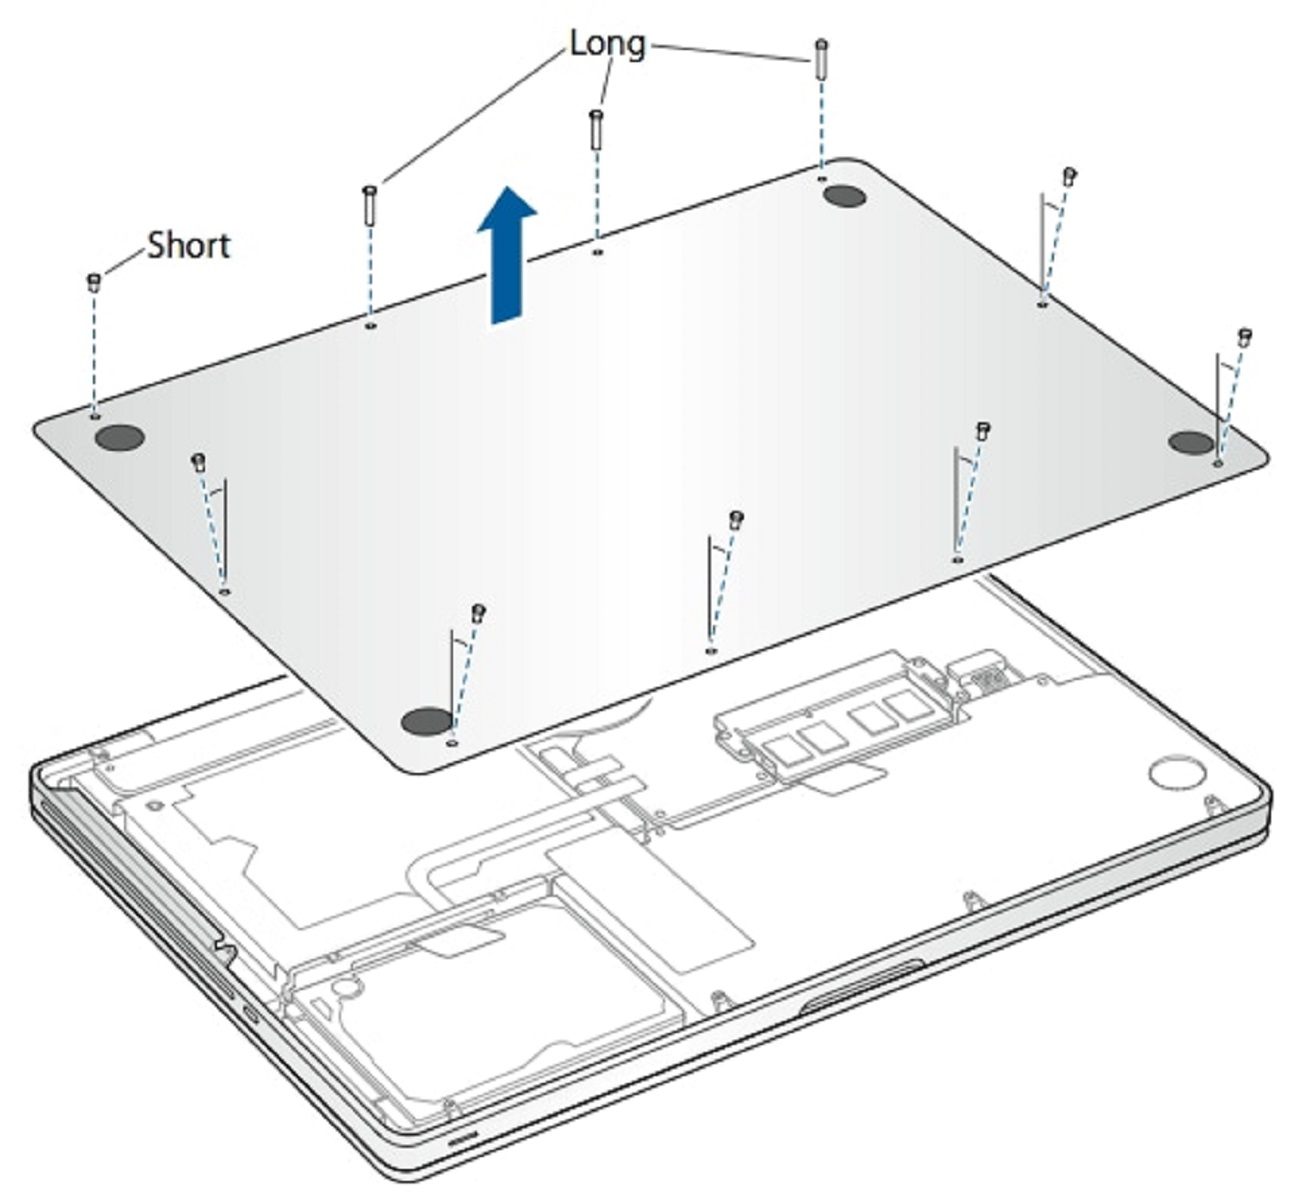
Step 1: Remove the bottom case
- Shut down your MacBook Pro. Disconnect the power adapter and all the cables connected to the Mac.
- Turn over your MacBook Pro and remove the ten (10) screws that secure the bottom case. Because the screws are different lengths.
Note: The screw’s lengths and locations so you can replace the screws correctly. Liftoff the case and place it to the side.
- Touch a metal surface inside the computer to discharge any static electricity from your body.


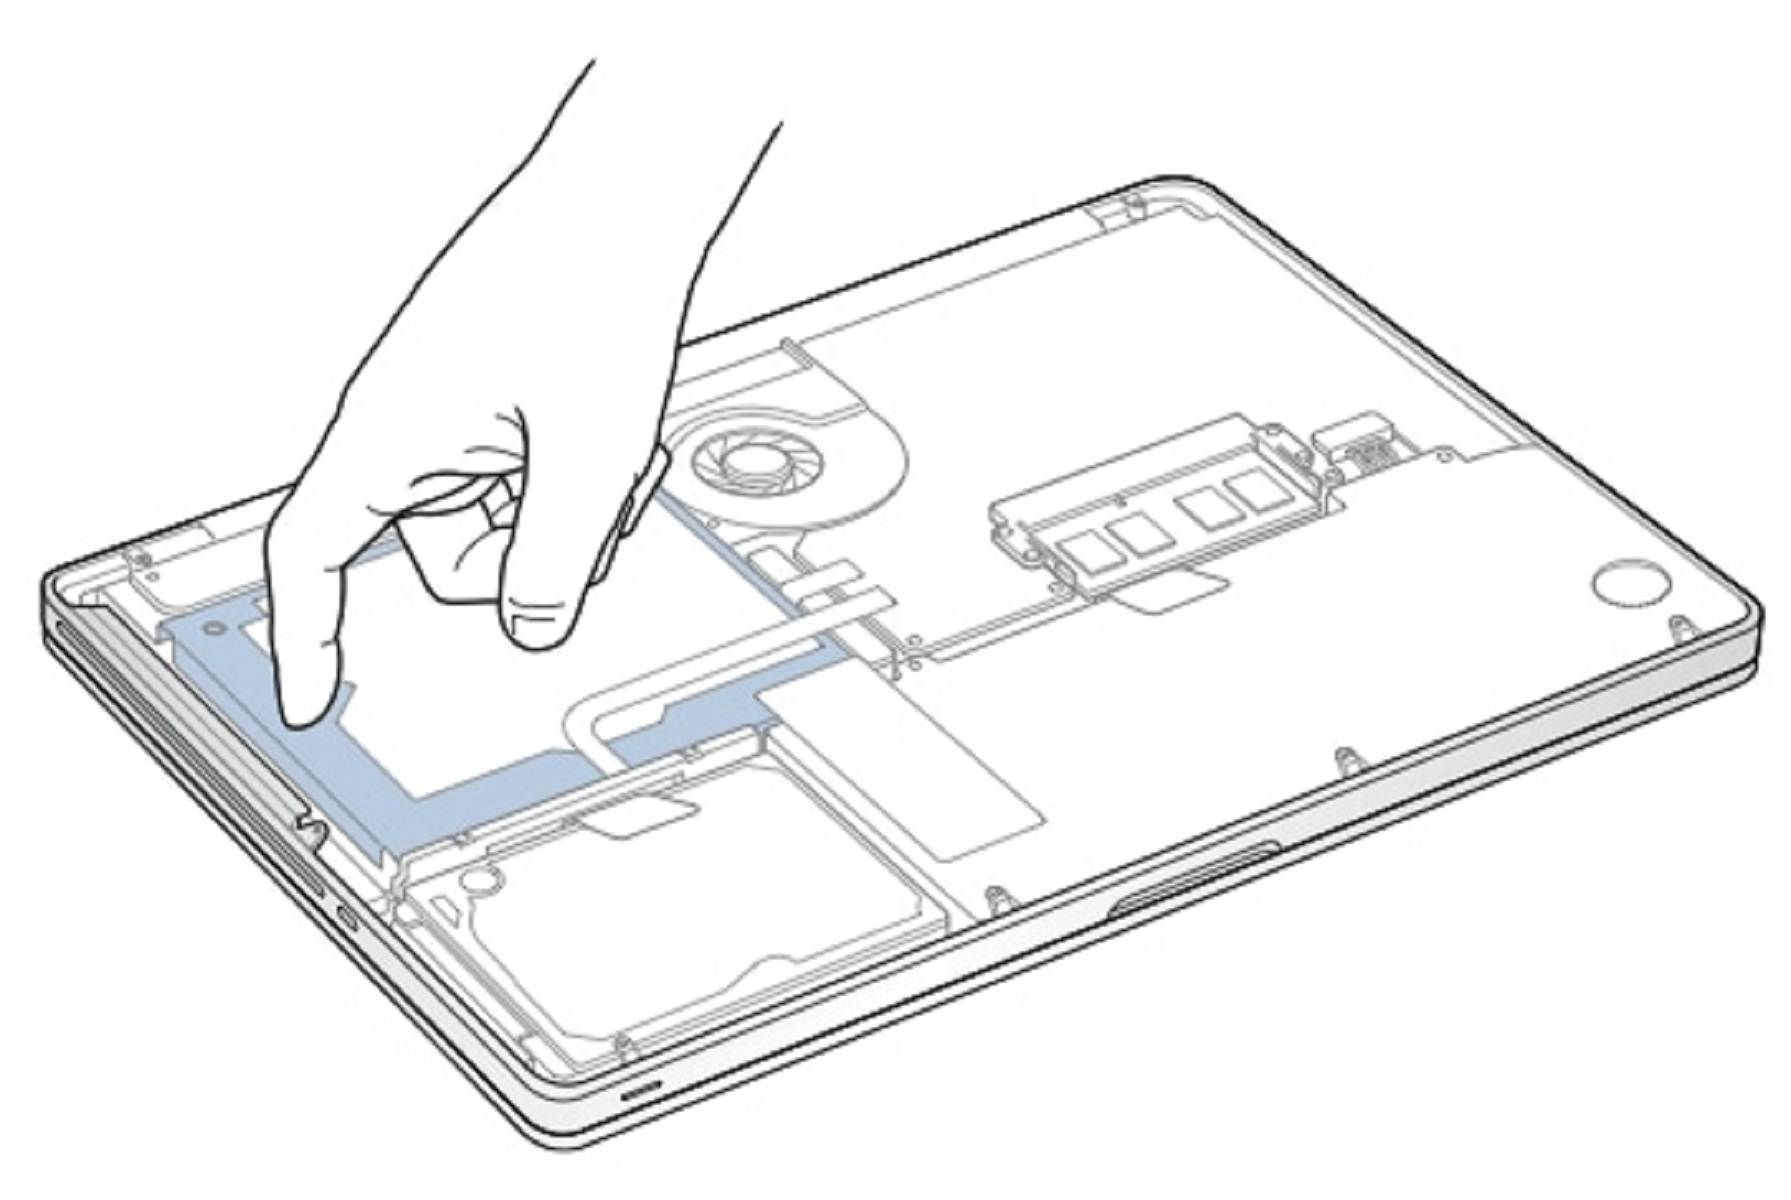
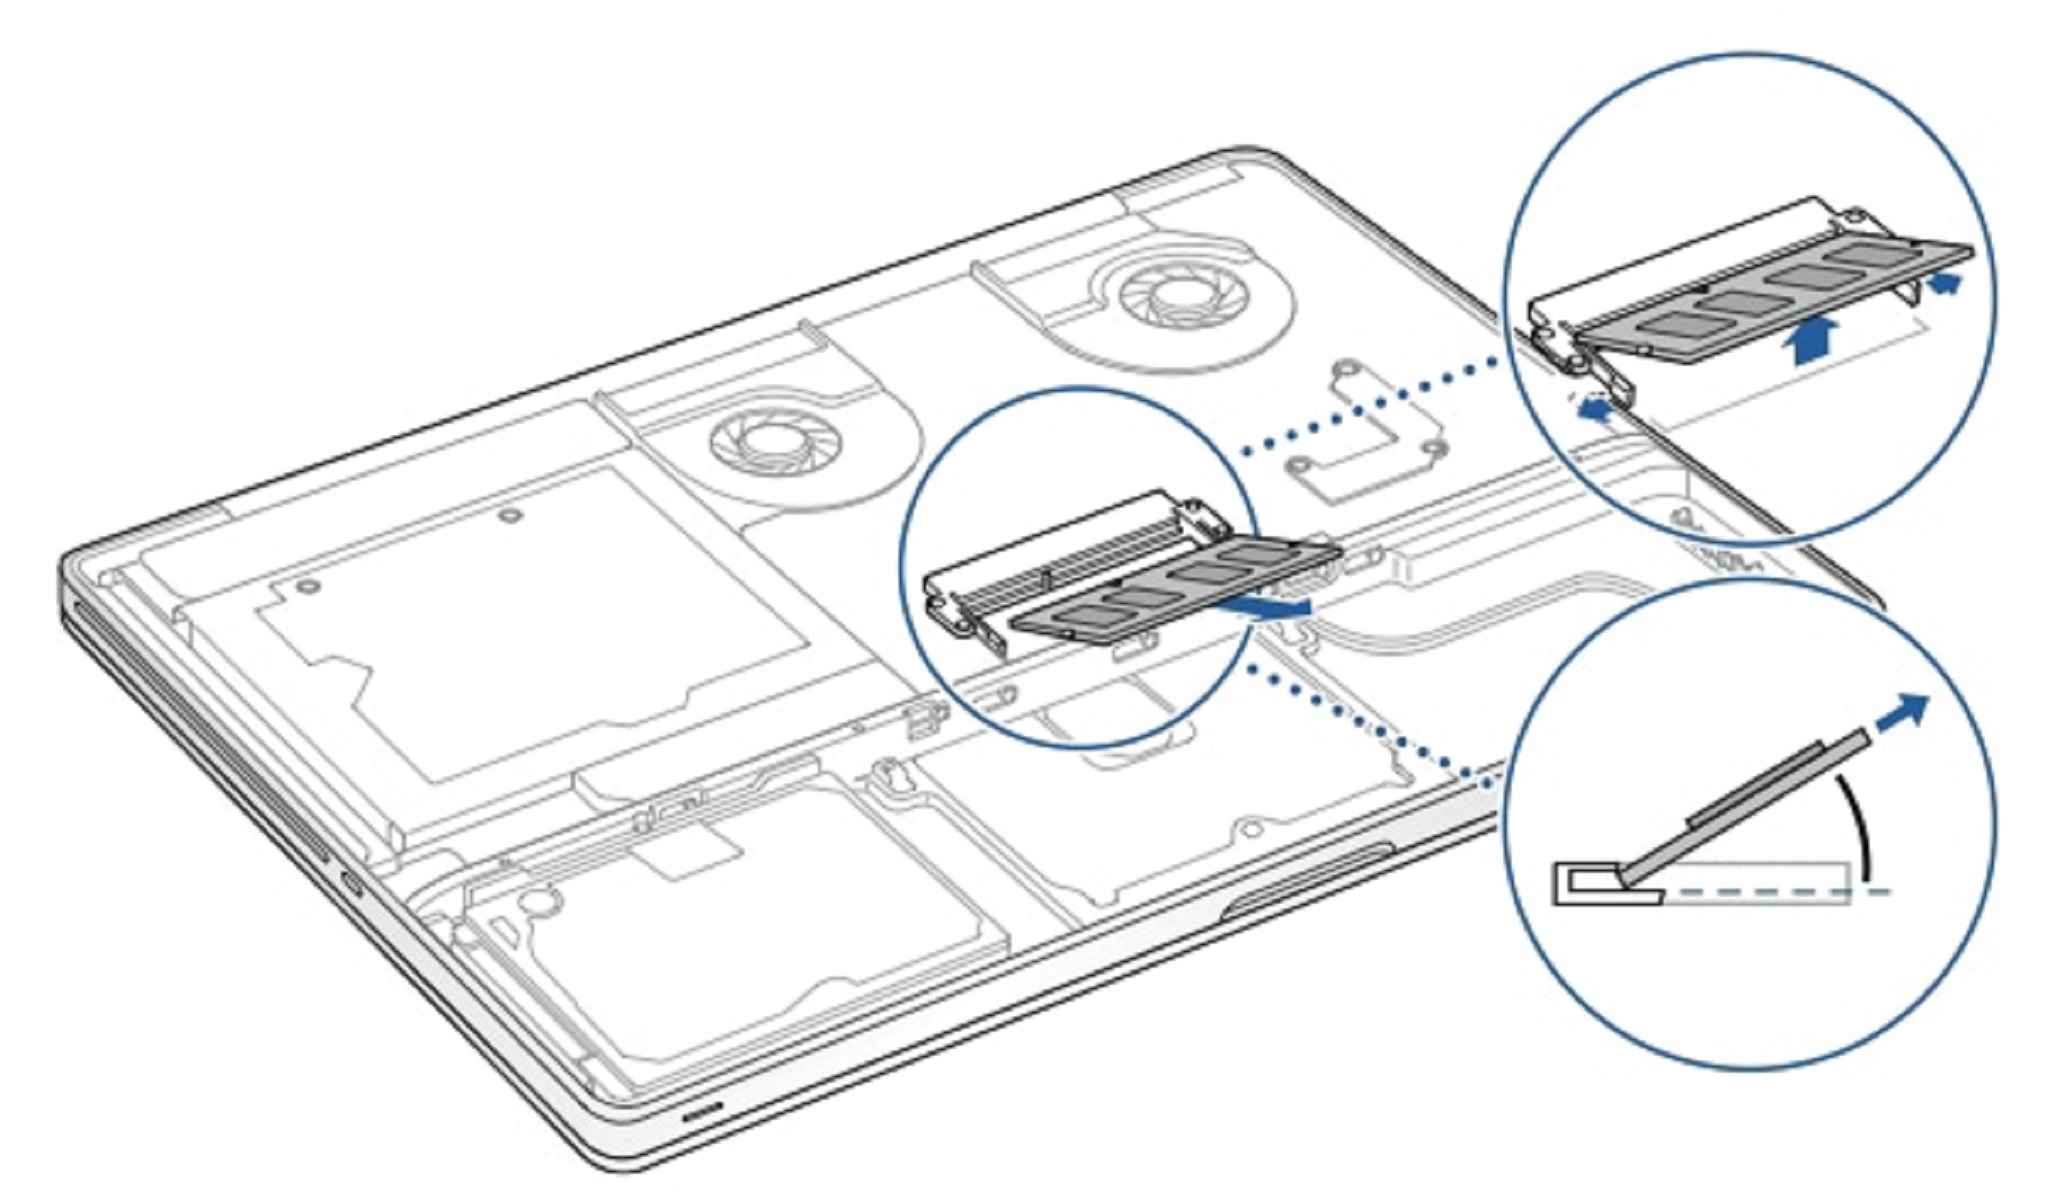
Step 2: Remove existing memory (if present)
- Push the levers on the sides of the memory module in an outward direction to release the module from the memory card slot.
- The memory pops up at an angle. Before removing it, make sure you find the half-circle notches. If you don’t, try pressing the levers outward again.
- Hold the memory module by its notches and remove it from the slot.
- Remove the other memory module.
- Important: Hold the memory modules by their edges, and do not touch the gold connectors.

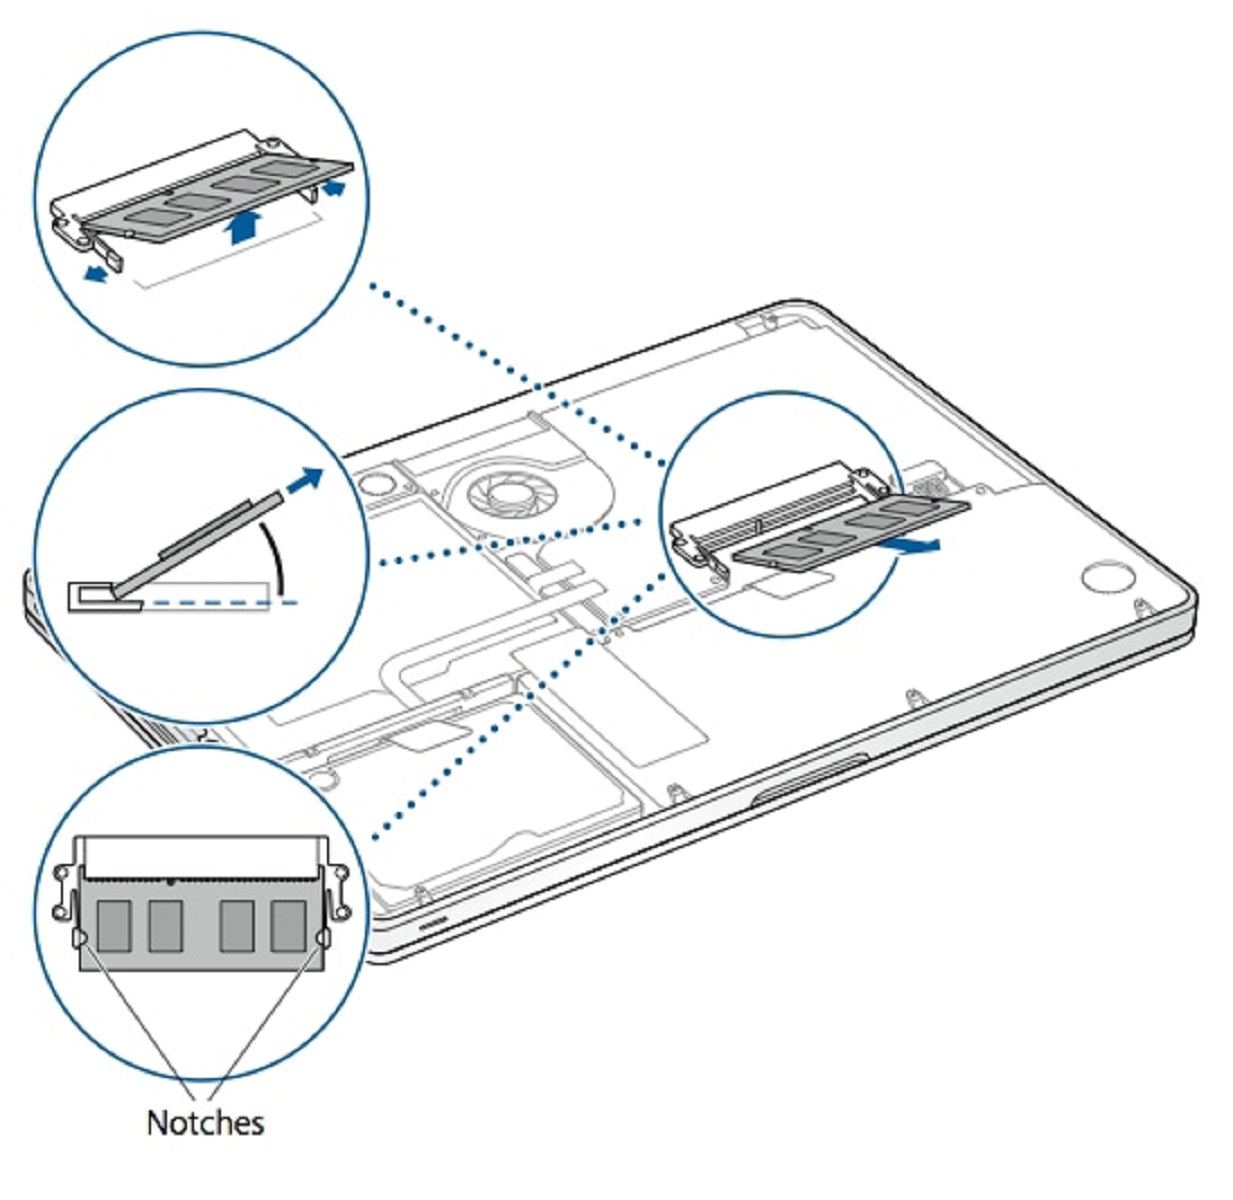
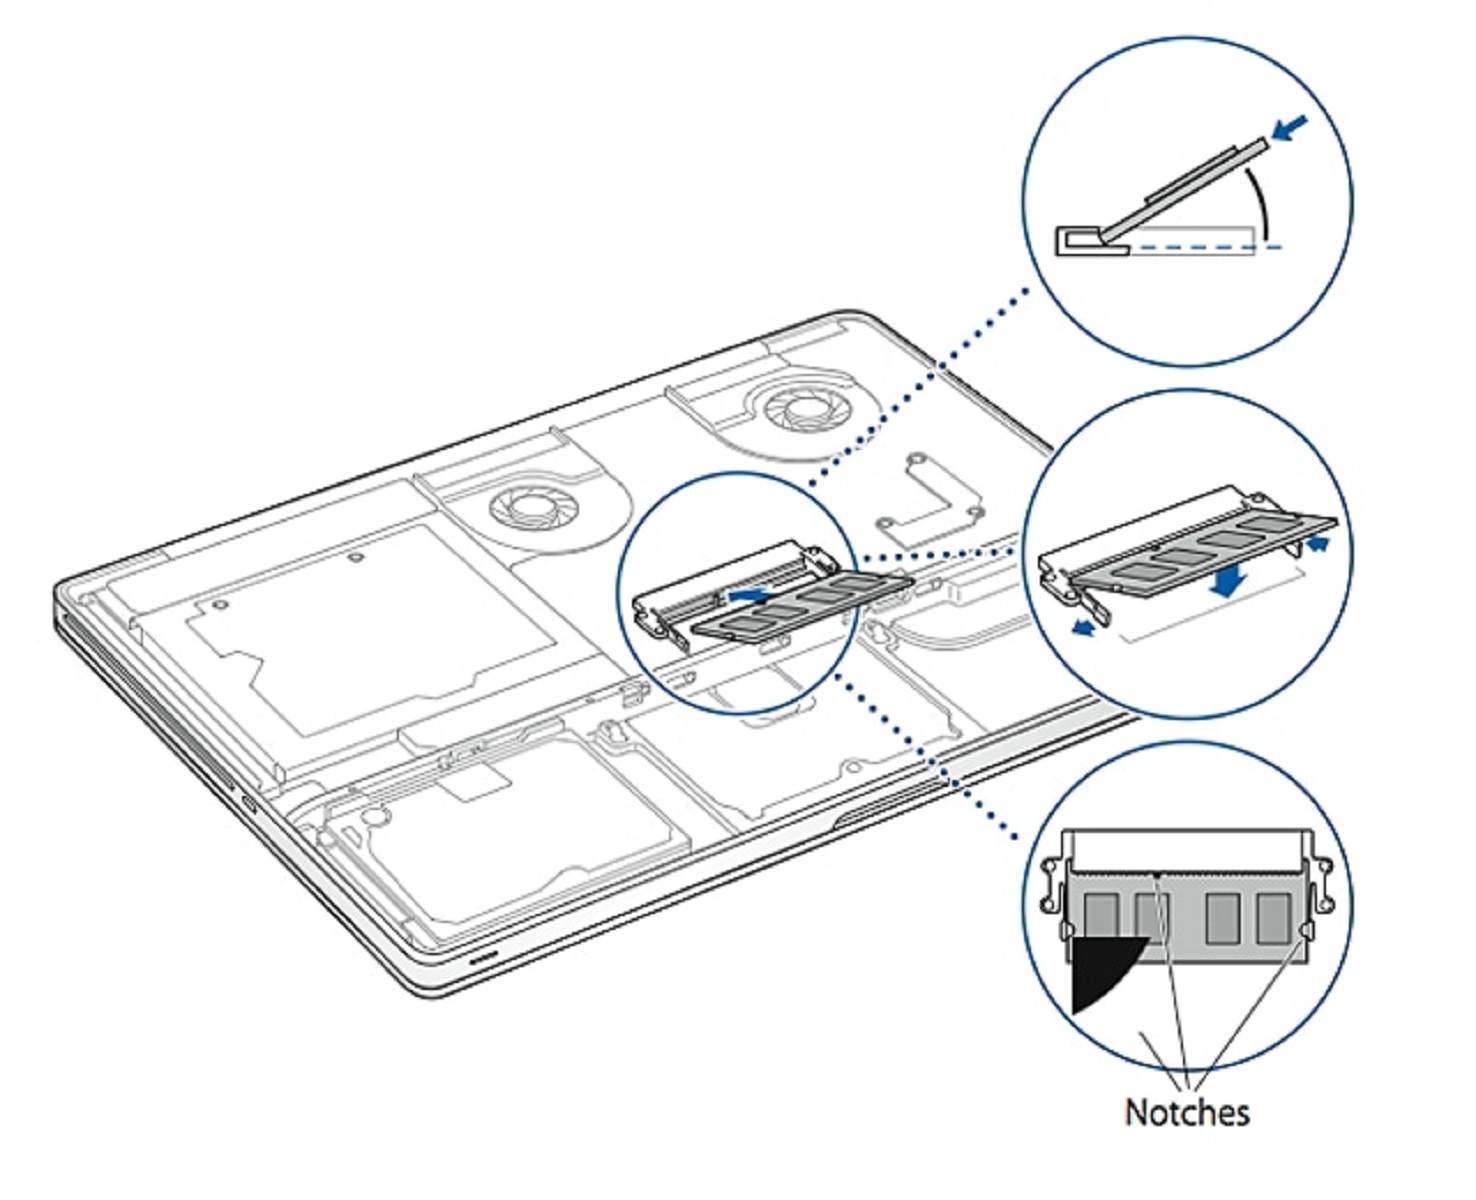
Step 3: Install memory
- Align the notch on the gold edge of the module with the notch in the lower memory slot.
- Tilt the card and push the memory into the slot.
- Use two fingers with firm, even pressure to push down on the memory module. There should be a click when you insert the memory correctly.
- Repeat this procedure to install an additional memory module in the top slot. Press down on the module to make sure it is level.


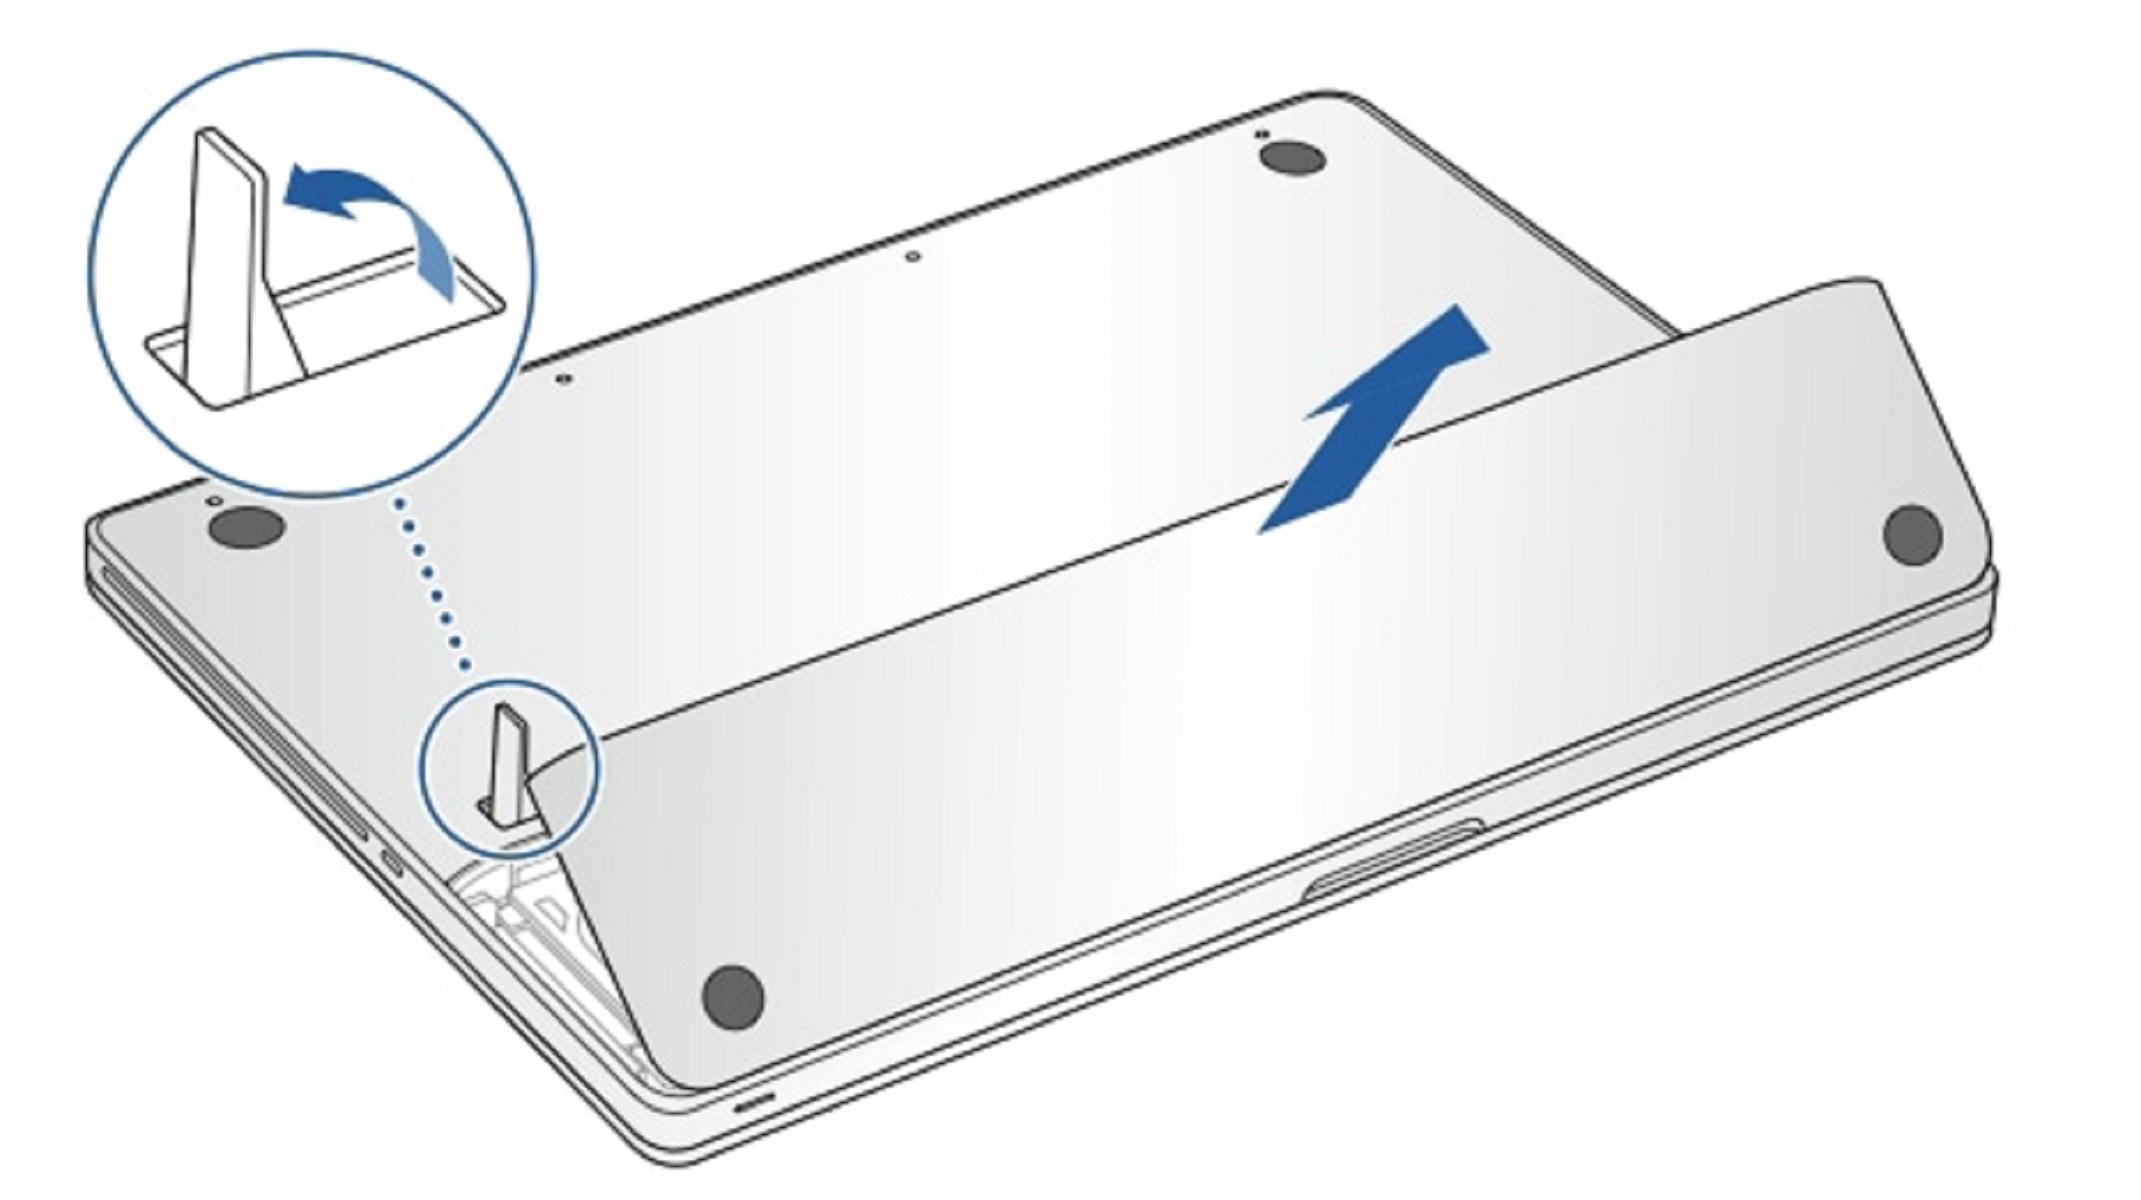
Step 4: Replace the bottom case
Replace the bottom case. Replace and tighten the ten screws you removed earlier, making sure to put the different length screws in their proper locations.
2. Remove or install memory on MacBook Pro (15-inch) Models
Step 1: Remove the access door
- Turn over your MacBook Pro and locate the latch.
- Push down to release the latch and remove the access door that covers the battery and hard drive.
- The latch must be in its released, open position to remove the access door.

Step 2: Remove the battery
With the latch still in its open position, gently pull up on the tab to remove the battery.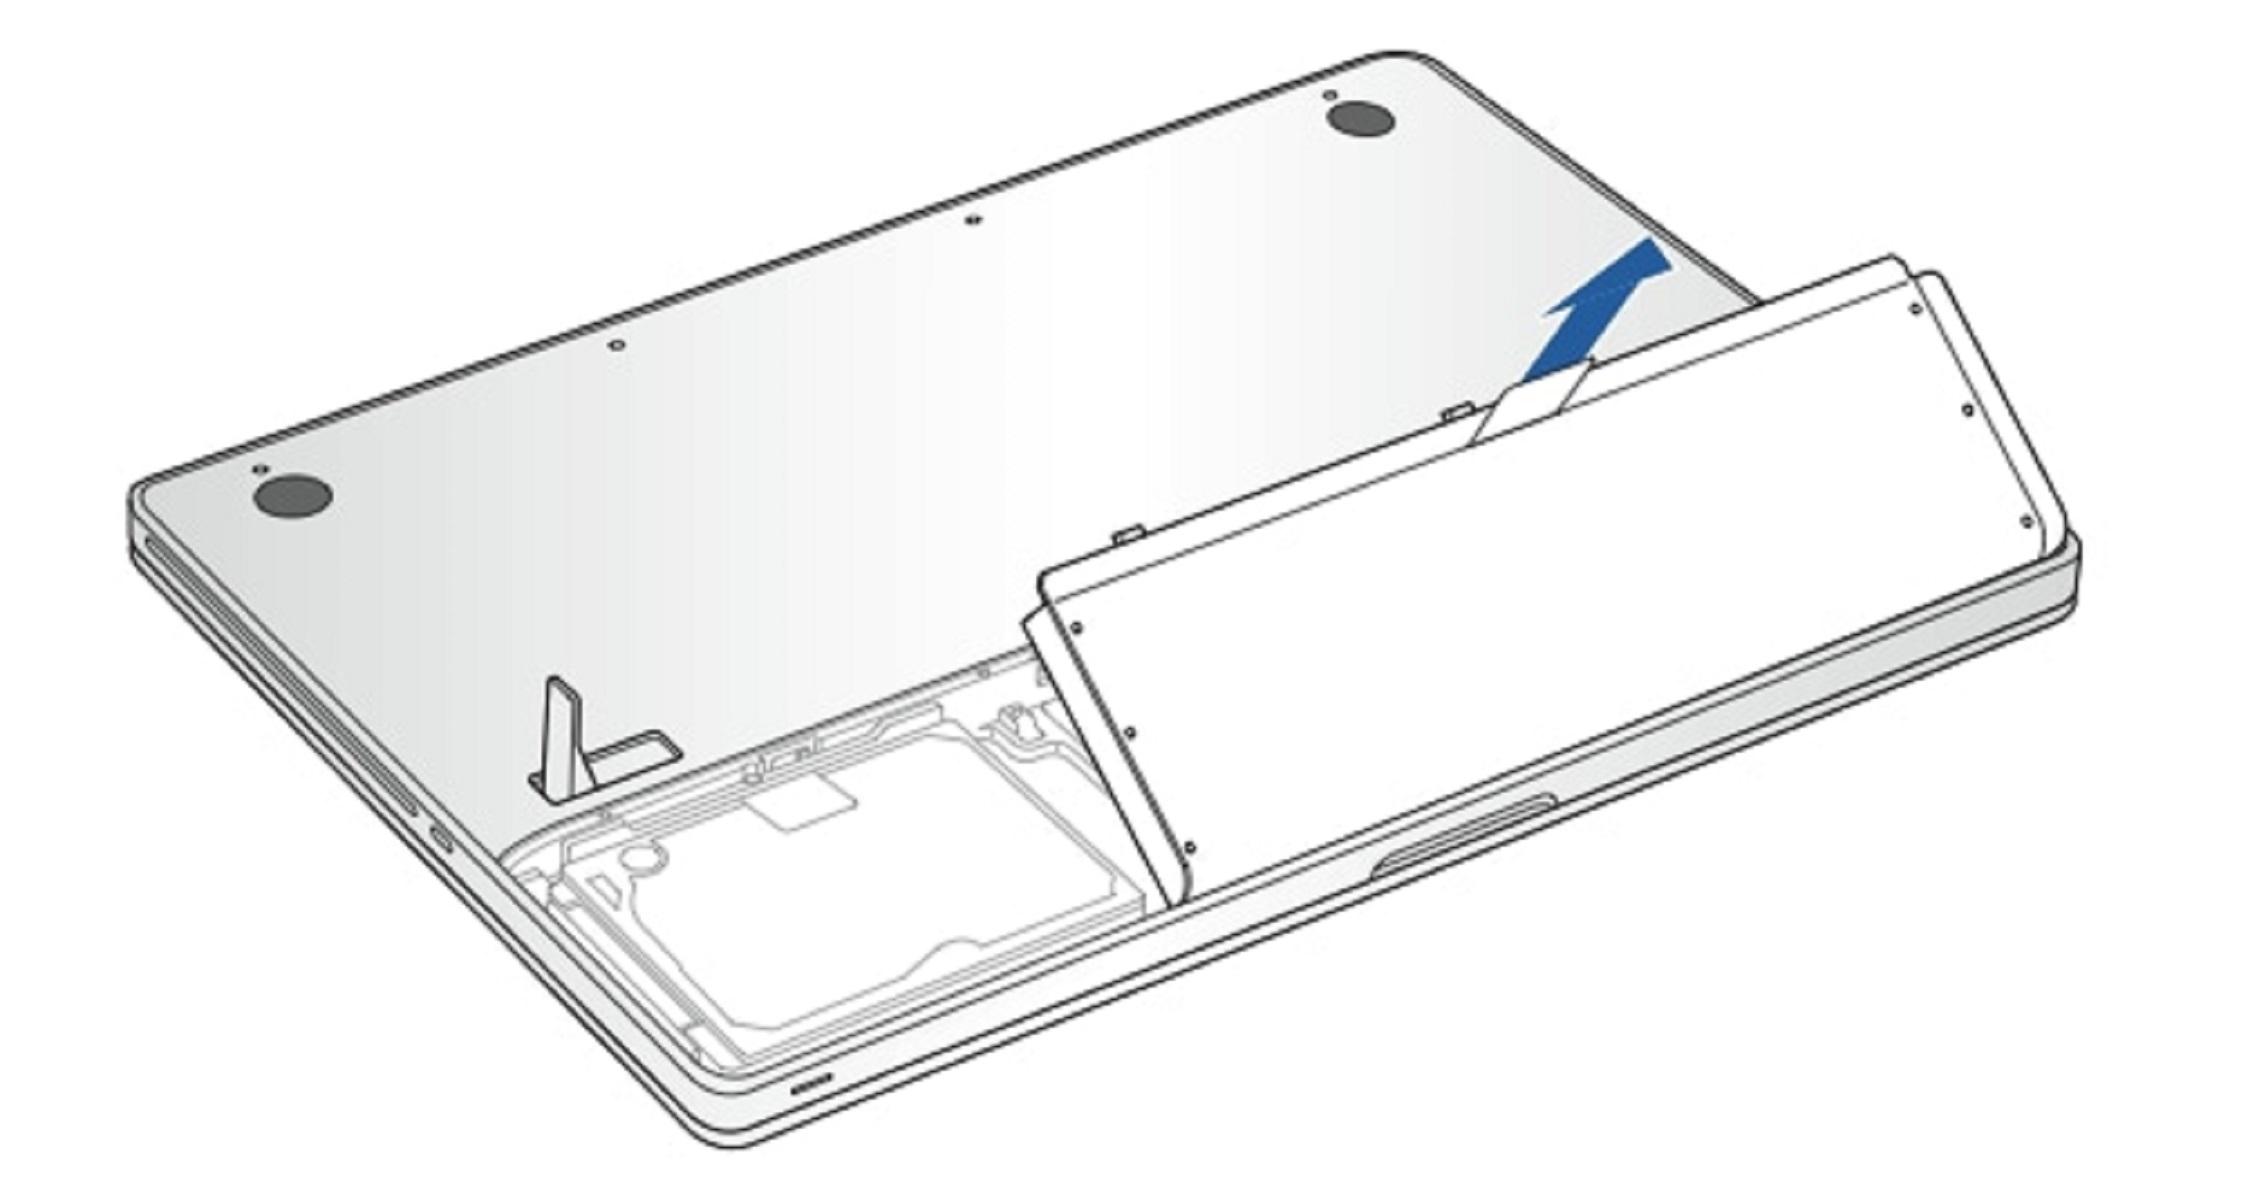
Step 3: Remove the bottom case
Remove the eight screws that secure the bottom case of your MacBook Pro, and then remove the bottom case.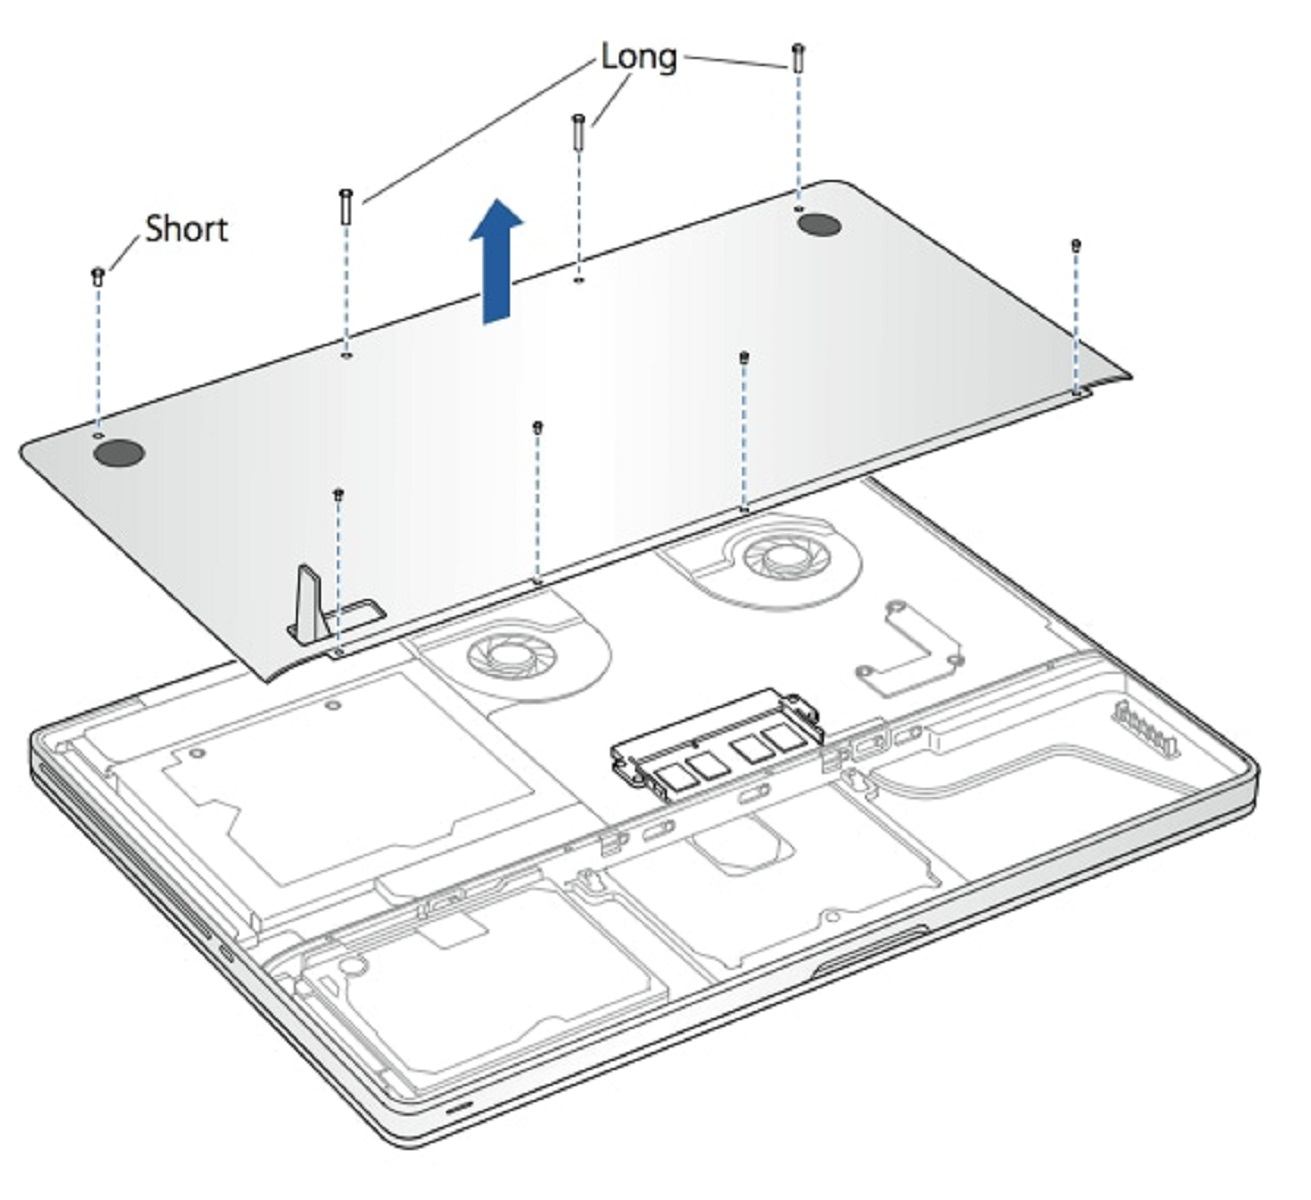
Step 4: Remove existing memory
- Push out the ejection levers on the sides of the memory module to release the module from the memory card slot.
- The memory pops up at an angle. Before removing it, make sure you find the half-circle notches. If you don’t, try pressing the ejection levers again.
- Hold the memory module by the notches and remove it from the slot.
- Remove the other memory module.
Important: Hold the memory modules by their edges; do not touch the gold connectors.
Step 5: Install memory
- Align the notch on the gold edge of the module with the notch in the lower memory slot.
- Tilt the card and push the memory into the slot.
- Use two fingers with firm, even pressure to push down on the memory module. There should be a click when you insert the memory correctly.
- Repeat, if necessary, to install an additional memory module in the top slot. Press down on the module to make sure it is level.
Note: Make sure you install the memory according to the illustration below, with the gold contacts inserted almost completely into the connector.
- Replace the case, battery, and access door
3. Remove or install memory on MacBook Pro (17-inch) Models
Step 1: Remove the bottom case
Turn over your MacBook Pro and remove the 10 screws that secure the bottom case.
Step 2: Remove existing memory
- Push the levers on the sides of the memory module in an outward direction to release the module from the memory card slot. The memory pops up at an angle. Before removing it, make sure you find the half-circle notches. If you can’t find the notches, try pressing the levers outward again.
- Hold the memory module by its notches and remove it from the slot.
- Remove the other memory module.
Step 3: Install memory
- Align the notch on the gold edge of the module with the notch in the lower memory slot.
- Tilt the card and push the memory into the slot.
- Use two fingers with firm, even pressure to push down on the memory module. There should be a click when you insert the memory correctly.
- Repeat this procedure to install an additional memory module in the top slot.
Step 4: Replace the bottom case
Replace the bottom case. Replace and tighten the ten screws.
Conclusion
Now you have everything you need to complete this process. Whether you’re interested in an iMac or MacBook Pro RAM upgrade, you know how to find the right RAM for your system and get it installed. It’s a relatively straightforward computer upgrade that will have a big effect.
Before spending money on new RAM for an old machine, make sure it’s not time to replace your Mac instead.
And if your device is not covered in this article, please let us know in the comments section. We will try to help you as soon as possible.


