


 Header Through Cloudflare")


Connecting to a VPN and accessing the internet through a remote server is the best way to remain under the hood. There may be several reasons for this, you might not want to fall prey to internet threats like malware or you want to avoid being tracked by snoopers and even your internet service provider.
VPN is also a wonderful choice to access some websites or internet content blocked in your country. Whatever, be your reason for setting up a VPN, in this quick guide we will show you how to set up and manage VPN connections manually on Windows 11.
So let’s walk you through the step-to-step guide to configure, connect and delete a VPN connection on Windows 11 PC.
Also Read: How To Install macOS Monterey On Windows PC?
How to configure VPN connection in Windows 11
Follow the steps below to set up a VPN connection in Windows 11:
- Head to the settings by pressing the ‘Windows+S’ key and type ‘Settings’ in the search box.
- Now, move to ‘Network & Internet’ and choose VPN from the right sidebar.
- Next, tap the Add VPN button in the VPN connections Window.

- In the VPN provider field, choose Windows 11 from the drop-down menu.
- Next in the ‘Connection Name’ field enter a name just for identification purposes. For instance, you can set a name as ‘Network1’.
- Now you have to enter the name of the VPN server in the ‘Server name or Address’ field.
- This should be your choice such as vpnserver.com or 122.122.122.122.
- Set the ‘VPN type’ drop-down menu to ‘Automatic’ or choose the name of the required protocol needed for connecting to that particular network.
- In the type of Sign-in info, you have to choose and set the authentication method from the drop-down.
Note: The above two options will vary according to the VPN provider.
- Now choose the ‘Username and Password’ option and confirm the username and password you’ve set.
- Finally, click the Save button to save VPN settings.
- After configuring the VPN on Windows 11, choose the VPN from the taskbar to browse the internet through VPN.
Also Read: How To Set The Default Web Browser In Windows 11?
How to connect to a VPN in Windows 11
There are two ways to connect to the VPN server after you’ve set up the VPN connection:
From Windows 11 Settings
- Click the ‘Windows+S’ key to open the start menu and type ‘Settings’ in the search bar.
- Now open ‘Network & internet’ settings and select ‘VPN’ from the right panel.
- Look for the ‘Connect’ button in the VPN settings and click it.
This will establish the connection and your PC will authenticate and you will be able to connect with the remote network.
Also Read: How To Install Android Apps On Windows 11
Connect from Taskbar
You can also connect to the VPN directly from the Taskbar, follow the steps below:
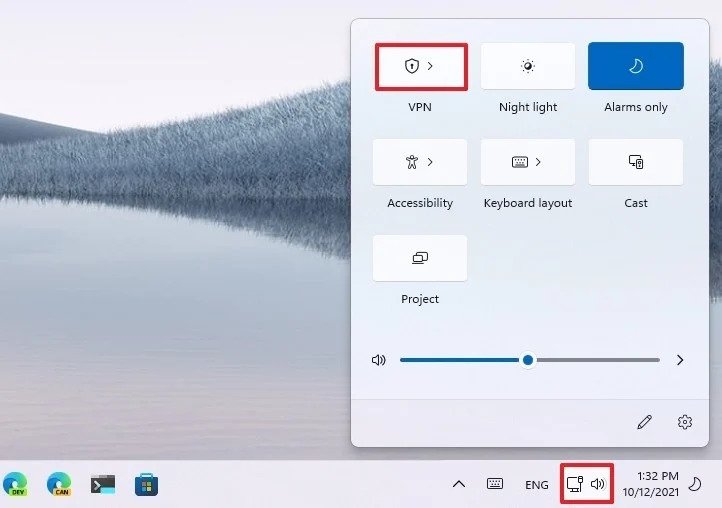
- Look for the network icon in the Taskbar and click it.
- Click the VPN card in the flyout menu.
- Select the VPN connection you wish to connect.
- Finally, click the Connect button next to it.
After clicking the Connect button your Windows 11 PC will successfully connect to the VPN.
Also Read: How To Split Screen In Windows 11 For Multitasking?
How to disconnect a remote network on Windows 11
Here are two ways to disconnect a currently active VPN connection, let’s take a look at them:
From Windows 11 Settings
- Open the Settings in Windows 11 in the same way as shown above.
- Now go to ‘Network & internet’ settings and choose VPN from the right panel.
- Look for the currently active VPN connection and click the ‘Disconnect’ button next to it.
- Click the Confirm button in the pop-up menu to save the changes.
After you complete the steps, the computer will disconnect from the VPN server.
From Taskbar
Here’s an easy way to end a VPN connection without accessing the Windows 11 settings, let’s take a look:
- Look for the ‘Network’ icon in the Taskbar and click to open it.
- Now tap the VPN button.
- Look for the VPN connection you wish to disconnect.
Press the Disconnect button to terminate the VPN connection.
How to delete a VPN connection on Windows 11 PC
Follow the steps below to easily remove or delete a VPN connection in Windows 11:
- Go to Settings on Windows 11 PC and click ‘Network & Internet.
- Select VPN from the right panel and look for the VPN connection you wish the remove.
- Click it to access the settings of the VPN connection.
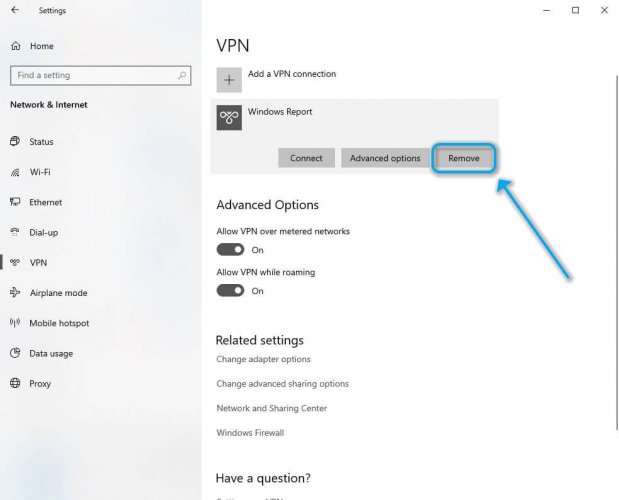
- Finally, click the Remove button.
Now this VPN will no longer be available on your computer.
Read: How To Install Windows 11 On An Unsupported CPU
Conclusion
So we reach the end of our quick guide on how to configure and manage VPN networks on your Windows 11 PC. VPN is a great way to protect from online threats as it makes you invisible in the virtual world. Have any questions regarding the VPN configuration process on Windows 11 PC? Let us know in the comments.


How To Set Up And Manage VPN On Windows 11
Setup, enable, disable, and remove a generic VPN is pretty straightforward, and your steps are quite clear.
What’s missing is the individual VPN connection Properties (per VPN, not global) allowing one to set special DNS settings needed for each VPN connection. Were the VPN’s DNS servers externally accessible, or if external DNS servers were not being blocked by the VPN-LAN firewall, etc, simply forcing a public (Google/HE) DNS on the emote computer via Ethernet/Wifi settings may suffice. This VPN properties option was available under Windows 10, but is not readily visible under Windows 11 Pro x64. Still searching for an easy workaround…