


 Header Through Cloudflare")


![[Interview] The Future of Screen Experiences ②: From Watching to Understanding With Vision AI Companion](https://www.hawkdive.com/media/samsung-tvs-and-displays-vision-ai-companion-interview_thumb932-218x150.jpg "Exploring Vision AI Companion: Transforming Screen Experiences for Users")


")
There are a lot of new features in Windows 11, but the core is mostly the same. I know that the Settings page looks different, but you can still find all the information you could on Windows 10 just like you could on Windows 7. If you want to find the IP address on Windows 11, you can still use Command Prompt or the Settings page to do it. You can check your computer’s IP address in a number of ways. In this article, we’ll show you how to do that.
How to tell the difference between an external and internal IP address
First, you need to figure out what kind of IP address you want to find. The two main types of IP addresses that we use are external and internal.
A “wide area network” or WAN address is the address that you show the world when you’re on the internet. This is the address that the outside world sees when they look at your computer. If you have a local network, it’s shared between all the devices on it. When somebody else wants to connect to your computer through the internet, they’d use this IP address to do so as well.
It’s a number that your router or broadband modem gives you. It’s called your internal IP address or LAN address. In many cases, routers use dynamic DNS to automatically assign IP addresses to devices on your network, like 192.168.1.100, when they connect to your network. In your home, at school, or at work, this address is only used on your local area network (LAN). The outside world can’t see this address.
Also Read: How To Find Your IP Address on Windows 11 PC
Method 1: Find Your IP Address by going to Windows Settings.
Setting up a computer with Windows 11 is the best way to find your IP address quickly. Here are the steps:
1. Go to Start menu. On Windows 11, you can press the “Win key + I” keyboard shortcut to open it.
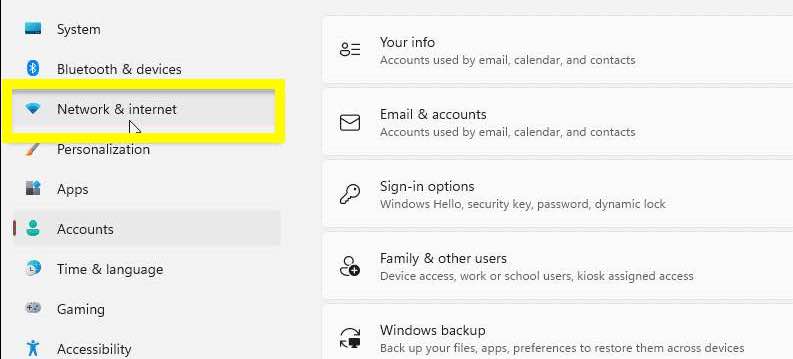
2. In the left sidebar, click on “Network and Internet.” Then, when you’re there, move to the “Network and Internet.” Then, if you are connected to a wireless network, click on “WiFi” on the right side if you see it. If you have a wired Ethernet connection, click “Ethernet.”
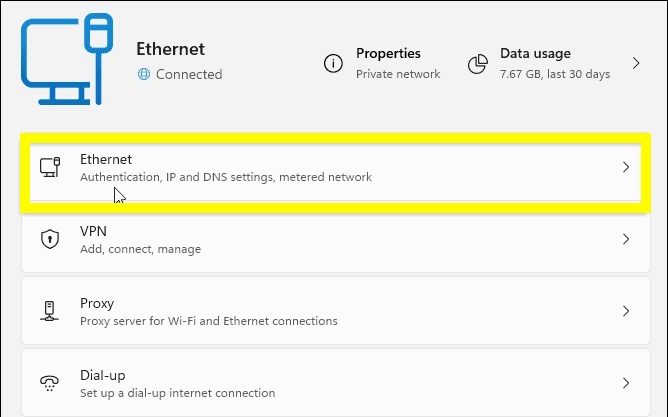
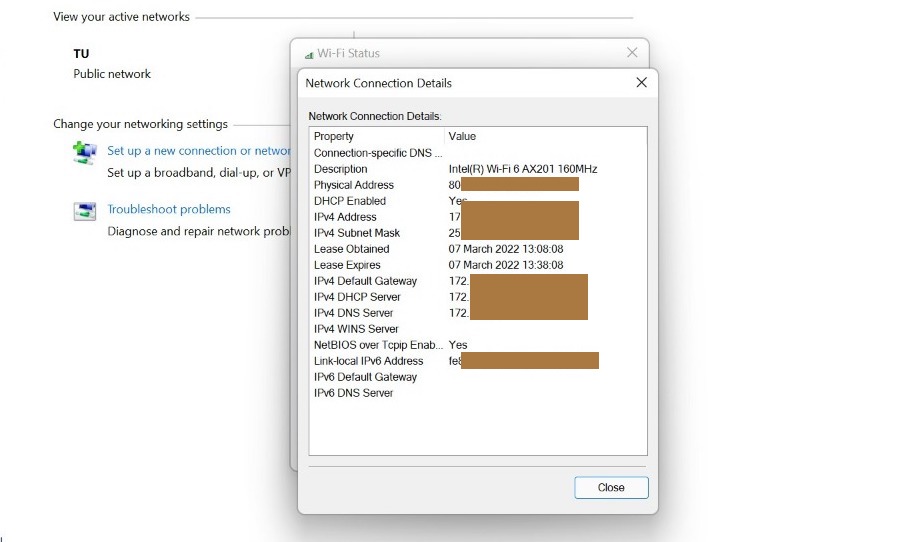
3. Then, Tap on the name of the WiFi network that you are currently using on your PC to connect to it.

4. The IPv4 address. Now, scroll down to find it. That is the IP address of your Windows 11 computer in your own neighbourhood. There is also a local IPv6 address, but you won’t use it very often when you’re in your own home.
Also Read: Miracast Not Working In Windows 11? Try These Fixes
A few things from the old Control Panel are still there, even though Windows 11 is putting them on the Windows Settings page. As for this guide, one of them is networking. This will come in handy.
1. First, press the Windows key once. Then, type “control panel” into the search bar and click on it.
2. Then, select “Network and Internet.” 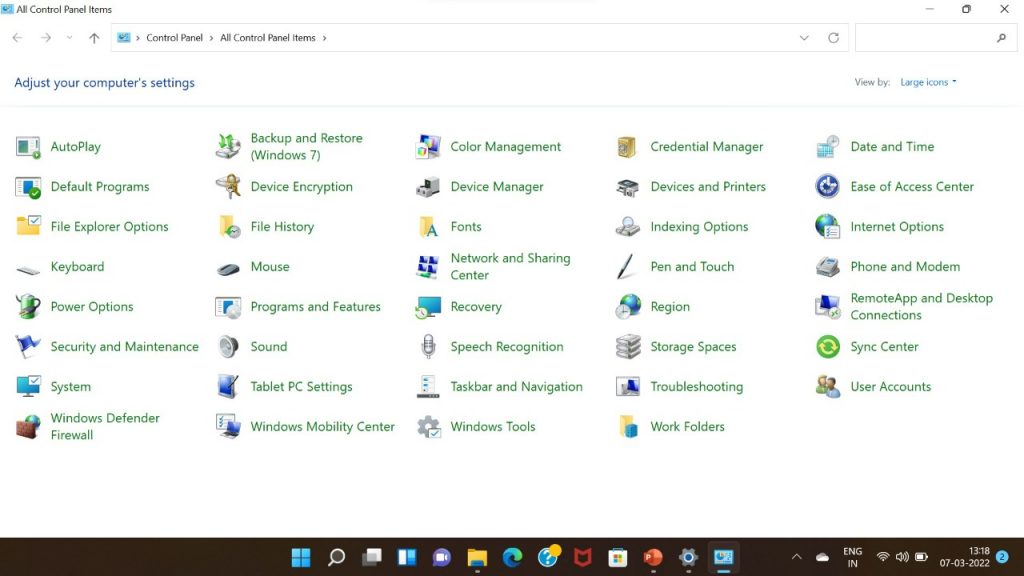
3. Then, check to “Network and Sharing Center” and click on it.
4. In this area, click on the WiFi access point to which your computer is linked. An Ethernet connection will show up if you are on a wired network, so you can connect.
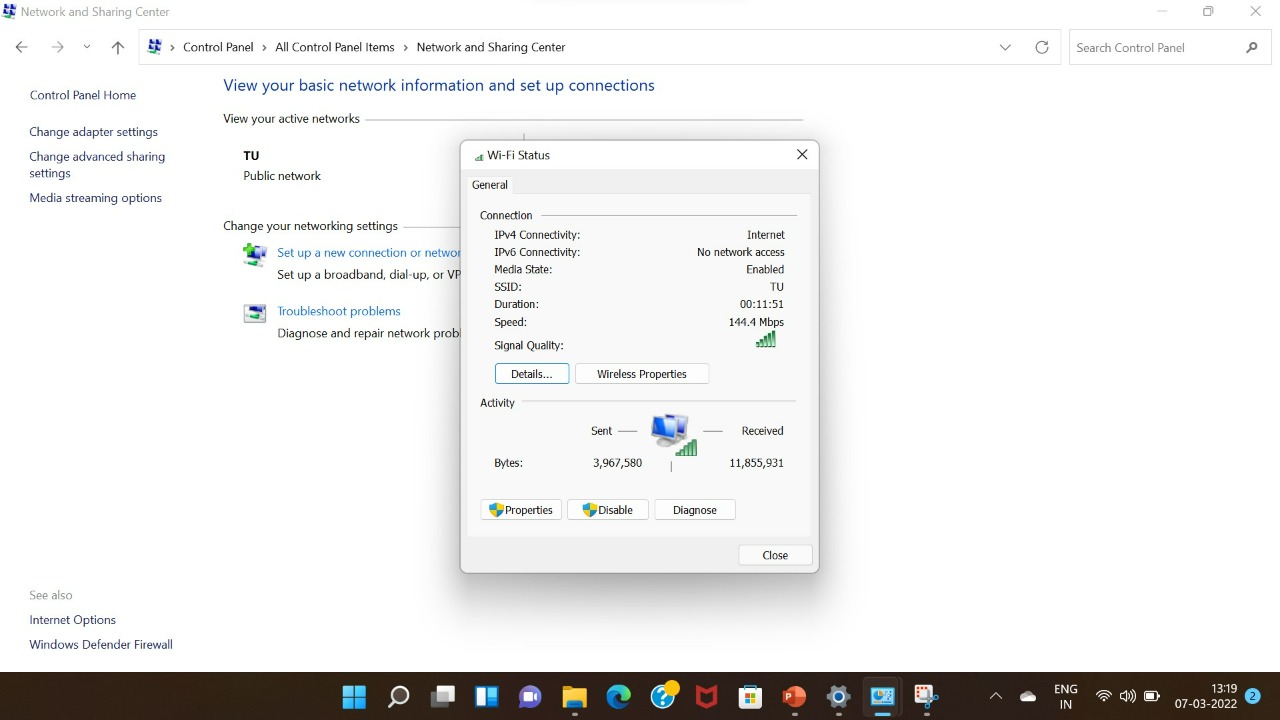
5. Select “Details” from the pop-up box that appears.
6. This is the IPv4 address. That’s the IP address of your Windows 11 computer in your own neighbourhood.
Method 3: Use the Task Manager in Windows 11 to find your IP address.
The Task Manager can also help you find your IP address in Windows 11. If you don’t want to go into Settings or the Control Panel, you can also use it. Take these steps:
1. First, open the Task Manager window on your computer with the keyboard shortcut “Win + Shift + Esc.” You can right-click on the Start icon and choose “Task Manager” from the menu that comes up.
2. When the Task Manager comes up, go to the “Performance” tab and click on “Performance.”
3. On the left pane of the “Performance” tab, click on “Wi-Fi” or “Ethernet,” depending on your internet connection. Right now, you can see both your IPv4 and IPv6 addresses at the bottom of the right-hand side.
That’s all. You can now use this IP address on your computer.
Also Read: How To Increase VRAM In Windows 11
Checking your IP address in Windows 11 is also very easy. You can do it through the Command Prompt. Here are the steps:
1. To start, press the Windows key once. Type “cmd” in the Windows search box. Now, go to “Command Prompt” and click on “OK.”
2. In the Command Prompt window, type ipconfig and press enter.
3. A lot of information will be shown, but you need to look for “Wi-Fi LAN adapter” if you’re using Wi-Fi to find it. if you want to use Ethernet, look for “Ethernet adapter” in the list This is where you will find your computer’s IPv4 address, which is your computer’s local IP address.
Also Read: How To Add Or Remove Widgets In Windows 11
If you want to find the local and public IP addresses of your computer, there are six simple ways to do it. For most people, the Windows Settings page or the Task Manager will give them all the information they need to know about what is going on. This doesn’t mean that Command Prompt won’t be able to show you more about your network if you want to.


