


 Header Through Cloudflare")


![[Interview] The Future of Screen Experiences ②: From Watching to Understanding With Vision AI Companion](https://www.hawkdive.com/media/samsung-tvs-and-displays-vision-ai-companion-interview_thumb932-218x150.jpg "Exploring Vision AI Companion: Transforming Screen Experiences for Users")


 High CPU Usage On Windows 10/11")
If you’ve witnessed that the WMI Provider Host is utilizing a considerable share of your PC’s CPU, you may have furthermore experienced a deceleration in your PC’s performance when its usage peaks in the Task Manager. You’re not alone, as numerous Windows 10 users have reported this problem.
WMI Host, an integral feature of the Windows operating system, furthermore referred to as Windows Management Instrumentation, is a fundamental system utility that plays a necessary function in fostering the smooth operation of Windows applications. If it malfunctions, numerous Windows features may become inoperable. In severe cases, your computer may even become unusable.
The pursuit of this article is to assist you in understanding WMI Provider Host, and the rationale for why it consumes a consequential share of CPU resources. And how to fix the high CPU usage on Windows 10 concern linked with WMI Provider Host.

What is the WMI Provider Host and why does it utilize a considerable portion of CPU?
The WMI Provider Host is a service provided by Windows which authorizes other applications to solicit information and data about your computer’s operating system in a standardized way. This service is very important because many features and applications on your computer rely on it to function properly. If the WMI Provider Host service stops or malfunctions, it can cause severe issues with your computer’s operating system.
Occasionally, you may witness that the WMI Provider Host is utilizing a lot of your computer’s CPU resources. This is usually because another application is soliciting a lot of data or information via WMI.
Nonetheless, if the high CPU usage prevails for a long span, it could signify that something is faulty with your computer. In this matter, you may require to investigate the cause of the high CPU usage and accept reasonable measures to address it.
Also Read- How To Uninstall And Reinstall Widgets In Windows 11
How to Revive WMI Provider Host High CPU Usage On Windows 10 Operating System?
1. Restart Your WMI Service
If you experience high CPU usage on Windows 10, restarting your computer is the initial solution to consider since the WMI service will furthermore restart with it. Alternatively, you may restart the WMI Provider Host alone without rebooting or restarting your computer.
Follow the steps below to Restart your WMI service:
Step 1: First, you need to hit Win + R to open the Run prompt and jot down or paste services.msc in the search box and press enter.

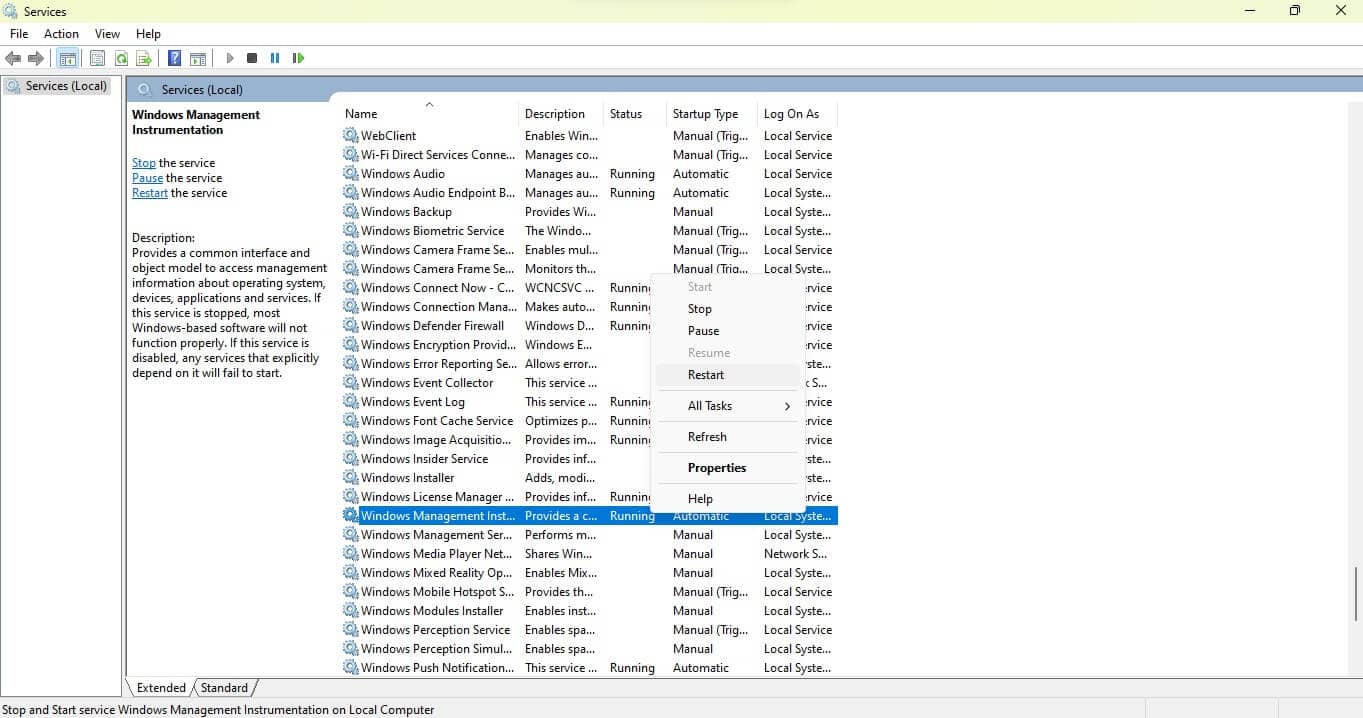
Step 2: Now you have to scroll down and locate Window Management Instrumentation Services in the Services window and right-click on it. Then in the submenu, click on Restart to restart Window Management Instrumentation (WMI).
Sometimes you get a confirmation prompt once you tap Restart. So simply tap Yes to proceed with the restart and then the services dashboard will then commence the restart of WMI services and additional linked services.
Lastly, head to the Task Manager to see if the spiked CPU usage problem induced by WMI Provider Host has been resolved.
Also Read- How To Reset And Clear “Notifications From Apps And Other Senders” List In Windows 11
2. Boot your Computer into Safe Mode
When you troubleshoot your Windows 10 computer in Safe Mode, it can assist you to isolate and determine the root grounds of issues you may be experiencing. Safe Mode starts your computer with a minimal set of drivers, services, and applications. This can help you determine if a problem is being caused by a specific program or driver. Further, you can Boot your PC in safe mode by adhering to the steps provided below:
Method to Safe Boot Your Windows System
Step 1: You have to hit Win + R to open the Run prompt and write down or paste this command msconfig into the search box.
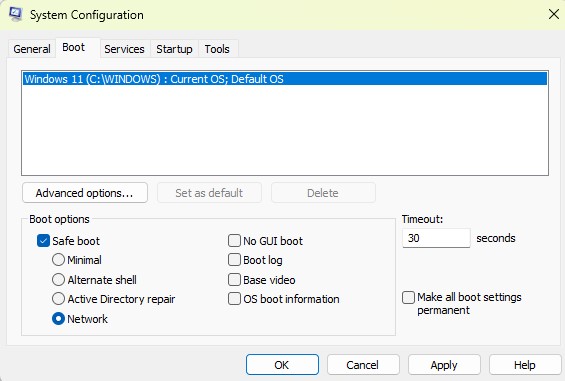
Step 2: After that, you need to click on the Boot tab located next to General. Then, in the Boot tab, check the box for Safe Boot and Network. Finally, tap Apply, and then finally click OK to save it.
Step 3: Before you tap on Restart make sure to Back up all your data and then enter Safe mode.

Step 4: Now you need to hit Win + X key together while in Safe Mode and click on Terminal (Admin).
Step 5: After that, in the terminal, write down or paste this command msdt.exe -id MaintenanceDiagnostic and press enter to run the command. Once you enter the command, a troubleshooting window will pop up, tap Next on the window to commence the troubleshooting process.
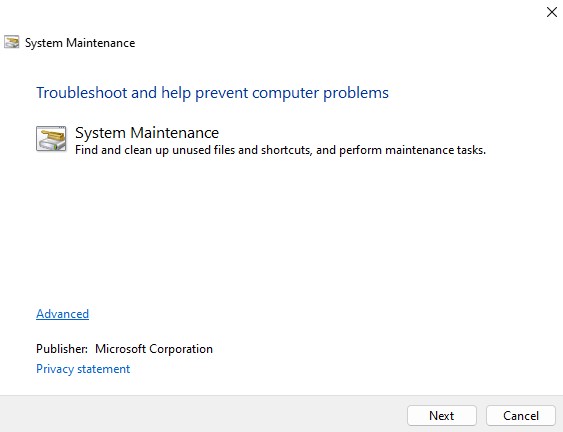
Step 6: Now you require to follow the instructions provided by the troubleshooter to repair any issues detected on your system. Then, in the same PowerShell window, type or paste this command msdt.exe /id PerformanceDiagnostic and hit Enter.
Step 7: Now hitting enter will open a Performance troubleshooting window, where you should click Next to proceed with the troubleshooting. And then follow any instructions provided by the system if it notifies you that changes require to be made.
Step 8: Once the troubleshooting procedure is finished, reboot your PC and proceed into normal mode. To do this, go to the Boot tab as you did in the initial steps, uncheck the box for Safe Boot, click Apply and OK to save the changes, and then restart your computer in normal mode.
Also Read- Change Network Adapter Interface Connection Priority Order In Windows 11
3. Perform an antivirus scan
WMI Provider Host is a vital system process in Windows 10 that equips myriad management and monitoring services. Nonetheless, at times, users may experience a high CPU usage issue induced by the WMI Provider Host process. This issue can harshly impact the performance of the computer, driving it to slow down significantly.
One conceivable solution to this issue is to perform an antivirus scan on your computer. Antivirus software such as TotalAV Antivirus, Norton Antivirus, or McAfee Free Antivirus is developed to capture and terminate malicious software. Such as viruses and malware, which can induce diverse problems on your computer, including high CPU usage.
If the antivirus scan detects any malware or viruses on your computer, it’s crucial to remove them completely to resolve the high CPU usage issue. The antivirus software removes any detected threats automatically or you can even remove them manually.
Use the Built-in Windows Security
If you are not comfortable with the third-party tools you can use the robust built-in Windows security scan on your Windows 10 by typing Windows security in the search box located in the taskbar.
Then, click on Open to open Windows Security and then click on Scan Now button to access the Virus & threat protection menu.

After that, proceed to the scan options and select Full Scan to perform a comprehensive virus scan of your computer.
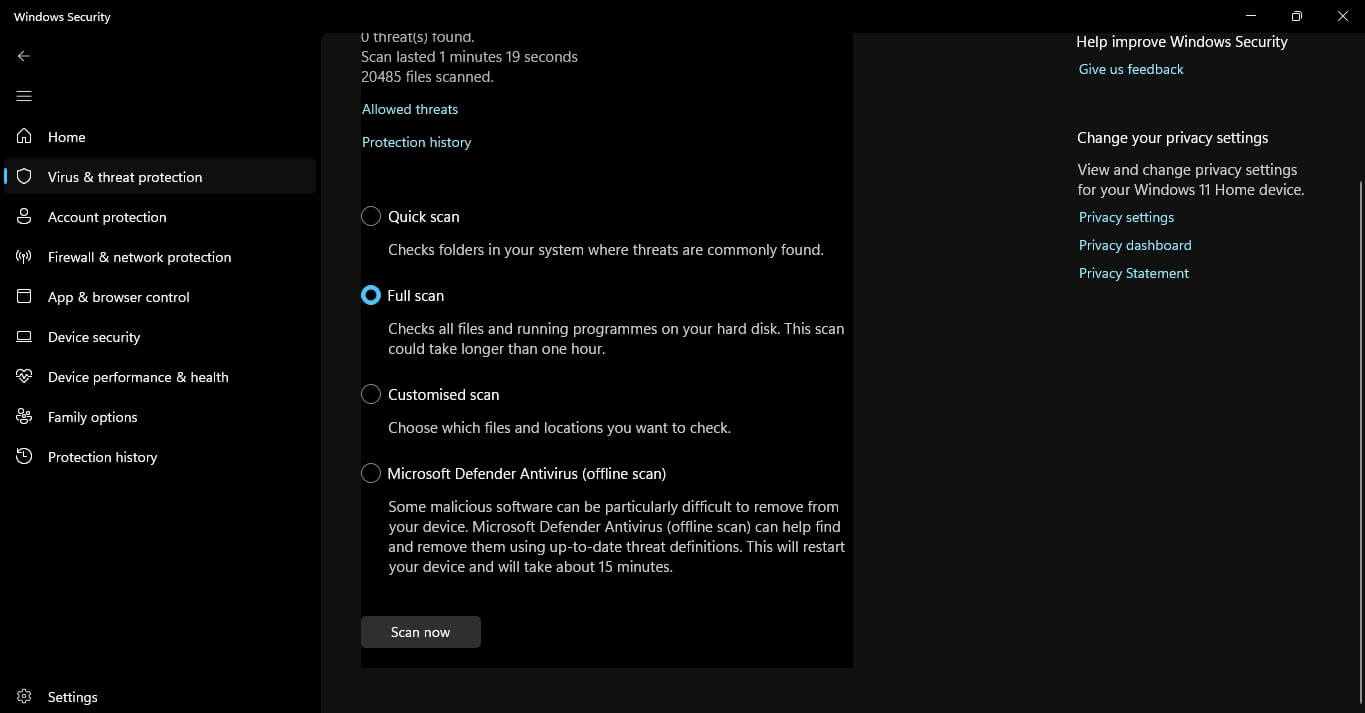
Now you require to tap on Scan Now to initiate the anti-virus scan. This may take between 15 to 40 minutes depending on the size of your computer’s files and folders. If any threats are found during the scan, you will be prompted to take necessary actions. Simply, follow the suggested actions and restart your computer.
Also Read- Remote Assistance With Quick Assist App In Windows 11- A Complete Guide
4. Resolving WMI Provider Host High CPU Usage with SFC Tool
The System File Checker (SFC) is a free built-in tool equipped by Windows that assists identify and repair corrupt or missing system files. In the case of the WMI Provider Host’s high CPU usage error. The problem may be induced by corrupted system files. In these circumstances, utilizing the SFC tool can be a viable solution.
To use the SFC tool, follow the steps mentioned below:
Step 1: First you need to jot down cmd in the search box located in the taskbar. You will notice in the right pane the option to Command Prompt. And there you will see the option of Run as Administrator just click on it. And it will open the Command Prompt in your Windows 10 Operating System.
Step 2: Now in the Command prompt window paste or jot down this command sfc /scannow and hit enter to run the command.
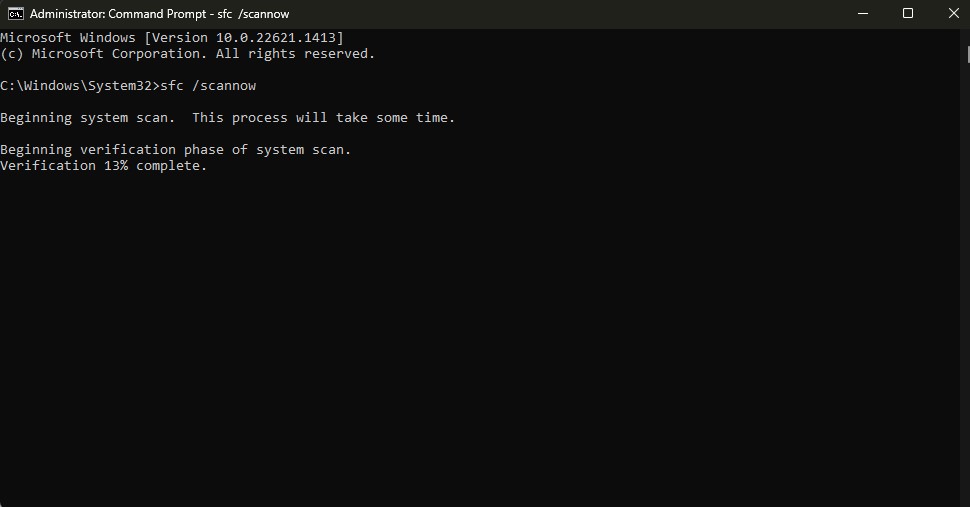
Then you will notice that the Windows File System Checker initiates a diagnosis of your computer’s system files to determine any corruptions and subsequently execute repairs on them.

5. Perform a Clean Installation of Windows 10/11
If the WMI (Windows Management Instrumentation) service, is consuming a high amount of CPU resources even after trying various troubleshooting steps. Then the last resort would be to completely reinstall the Windows operating system. Ensure that you back up all your important files before proceeding with the reinstallation process.
Performing a fresh installation of Windows 10/11 will wipe the entire hard drive and start with a clean slate and fix the high CPU usage on Windows 10 issue. This process can help to resolve issues related to software corruption, and conflicts. And other system errors that may be causing the high CPU usage of the WMI service. It is important to note that this step should only be taken as a last resort. And all other possible solutions that are mentioned above should be tried first.
Also Read- How To Install Or Uninstall VBScript Feature In Windows 11
Why is the WMI provider host causing 100% CPU usage?
CPUs or Central Processing Units in modern computers are designed to function safely at 100% CPU utilization. This means that they are apt of running at full capacity without overheating or inducing damage to the hardware. Nonetheless, when a CPU is running at 100% utilization for prolonged periods, it can impact the performance of high-intensity games and applications. As the CPU may not have enough processing power left to handle other tasks efficiently.
Nonetheless, some CPU issues may mandate hardware fixes such as enhancing cooling, addressing dust buildup, or upgrading hardware. It’s important to seek technical expertise for the suitable diagnosis and resolution of CPU issues.
Can low RAM cause high CPU usage?
RAM (Random Access Memory) is a sort of computer memory that is utilized to temporarily stow data that is being actively used by the CPU while a computer is powered on. When a computer is low on RAM, it may not have sufficient space to store all the data it needs to actively process. Thus, resulting in what stands known as “memory swapping” or “page swapping”. This denotes that some data that would normally store in RAM may require a temporary move to the computer’s hard drive. Or different storage devices, which is a slower process corresponding to accessing data from RAM.
When a computer is low on RAM and has to lean on memory swapping. It can put further stress on the CPU. The CPU has to devour more time waiting for data to swap in and out of RAM. This can result in inflated CPU usage. This is because the CPU has to function harder to counteract the gradual data access times. Therefore, directing to higher CPU usage.
Thus, adding additional RAM to a computer can assist alleviate the issue of low memory and lessen CPU usage. With more RAM, the computer can store more data in memory, downsizing the requirement for memory swapping and authorizing the CPU to access data more quickly. As a consequence, CPU usage may decrease. As the CPU does not have to work as strongly to compensate for the lack of memory.
Also Read- How To See List Of Available Restore Points In Windows 11


