


 Header Through Cloudflare")


Windows 11 from Microsoft comes with the special feature known as Quick Settings. This feature is enabled by default and can be accessed in several settings on the computer, including Accessibility, Wi-Fi, Bluetooth, Battery saver, Airplane mode, and many more.
This setting is very helpful which saves time for the user from going to Settings and searching for the relevant option and then taking that option by going to the Settings app. Instead, the users can now change the settings quickly from the Quick settings panel easily by clicking on the Taskbar.
But few users are not yet aware of this option in the settings. Some of them get annoyed by the frequent opening of it in middle accidentally. If you are one of those users, then it is good news for the users that this setting can be disabled easily by changing the settings of Quick settings.
There are a few steps to disable the feature by taking a look at one using the Registry Editor. In this article, we will be guiding you on how to disable and enable the Quick settings in Windows 11 by built-in Registry Editor.
When you have disabled this feature in your computer you can neither open this setting by pressing the hotkey (Win+ A) nor can open Quick settings using the system tray icons such as Wi-Fi, Bluetooth, Volume, or Battery. But nothing to worry about if you want to use it again sometime you can easily enable it.
Also Read: How To Turn On/Off Smart App Control In Windows 11
How to enable and disable the Quick settings in Windows 11 computer
There are majorly two options to enable and disable the Quick settings in Windows 11 computers. These are as follows:
- Windows Registry Editor
- Group Policy Editor
Firstly, Let’s start with Windows Registry Editor
To disable Quick settings in Windows 11 through the Registry editor
- Firstly, open the Registry Editor on your Windows 11 computer. This can be opened by pressing the Win+ R key on the keyboard.
- Later when Run Prompt appears, enter “Regedit” and tap on the enter key.
- When the Registry Editor opens, head towards the following location:
HKEY_LOCAL_MACHINE\SOFTWARE\Policies\Microsoft\Windows
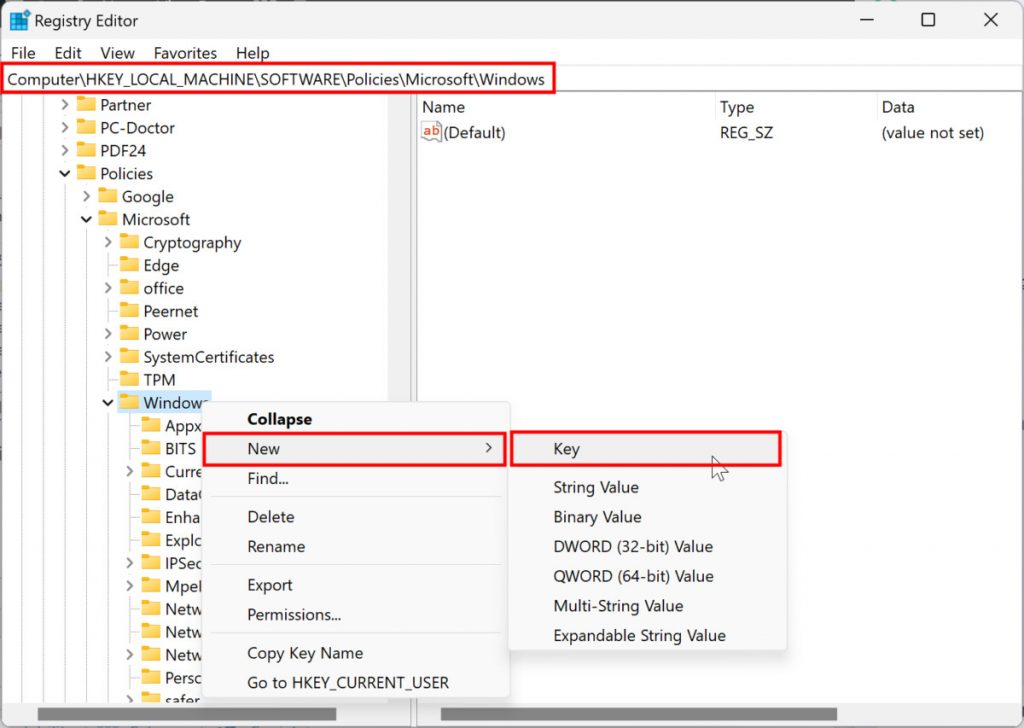
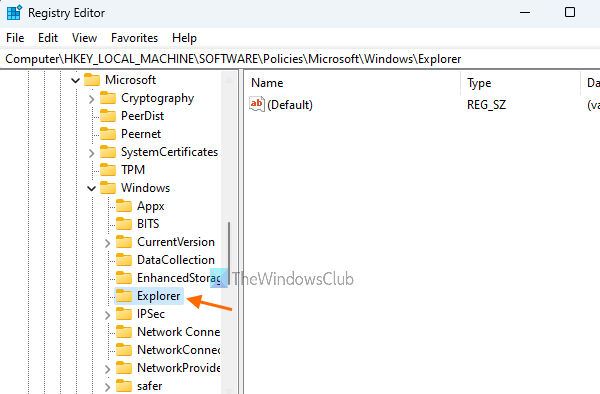
- After this, right-click on the Windows folder and select New under this Key option and name the newly created key as “Explorer”. If this windows folder is already present there then skip this step

- Further right-click on the “Explorer” and select New under this click on the DWORD(32-bit) value. Name the newly created REG-DWORD as “DisableControlCenter”.
- Now double click on the DisableControlCenter REG-DWORD and change its Value data to 1 and then click on the “OK” button.
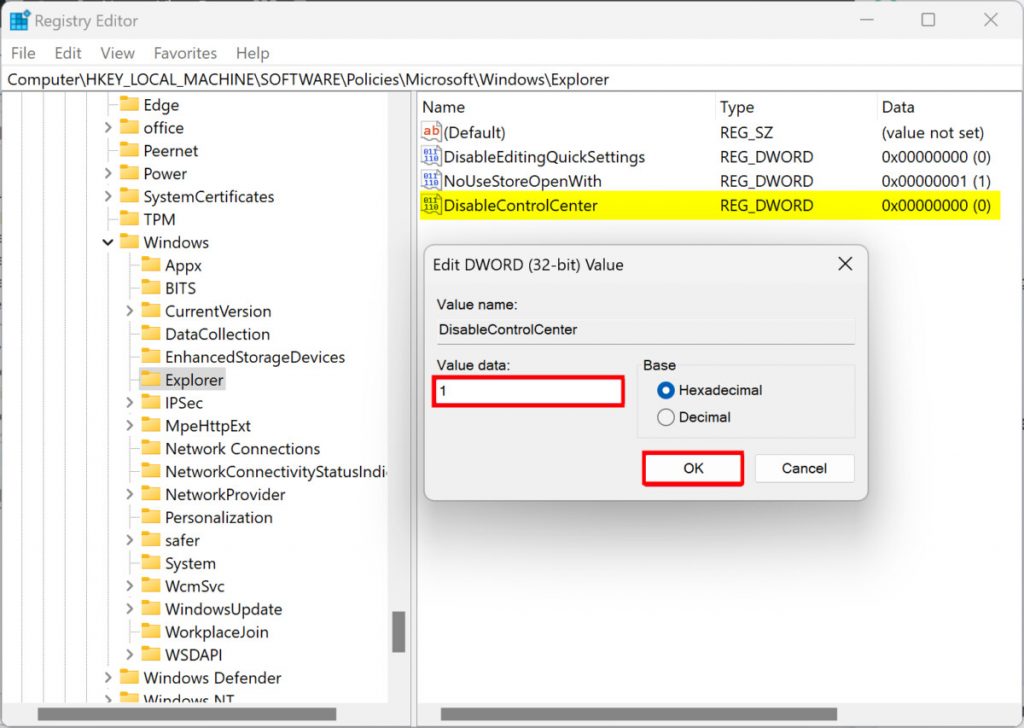
Therefore, restart your Windows 11-powered computer after making changes to make the changes take effect. Later, when your system is restarted you will notice that the Quick settings panel is disabled in the taskbar and you can no longer use it. If you want to again use this Quick setting then you have to enable the Quick settings menu back by changing the Value data for DisableContorlCenter from 1 to 0 which will bring the Quick settings back to Windows 11 computer.
Also Read: How To Screen Record On Windows 11 Without Downloading Software
To enable the Quick settings in Windows 11 through Registry Editor
To use or enable the Quick settings in windows you can follow the following steps:
- Open Windows Registry editor
- Further, Select the Windows key under it
- Delete the Explorer key
- Later, set the DisableControlCenter value data from 1 to 0.
- Press “OK” button
- Restart your Windows 11 computer and enable the changes made
- You start using the Quick settings again
How to enable and disable the Quick settings on Windows 11 through Group Policy Editor
The steps used to enable or disable the Quick settings on Windows 11 through Group Policy Editor:
- Firstly, open the Group Policy Editor window using the search box or Run command box or in any other way.
- After this, select a folder named Start Menu and Taskbar. The following path is used to open the folder:
User Configuration > Administrative Templet > Start menu and Taskbar
- Double click on the Remove Quick settings option available in the right section which opens a separate window.
- Here, select the Enabled option present in the top left section of the window.

- The last step is to press the “OK” button.
- This will save the changes and you will have to restart the windows to save the changes and observe the changes that occurred.
- This will disable the Quick settings in Windows 11-powered computers through the Group Policy Editor.
By following the above steps you can enable the Quick settings. Click on the Not Configured option present in the Remove Quick Settings Window. Finally, click on the “OK” button and you will be able to access the Quick settings panel. Restart your computer.
Also Read: XDA Basics: How To Record Your Screen In Windows 11?
How to change the Quick settings in Windows 11
If not satisfied with the default option and icons present in the Quick settings panel of Windows 11. Then you can easily edit these options by changing them by using the Edit Quick Settings option icon present in the Quick Settings. There is a pencil icon that is available just before settings are present in the Quick settings panel. After clicking that option you can unpin the icon will be visible for all the added icons to remove them. You will also see an Add option that lets you enter any of the quick settings. Once all the required settings are added you can press on the Done option to save them.
Also Read: 9 Ways To Fix Transparency Effect On Windows 11
How to reset the Quick settings
To reset the Quick Settings in Windows 11, we should need to create a BAT (*.bat) file. Once the BAT file is created, run it as administrator to reset the Quick settings panel. Before running that file you need to back up the Windows Registry or create a restore point that will help you to restore the unexpected changes if it happens.
Coming to the conclusion part, this article mainly gives you the information about enabling and disabling the Quick settings on Windows 11 through two methods such as Registry editor and Group policy editor. Hope you liked the article, for any suggestions and ideas reach us in our comment section. Happy Reading!


