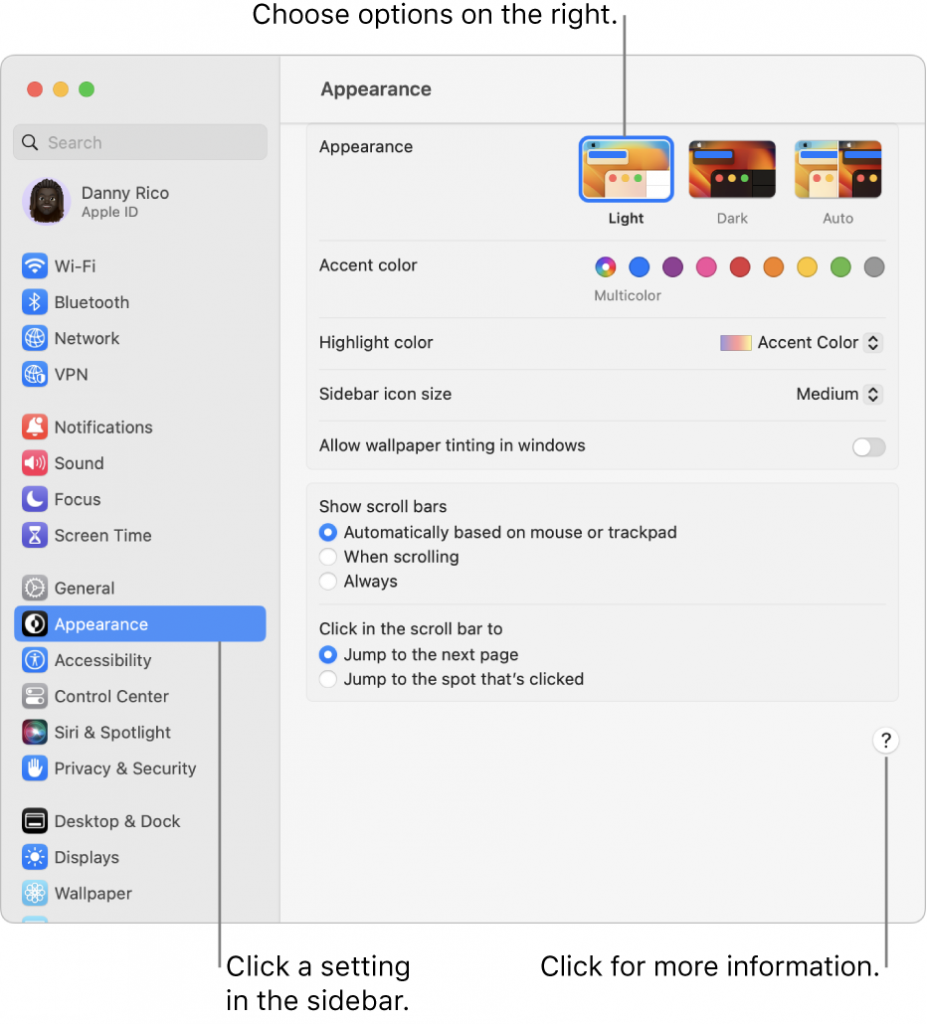
Apple introduced a brand-new app called System Settings in place of the well-known System Preferences app in macOS Ventura. Long-time Mac users may initially struggle with the completely new interface and the relocation of numerous settings. Nevertheless, VoiceOver may access this program in its entirety. The new layout might feel comfortable if you’ve used iOS or iPadOS.
On the Mac, there are many different preferences, settings, and options, and many of them are grouped in the System Settings app. This app, which you can access from the Apple menu, provides many settings for altering the features on your Mac. This article will describe the new system setting apps on macOS Ventura and how to operate the System Settings app.
Also Read: How To Play Background Sounds On macOS Ventura
Changes to the Preferences Pane
The most obvious change you can see right away is the new design of the preference pane. You’ll notice that the System Settings app looks a lot like an iPhone or an iPad if you’re familiar with iOS and iPad. The System Settings app on Ventura features a sidebar on the left to navigate instead of the tiled icon view used in prior versions of macOS Monterey and before.
The second change focuses on the moved areas in the preferences menu. There were 31 preference sections on Monterey’s System Preferences. Still, some are now at the bottom of another segment, and some previously contained in a preference entry now have their entries on the pane.
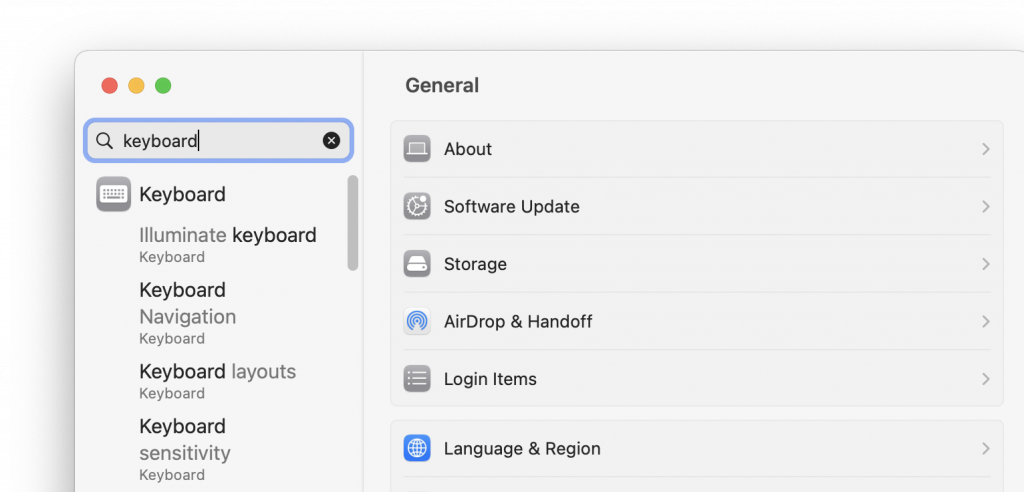
Moreover, macOS Ventura has changed the organization of some preference sections by merging, dividing, and splitting them. The search bar has also been moved from its previous location in the preferences pane’s upper right corner to the top of the sidebar, directly above the user profile. On macOS, Ventura, for example, network locations can be removed, rearranged, and switched to a list view to change system preferences.
Also Read: How To Speed Up macOS Ventura
Administrator-accessible settings
The old System Preferences app had a padlock icon that you clicked to make changes; the settings that were only accessible to administrators were dimmed. This is no longer available. The scenes that demand administrative privileges are hidden from view, but a dialogue box appears when you attempt to access them.
Only administrators can access advanced network settings, user account creation, various security and privacy options, and other settings. It’s noteworthy that Apple has made several system-wide options available to all users, at least by default. You can modify this by selecting Privacy & Security, navigating to the bottom of the window, and selecting the Advanced option.

Also Read: macOS Ventura: What’s New With Spotlight?
Searching settings
Finding specific settings in the outdated System Preferences was difficult, and the same was true for the iPhone and iPad. The System Settings search area, located at the top of the sidebar, allows you to see (almost) anything. Apple has now fixed the problem.
Click on a search result to access its settings. If a button in a settings pane can be used to access the setting, you’re looking for, clicking the button in the search results shows the dialogue box that would appear if you did.
Apple ID settings
The settings for your Apple ID are located at the top of the sidebar and are very important. To view iCloud and Apple ID settings, click this entry. In Password & Security, you can modify your Apple ID password and the settings for your name, phone number, email address, and address. You can also set up trusted phone numbers, enable two-factor authentication if you haven’t already, set up account recovery and legacy contacts, and more on this page.
All of your iCloud-enabled devices are listed at the bottom. Click on one of them to view its details, including its serial number, any credit cards it has set up for Apple Pay, and its Find My status. Click Remove from Account if you come across a device that you don’t currently own listed.
Also Read: How To Use Desk View With iOS 16 And macOS Ventura
Tips for the macOS Ventura System Settings app
We’ll give you a few handy tips for the new macO Ventura System Settings in this section so you can quickly find things in the app.
Utilize the search bar: The System Settings have moved a lot of settings, so it may take some time to find the one you’re looking for if it’s hidden under another set of menus. For example, you may look for the Login items in the General sections when they belonged to the User & Groups in Monterey and earlier versions. You have a list of all relevant settings to choose from when you type the settings in the search box.

List settings in alphabetical order using the View menu: Some Mac users complain that the sidebar’s settings need to be fixed and that they get lost trying to find them. To find the target setting quickly, you can view these settings alphabetically by selecting View from the top menu bar.
Find specific settings quickly on a Mac using Siri or Spotlight search: You can use the built-in Spotlight search on macOS Ventura to access particular settings or use Siri to modify system settings without opening the System Settings app.
Also Read: 12 Latest iOS 16 And macOS Apps You Should Download
Conclusion
That’s all about the revamped system preferences app in macOS Ventura now known as System Settings. What are the particular features you loved in this update? Don’t forget to mention them in the comments.


![The Apex Legends Digital Issue Is Now Live! Apex Legends - Change Audio Language Without Changing Text [Guide]](https://www.hawkdive.com/media/5-Basic-Tips-To-Get-Better-On-Apex-Legends-1-218x150.jpg)


![The Role Of Color Schemes In Web Design [Full Guide] web design minimalist](https://www.hawkdive.com/media/web-design-minimalist-218x150.jpg)

