


 Header Through Cloudflare")


The iOS Camera app automatically utilizes GPS to log the precise position when a photo is taken on an iPhone or iPad. This is quite helpful since it helps you to organize your extensive photo collection by date and geographical area. It is useful for organizing photo shoots and keeping tabs on friends and family throughout the years. While geotagged photo metadata is generally appreciated, there are occasions when it is not desired.
The iPhone automatically geotags any photos you take. They may also see the location information when you share the image with others. You may edit a photo’s geolocation before sharing it if you don’t want the location shown in the geotag.
Why should you be concerned with photo metadata?
Metadata describes the data that accompanies a photograph. Location, camera model, time and date, and other metadata are all included.
If the photo doesn’t include a date and time, it may be because it wasn’t set properly on your device or because you didn’t take the photo yourself.
Photos may be quickly located, sorted, searched for, and identified based on various criteria, including date, time, location, and more, after the appropriate or custom information has been included.
In addition, if you wish to protect your privacy while sharing photos by email, AirDrop, or any other service that does not compress the picture, you should probably alter or remove the geotag information from the image.
Journalists mistakenly used photo information to reveal the whereabouts of John McAfee, the rich and “semi-fugitive” inventor of the popular McAfee antivirus. We’re going to assume you’re not a fugitive, but there are situations when you might wish to hide your location in photos.
Change your iPhone’s photo location.
When snapping an image with an iPhone, its precise position is also recorded. The ability to do so streamlines the process of locating all the pictures you’ve ever taken in a specific spot. In addition, geotagging your images makes it simple to organize them.
Do you feel hesitant to tell others where you took the picture? To protect your privacy, you may change your photos’ metadata to include the location where they were shot, such as the city, state, or region.
Let’s look at how to edit the geotag of an iPhone photo in case you realize later that one of your shots was taken in the wrong place (or you want to alter the location information). If you’re going to edit geotagged photos on your iPhone, you’ll need iOS 15 or later.
1. If you wish to edit a photo on your iPhone, you may do so by opening it. 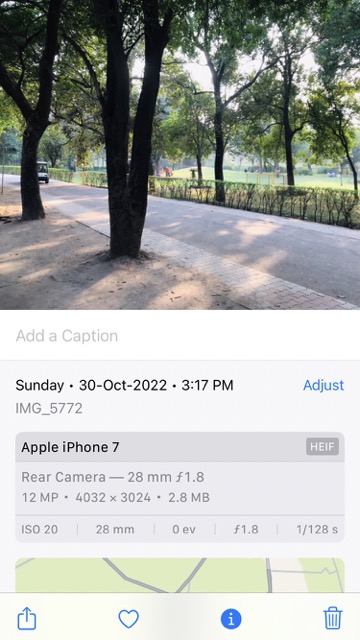
2. To view further details about the image, click the “i” (information) symbol that appears just below it.
3. Next, select the little thumbnail map on the screen’s bottom. 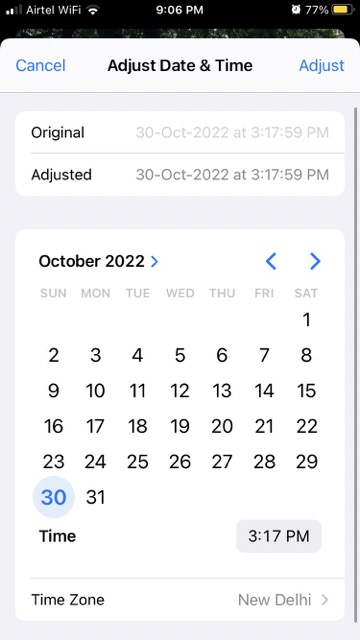
4. To change where a photo was taken, select Edit from the menu in the upper right.
5. Proceed to the following step to look up and add a place.
6. After selecting, you may update the photo’s geolocation on your iPhone. 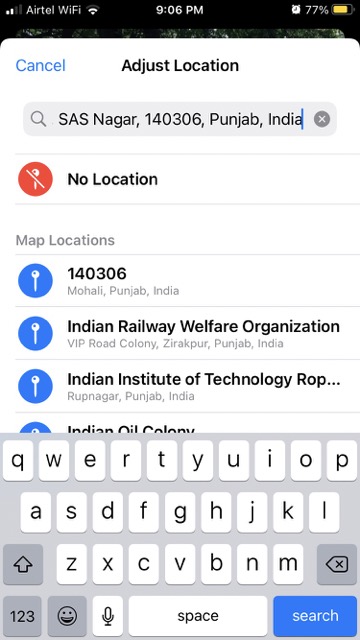 7. However, you cannot geotag numerous photographs at once using this approach. Keep reading to learn how to batch edit a photo’s geotagged.
Metadata can be updated, altered, or deleted.
Quickly alter the information in your photos, including the camera, ISO, software, exposure time, zoom, flash, focal length, camera lens, and more; check the instructions:
1. Launch Exif Metadata and load the picture there.
2. Either select Edit in the upper right or go to the very end of the page and select Edit Exif.
3. You may enter new information or modify existing values by tapping the relevant fields. The last step is to choose “Save.”
4. To get rid of these annotations, select Remove Exif from the menu.
Deleting several photographs’ geolocation data at once (iOS 15)
Even if you can’t view the detailed information for more than one photo at a time, you can still erase the location data from several photographs in your collection. So, here’s what you do:
1. Launch the Photos app and navigate to the album from which you’d like to remove the location data.
2. Click the Select button in the upper right.
3. Tap on each image to select it for editing.
4. As if you were about to transmit or post these pictures online, tap the Share icon in the corner. The conventional balance sheet is displayed.
5. Instead of selecting a sharing option, go to the bottom of the screen and select Adjust Location.
6. Select “No Location” from the menu. All the pictures in the set will have their geotags wiped clean.
Change photo information on Mac
The Photos app on a Mac allows you to edit the photo’s metadata, including the date, time, and location, right there in the app. No additional equipment is required.
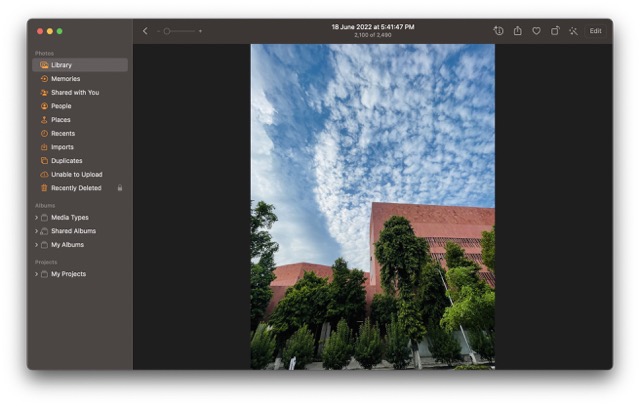
1. If the image is open, right-click it and select Get Info; otherwise, the information may be accessed by clicking the Info I icon in the toolbar.
2. Double-click the date and time at the top of the open new window.
3. Bigger window for viewing. Choose the area you want to modify up top, next to Adjusted. The time and date may be adjusted by choosing a new month, day, or year.
4. Use the right-hand arrows or the keyboard to enter the updated details.

5. After making any necessary changes, click the Adjust button.
If you have Location Services turned on for your iPhone’s Camera app, any photos you take with it will have geotagged information. That’s fantastic since it means you can do location-based searches in your collection of stored photographs in your gallery application.


