


 Header Through Cloudflare")


![[Interview] The Future of Screen Experiences ②: From Watching to Understanding With Vision AI Companion](https://www.hawkdive.com/media/samsung-tvs-and-displays-vision-ai-companion-interview_thumb932-218x150.jpg "Exploring Vision AI Companion: Transforming Screen Experiences for Users")


What is the purpose of BitLocker recovery?
BitLocker recovery is the procedure for regaining access to a BitLocker-protected drive if you are unable to unlock it properly. In a recovery scenario, the following alternatives are available for regaining access to the drive:
- The user has the option of providing the recovery password. If your business permits users to print or store recovery passwords. The user can enter the 48-digit recovery password they printed or stored on a USB drive or in their Microsoft Account online. (Online storage of a recovery password via your Microsoft Account permits only when BitLocker utilises on a non-domain-joined computer).
Data Recovery
- A data recovery agent can unlock the drive using their credentials. If the drive is an operating system drive. It must be mounted on another computer as a data drive before the data recovery agent may unlock it.
- The recovery password can be obtained from AD DS and used to open the drive by a domain administrator. It is suggested to save recovery passwords in AD DS to offer a mechanism for IT professionals to retrieve recovery passwords for drives in their business if necessary. This procedure needs that you have enabled the BitLocker Group Policy setting for this recovery option. Choose how BitLocker-protected operating system drives can be restored in the Local Group Policy Editor by going to Computer Configuration\Administrative Templates\Windows Components\BitLocker Drive Encryption\Operating System Drives.
Also Read: Windows Key Not Working – Fixed
Which recovery key do I have for BitLocker?
Your BitLocker recovery key is a unique 48-digit numerical password that can be used to unlock your system if BitLocker is unable to verify that an attempt to access the system disc is authorised in any other way.
What is the purpose of Windows requesting my BitLocker recovery key?
BitLocker is a Windows encryption solution that safeguards your data against unauthorized access by encrypting your drive and requires one or more authentication methods to unlock it.
When Windows detects an unauthorized attempt to access the data, it will request a BitLocker recovery key. This additional step is a security measure designed to safeguard your data. This can also occur if you make changes to your hardware, firmware, or software that BitLocker does not recognize as an attack. BitLocker may require the additional security of the recovery key in these instances, even if the user is the authorized owner of the device. This is to ensure that the individual attempting to unlock the data is indeed allowed.
Also Read: How To Check For Updates On Windows 11/10?
How to Setup BitLocker on my computer?
BitLocker often begins safeguarding your device in one of three ways:
- Your device is a modern gadget that satisfies the following requirements for automatic encryption: Before BitLocker protection is implemented, your BitLocker recovery key is automatically saved to your Microsoft account.
- BitLocker security (also known as device encryption on some devices) activates by the owner or administrator of your device via the Settings app or Control Panel: In this situation, the user activating BitLocker either picked a location for the key to be saved or (in the case of device encryption) it saves automatically to their Microsoft account.
- The BitLocker protection was enabled on your device by a business or school organization that manages it (now or in the past): The business may hold your BitLocker recovery key in this situation.
- It is always activated by or on behalf of a user who has full administrative access to your device, whether that user is you, another user, or an organization. At the moment of activation, the BitLocker setup process involves the production of a recovery key.
Also Read: Remove “System Requirements Not Met” Watermark Windows 11
How to Encrypt Files with BitLocker on Windows 11
BitLocker can encrypt any drive on a Windows 11 computer, but there is a caveat. BitLocker is only available to Windows 11 Pro, Education, or Enterprise users. To use it, you must upgrade from Home to Pro (or another version).
Follow these steps to use BitLocker to encrypt your local or other fixed discs on Windows 11:
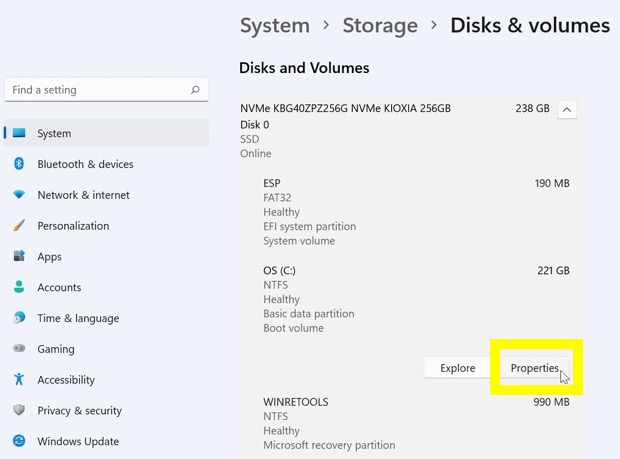
- Click the Start button and then the Settings icon (or hold down the Windows key + I).
- Settings menu, on the left, choose System, and then on the right, click Storage.

- In the Storage management section, click Advanced storage options, then select Disks & volumes.

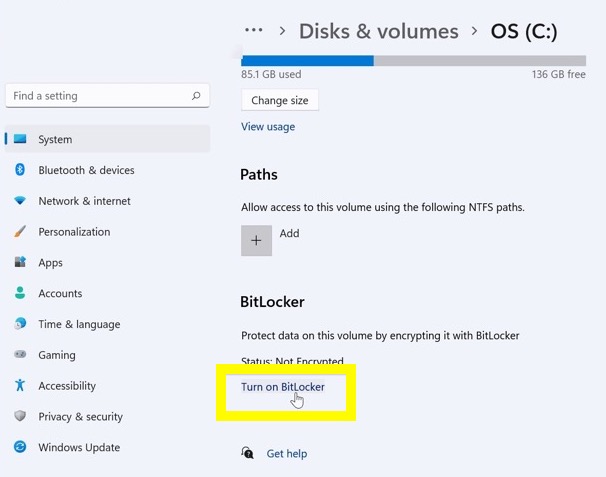
- In the Disks and volumes section, click the Properties button next to the drive you want to encrypt with BitLocker.

- Then, near the bottom of the BitLocker section, choose the Turn on BitLocker option.
- Then, next to the drive you want to encrypt using BitLocker, click Turn on BitLocker.
- After a few system tests, choose a method for backing up your recovery key. You can save the recovery key to your Microsoft account, to a file, or to print it.

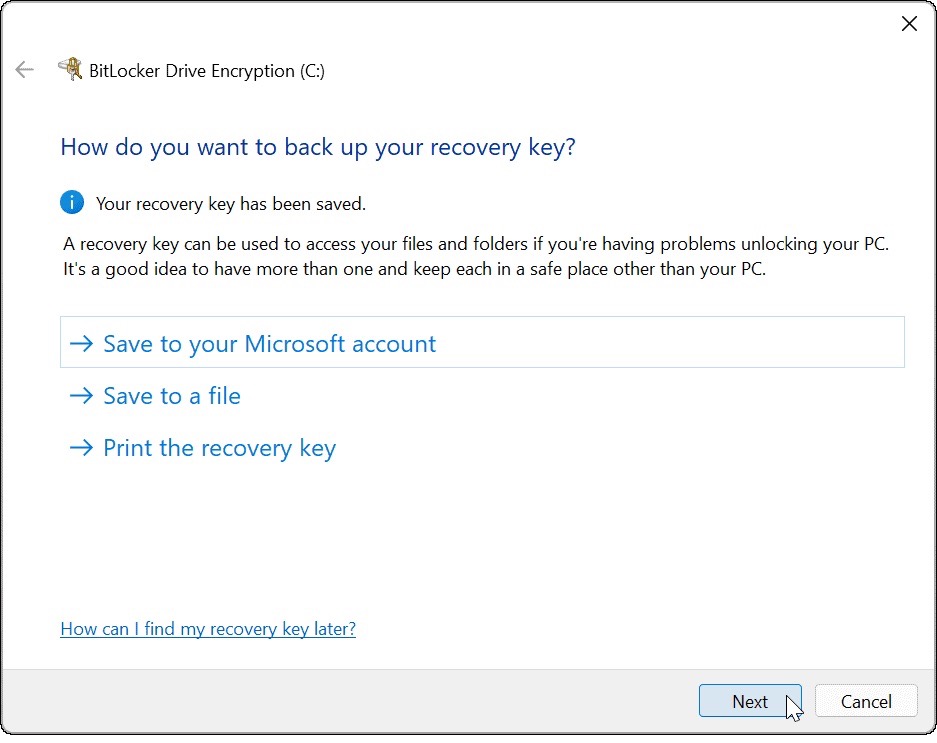
- The recovery key is require to retrieve your files in the absence of a password. Without the recovery key, if you forget your password, you would be unable to access your files. We strongly advise you to do so, though it is entirely optional.
- If you choose to save the 48-digit recovery key, the simplest method is to associate it with your Microsoft account. You’ll be able to recover the key in your account settings’ BitLocker recovery keys area.
Also Read: How To Install Windows 11 On Virtualbox VM
8. After backing up your recovery key, click Next.
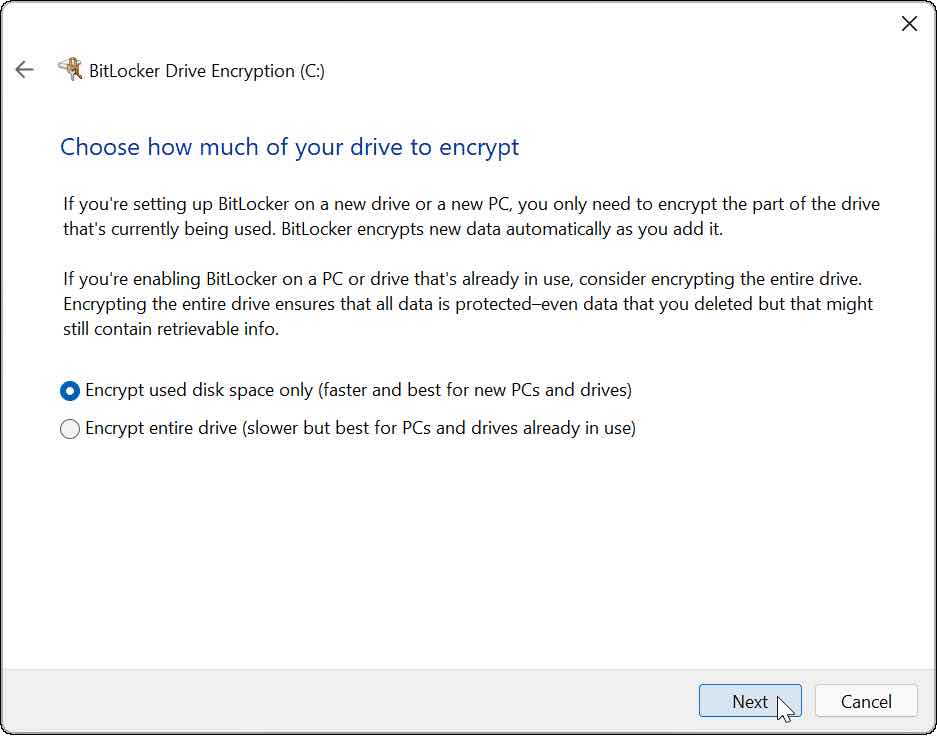
9. On the following screen, be sure to select Encrypt used space only (faster and ideal for new PCs and drives) and click Next.
10. You’ll want to choose an encryption mode. To ensure the highest level of security, select New encryption mode (suitable for fixed discs on this system) as the preferred encryption mode, and then click Next.
- If you’re going to migrate your BitLocker drive to a Windows PC running an older version of Windows (previous to Windows 10 version 1511), you’ll need to pick Compatible mode (optimal for drivers that can transfer from this device).
11. Click Continue after selecting the Run BitLocker system check option.
12. Restart Windows 11 to complete the check and BitLocker encryption process.
13. After restarting your computer. You log in and wait for BitLocker to encrypt your computer. When you launch File Explorer, you’ll notice a lock next to your drive to indicate that this operation is complete.
Also Read:Top 11 Fixes For 0xc0000142 Error Windows 11/10


