


 Header Through Cloudflare")


The mouse is one of your computer’s most important hardware parts because it makes it very easy to interact with your computer. As a result, you must know how to use the mouse pointer’s sensitivity, speed, and design. When you use Windows 11, it’s easy to change the mouse’s settings to make it more comfortable for you.
A lot of things can be done to change the pointer sensitivity or to make the pointer icon look different. You can check by going to Control Panel or the Settings app.
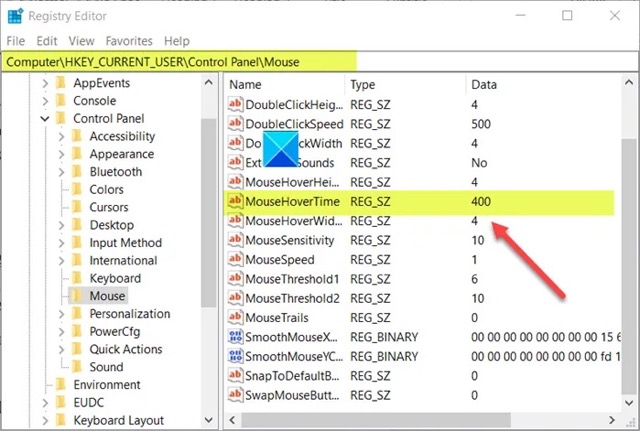
As soon as you move your mouse cursor over a file or folder, a pop-up window comes up that shows all the information about that file or folder. The action can take anywhere from 400 milliseconds to 1000 milliseconds. This is called Mouse Hover Time, and it lets the mouse pointer stay hovered over an item before it does something. There is a setting in Windows 11 that lets you change how long the Mouse Hover time is. On this page, we show you how to change the mouse settings on Windows 11.
Also Read: Fix “node.dll is missing” On Windows 11
How to Change Mouse Hover Time
The thumbnail preview in the Taskbar and the selection of files in the File Explorer both change when the mouse hovers over them. As an example, if you increase the mouse hover time and hover your mouse cursor over an open programme in the Windows 11 Taskbar, a preview will show up, but it will take a few milliseconds.
- Open Registry Editor.
- Navigate to Control Panel\Mouse.
- Double click the MouseHoverTime,in the right pane of the Mouse key.
- For the mouse hover time, Enter time in milliseconds
- Tap OK.
- Close the Registry Editor
- Restart PC.
Please be aware that this method requires you to make changes to the Registry Editor, so be careful. If you make mistakes when you make changes to the Registry Editor, things can get very bad. Before you make any more changes, make a System Restore Point.
In order to open the Run dialogue box, press Win+R at the same time.
When the Registry Editor is open, go to the address HKEY CURRENT USERControl PanelMouse and click on it.
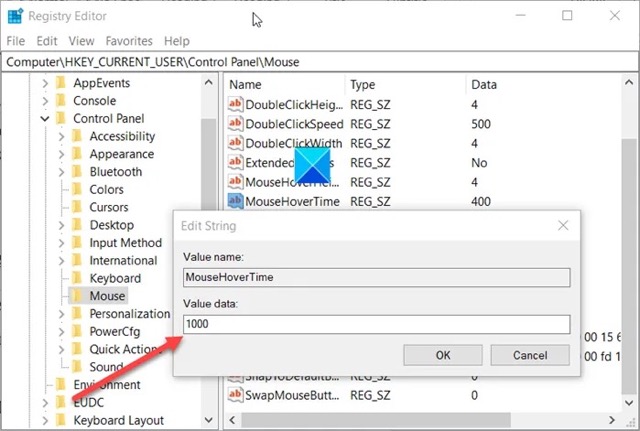
Make sure you are in the right pane of the Mouse key. Double-click the MouseHoverTime string value (REG SZ).
Also Read:Windows Key Not Working In Windows 11? Try These Fixes
Whenever the Edit String box comes up, type in how long you want the mouse to hover. When you start a game, the time is set to 400 milliseconds.
A second is 1000 ms(milliseconds) You can extend this time limit up to 1000ms (milliseconds), which is the same.
The Registry Editor should be closed when you’re done, and you should exit.
You need to restart your computer in order for the changes to take place.
How to Change the Speed of the Mouse in Windows 11
It’s called “mouse sensitivity” in some apps and programmes. The speed of the mouse pointer is called “mouse sensitivity.” Set how quickly the pointer moves across the screen with this setting turned on or off. A high sensitivity setting will make the mouse pointer move faster, and the other way around.
The speed of the mouse pointer should be set to a speed that you’re easy with and can keep track on the screen.
To modify the speed or sensitivity of the mouse on Windows 11:
- Open Start menu, look Settings, and tap the Best match.
- Tap on Bluetooth & devices and then tap on the Mouse tab.
- So, adjust the Mouse pointer speed slider to your preferred speed.
Also Read:How To Uninstall Apps In Windows 11
In Windows 11, how do you change the primary mouse button?
Microsoft Windows, by default, makes the left mouse button the main button. If you need to change the primary mouse button quickly, you can always do so.
It is possible to change the main mouse button on Windows 11:
- Open the Settings app and Tap Bluetooth & devices.
- Click on Mouse tab.
- From the Primary mouse button drop-down menu, you can choose Left or Right as your main button.
The changes should be made right away.
Also Read:How To Use Credential Manager In Windows 11
In Windows 11, how do you change the speed at which you scroll?
It’s very easy to change the scroll speed on your computer if it feels too slow or too fast. In order to change the scroll speed settings, you’ll have to make a big change to your computer.
When you want to change the scroll settings on Windows 11, you do this:
- Tap the Start menu, search for Settings, and then open the Best match app.
- Click on Bluetooth and devices on the left side of the screen. Then click on the Mouse tab.
- Tap on the Roll the mouse wheel to scroll drop-down box to change what happens when you move the mouse wheel. Then choose the right option.
- The Lines to scroll at a time slider lets you change how many lines are scrolled at once.
- It’s the same for scrolling inactive windows when you hover over them. You can select whether or not to use the “Scroll inactive windows when hovering.”
Also Read:Registry Hacks To Improve Your Windows 11 Experience
How to Change the Mouse Pointer on Windows 11 with the Settings App.
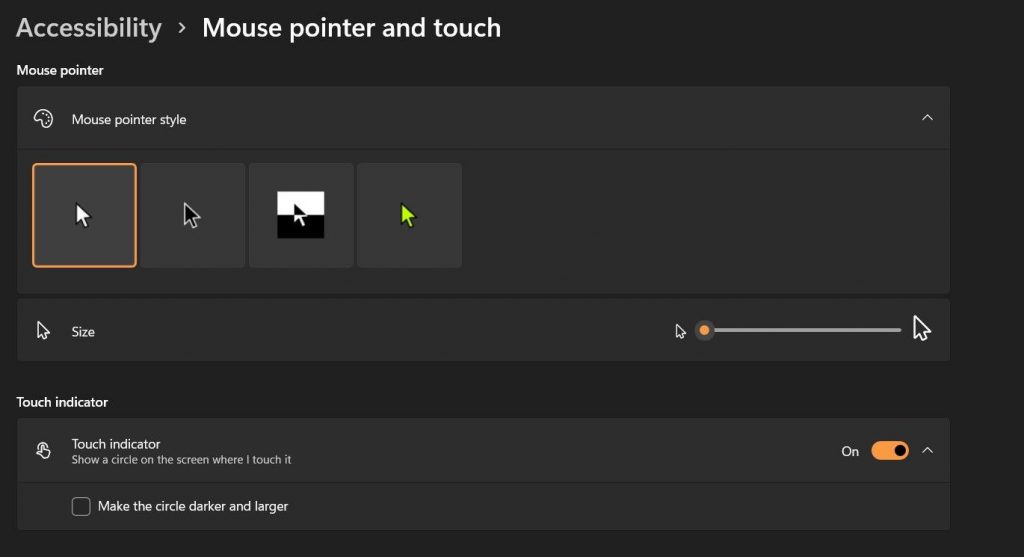
A tool called the Windows 11 Settings app makes it easy for people to change how their mouse pointer looks on Windows 11. You can change the look of your mouse pointer through the Accessibility section of the Settings app, which is where you can change how your mouse pointer looks.
Here’s how you can make the mouse pointer your own:
- Open the Settings app. Then, go to Accessibility > Mouse pointer and touch and click on it.
- Under Mouse pointer style, choose the icon you like best.
- The Size slider lets us change the size of the mouse pointer.
How to Change the Mouse Pointer Using the Control Panel
You can also change a lot of different mouse pointer settings by going to the Control Panel. Click speed, pointer icon, pointer movement, and more can all be changed through the Mouse properties. This is a list of things you can do with your mouse.
In the Control Panel, you can change how the pointer moves.
- Launch the Start menu. Now, Type Control Panel into the search bar and click on the Best match. This will open the Control Panel.
- Choose Hardware and Sound. Then, under Devices and Printers, click on Mouse. Click on the mouse button to move the mouse around.
- Slide the Double-click speed slider to change how quickly your mouse double clicks.
- Similarly, you can change how your pointer looks in the Pointers tab.
- The Pointer Options are where you can change the motion settings of your pointer. To do this, click on the Pointer Options and choose from the available options.
- You can change how horizontal and vertical scrolling works when you click on the Wheel tab.
- Then, click on Apply and then OK.
Also Read:[Fixed] Green Screen Error In Windows 11
The last words
When you open the Settings app, you’ll find a lot of settings that you can change. These settings can make a big difference. You can also use a lot of third-party apps to make Windows 11 look the way you want.


