


 Header Through Cloudflare")


Install Windows 11 Lite on your PC is what we will get to know in this article. There is no doubt that Windows 11 is a feature-packed operating system with a nice look. However, even though Windows 11 has many new features, it is still a lot of work. There is a chance that it will soon fill up an old device to the point that it can no longer run it properly. There are now five main ways to download and install Windows 11 Lite. Windows Update is the best way to get it free, but you should wait until it comes out.
If you want to get Windows 11, you’ll need to have the right hardware. As a result, your PC might not get any updates from Microsoft. If you don’t want this to happen, there are ways you can tweak your installation to make it work. Before you do anything else, we suggest checking the PC Health Check app to ensure your computer can run Windows 11.
Also Read:How To Always Show Scrollbars In Windows 11
How do I get Windows Update to install?
Most people just get Windows 11 by getting it through Windows Update. You’ll be able to tell that it’s ready for your computer because you’ll see messages about it in the Windows Update app. Follow these steps to finish installing the app. You won’t lose any data or files on your computer if you do this. Follow the steps to Install Windows 11 Lite.
Step 1: Go to Settings > Update & security to get there. To check for new updates, click Check for updates in the upper right corner of the screen.
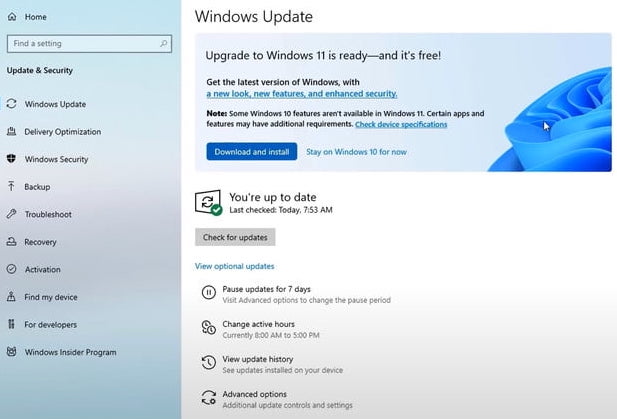
Step 2: You should see a prompt to upgrade to Windows 11, completely free. Click the blue Download and install button. Then, click the Accept and install button to agree to the terms and start the process.
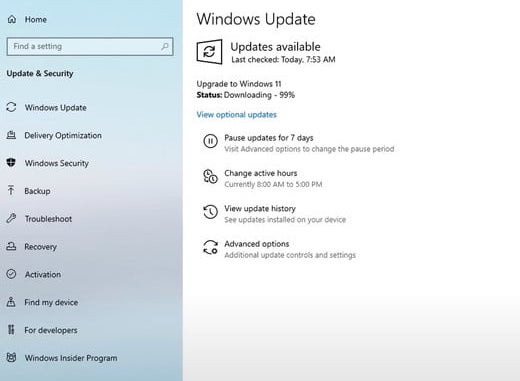
Step 3: The Upgrade to Windows 11 should now appear under Windows Update and a percentage and download progress. Wait for it to finish.
Step 4: You’ll be prompt to restart your computer when you’re complete. A blue box will show it. Choose the “Restart now” choice. Windows 11 will install on your computer. It will restart a few times during the process. It will take you to the Windows 11 desktop as soon as you’re done!
Also Read:How To Temporary Disable Your Account On Windows 11
Get Assistance from The Installation Assistant.
If you don’t see Windows 11 in your Windows Update, you can use the Windows 11 Installation Assistant instead to get it instead. This will help you move from Windows 10 to the new OS on your own. Again, if you want to use this method, you’ll need to make sure your computer meets Microsoft’s minimum specs. You won’t also lose any files. Here’s how to. Follow the steps to Install Windows 11 Lite.
Step 1: Go to Microsoft’s Windows 11 download site to get it. Then, look at the top and click the blue Download now button.
Step 2: Wait for the tool to download before you start. When it’s done, start it up. When asked, say “Yes.”
Step 3: In the pop-up window, select Accept and install. From now on, it will be three steps. There is a first step that you must do before getting Windows 11. Because of your connection speed, it could take a long time. It may ask you to agree to Microsoft’s terms and service. This could happen.
Step 4: Windows 11 will check if your download is safe in the second step. Some time should pass.
Step 5: In the third step, you will be prompted to install Windows 11 in the background. Let it set up, and then wait. When it comes to how fast your computer is, it could take some time – about 30 minutes at the most.
Step 6: When the third phase is done, click the Restart button. You will be told that you’re about to be signed out. Wait until your computer restarts and Windows 11 is set up. As the speed and age of your computer and CPU are taken into account, it could take up to 30 minutes or more.
Step 7: In this step, you’ll see “Working on updates” on your screen as Windows 11 is being installed. A percentage will show how far you’ve come. You’ll have to wait for your computer to restart. Once done, you’ll be taken to the sign-in page and then the Windows 11 desktop.
Also Read:[Fixed] DLLRegisterServer Was Not Found On Windows 11
Install via the Windows Insider Program
There are other ways to get Windows 11 if the above two don’t work for you. You can get Windows 11 through the Windows Insider Program. This is the last thing you can do because the Windows Insider Program will put unstable, still-in-preview versions of Windows 11 on your PC. Follow the steps to Install Windows 11 Lite.
Step 1: Go to Settings > Update & security > Windows Insider Program to find out more. Then, link your Microsoft account to the account you want to use.
If this is your first time using the Windows Insider Program, you’ll see that there are three channels: Dev, Beta, and Release Preview. Each of these channels has a different purpose. Windows 11 is being used on the Beta and Dev channels to see how it works. Choose the one that’s right for you.
Step 2: One of the most stable ways to test Windows 11 is through the beta channel. There will be fewer bugs and problems if you join this group. It’s important to keep in mind that beta channel releases happen only once or twice a few weeks.
As a developer, you can get the newest and best versions of Windows 11 from Microsoft every week. You have to join the dev channel, which has all the new features. On the other hand, the Release Preview is where you can try out the new Windows 10 update before it comes out.
Step 3: After you pick a well-known channel, make sure you make the right choice. If you haven’t already, you’ll ask to sign in with your Microsoft account. And your computer will start up again, as well.
Step 4: After your computer restarts, go to Settings > Update & security. There, check again for updates. You’ll see Windows 11 on the list. Download and install the OS on your phone or tablet, then wait for it to finish installing!
Also Read:How To Remove “System Requirements Not Met” Watermark On Windows 11 Desktop
How to start over from scratch with Windows 11 Installation Media
The installation media is another way to get Windows 11 set up. You can make a USB drive that can use to install a new version of Windows on your computer or another computer. This is how to do it. You’ll lose all of your files if you do this, so we don’t recommend it. If you’re aware of the risk, you can get to this option by going to the Windows 11 Download Page, where you can download Windows 11. From there, choose the option to make Windows 11 installation media. Follow the steps below to Install Windows 11 Lite.
Step 1: Accept the terms and click Accept. To start, let the Setup tool run. Then choose the options that are best for this PC. Next, select a USB flash drive.
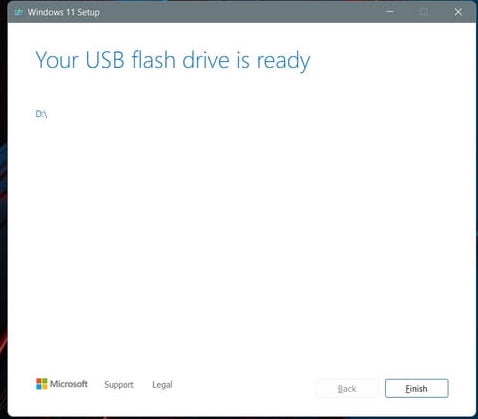
Step 2: Select your USB flash drive from the list and click Next. This is the next step. It will ask, and Windows 11 will download. Once the installer is done, it will switch to making Windows 11 installation media. You will be told that the drive is ready whenever it’s done.
Step 3: When your USB drive is ready, click the Finish option to exit the program. It’s best to keep the USB drive plugged into your PC.
Step 4: Go back to the Windows 10 settings app, and choose Update & security from the drop-down menu. Then, on the left side, click on Recovery. The Restart now options you can locate in the Advanced startup menu.
Step 5: When a pop-up message comes up, choose to Use a device from the list. Your USB drive should show up in the list. Choose it, and Windows will start over with your USB drive and the Windows 11 installer when it restarts. It’s possible that you won’t see this option. You’ll have to go into your BIOS or UEFI to manually boot from the USB drive. For the most part, this can be done by pressing F12 on boot right away when you start your PC. Check with your computer’s manufacturer for more information, or look up how-to guides online.
Step 6: When you’re in the Windows 11 installer, choose a language and click Next. Choose the version of Windows 11 that is the same as the version of Windows 10 on your PC. Then, click Next.
Step 7: Select the Custom option and browse to the drive to install Windows 11. Some people might have to click the Format button to remove all their files on the drive. Select the drive again and click Next.
Step 8: Windows 11 installs on your computer, and you can just relax and enjoy it. Once you get to the out-of-the-box experience, it will ask you to set up your PC.
Also Read:Fix System Restore Error 0x8000FFFF Catastrophic Failure On Windows 10/11
How to do a clean install of Windows 11 with an ISO file (not recommended)
The last and most extreme way to install Windows 11 is to use an ISO file. If the steps above don’t work, this is for methods that don’t work. Keep in mind that if you use this file, you’ll have to erase everything on your computer and start over with Windows 11. It’s important to back up everything. Another way to get Windows 11 on a virtual machine is to use this ISO option to get it. Follow the steps to Install Windows 11 Lite.
Step 1: First, go to the Windows 11 download page. Select the Download Windows 11 Disk Image option and click the Download button. Make sure you choose the Windows 11 multi-edition ISO from the list and then click the blue Download button to get it. Choose English, then click the blue “Confirm” button.
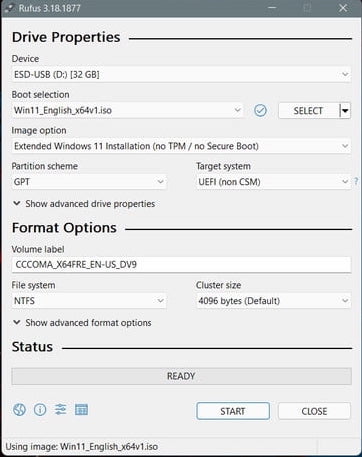
Step 2: After you download the file, you’ll need to get some extra software to keep going with a clean install of Windows 11. Rufus is a great tool for making a bootable Windows 11 installation drive.
Step 3: Get Rufus from the website. Run the file and choose “Yes.” Plug in an empty USB drive and choose it under “Device” on the next screen. Make sure the device has more than 8GB of space.
Step 4: You can choose to boot from a disc or an ISO file. Then, press the Select button. Then, go to where you kept the Windows 11 ISO file and click the Open button.
Step 5: Make sure you choose either a standard version of Windows 11 or an extended version of Windows 11. It’s best if your computer meets the following requirements: If it doesn’t, you can try the extended option to get around Microsoft’s rules. Everything else should stay the same. Then, click the Start button to start making the drive.
Step 6: The USB drive will be ready after a while. Close Rufus when it’s done, and restart your computer to install Windows 11.
Also Read:Quick Assist In Windows 11: How To Use It
There are many things in Windows 11 Lite that you don’t get with full
- There should be an operating system that is safe and easy to use.
- Windows 11 is a smaller version means it uses as little space as possible.
- It has a new Start Menu, Taskbar, and Search Bar.
- The best version of Windows 11 for games and hard work is the Creators Update.
- Many new animations are in the way the window moves and drag.
- Touch controls have been a lot better.
- It has a lot of new sounds and better functionality.
- The corners of a lot of different bars will be round.
- Adding New icons to the program to make it look better than older program versions.
- Many new widgets add to this release.
Also Read:Network Sharing Not Working In Windows 11? Apply These Fixes
Bottom line
We hope you found our guide useful. Now that you’ve got Windows 11 Lite up and running, you might want to check out our other how-to guides. We’ve talked about many things about the new Microsoft operating system.


