


 Header Through Cloudflare")


Windows 11 isn’t recommended for computers that don’t meet the minimum system requirements, something Microsoft had previously warned against. You may have to deal with a “System requirements not met” watermark on your desktop and in the Settings app if you’re running Windows 11 beta or release channel build 22000.588. (KB5011563).
Why does Windows 11 display a “System Requirements not met” message?
For Windows 11, Microsoft made the use of TPM 2.0, UEFI, Secure Boot, and other security features obligatory. Installing a new operating system does not necessitate a user’s presence. The instructions were provided by the company itself.
New Windows 11 features including taskbar drag and drop, App Folders in the Start menu, Do Not Disturb and Focus, Live Captions, and a redesigned Task Manager with support for dark mode were included in the newly released Windows 11 builds 22557 and 22000, which were made available by Microsoft.
The “System Requirements not met” error message appeared on desktops and in Settings for Insiders who tried to install the current edition on unsupported PCs.
Also read:How To Uninstall Apps In Windows 11
How can I get rid of the watermark on Windows 11 that says “System requirements not met”?
A simple way to get rid of the “Systems requirements not met” message from your desktop is to make a few changes to a registry file. If you want to change a registry file, there are two ways to do it.
You can either go to the Registry Editor and change the DWORD value of the key you want to change yourself, or you can run a Registry file (.reg) that will do this for you.
There are two ways you can get rid of the watermark on your Windows 11 computer. Let’s see how to do both of them.
Also Read:How To Use Credential Manager In Windows 11
Method 1: Using Registry (manually)
- Press Windows + R on your keyboard to open the Run window on your computer.
- There is a Run box. Type “regedit” in the box and press OK.
- Take a look at the Address Bar of the Registry Editor. Type in the following address and hit ENTER on your keyboard.
Computer: HKEY CURRENT USERControl PanelUnsupportedHardwareNotificationCache is on the computer.
As a note, if you can’t find the UnsupportedHardwareNotificationCache key in the Registry Editor on your computer, you’ll have to make and edit this key yourself. This time, skip the next four steps.
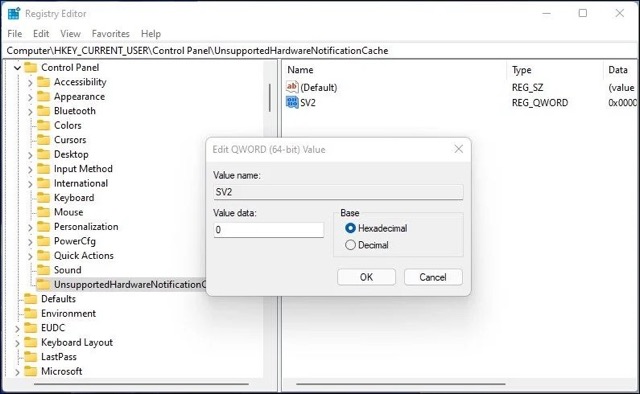
4. Right-click on the SV2 DWORD value in the ‘UnsupportedHardwareNotificationCache’ key and select the ‘Modify’ option.
5. To change the value data field, change the number 1 to 0.
6. When you’re done making changes tap Ok
7. Now, restart your computer so that the change made in the SV DWORD will be made.
The watermark will delete from your desktop now.
Also Read:Registry Hacks To Improve Your Windows 11 Experience
Can’t find ‘UnsupportedHardwareNotificationCache’ key?
Another option: If you don’t have the UnsupportedHardwareNotificationCache key on your PC, you can still use this method.
- You need to open the Registry Editor. Type the path in the address bar, and then hit ENTER on your keyboard.
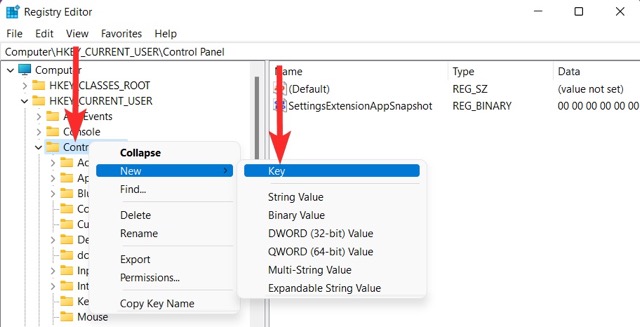
Computer\HKEY_CURRENT_USER\Control Panel
2. Right-click on “Control Panel” and choose “New > Key” from the menu.
Rename this new key “UnsupportedHardwareNotificationCache.”
3. Now, right-click on the “UnsupportedHardwareNotificationCache” key and choose New > DWORD (32-bit) Value from the drop-down menu.

4. Add “SV2” to the DWORD Value.
5. To change the value data field, change the number 1 to 0.
6. When you’re done making changes, click “OK.”
7. Now restart your computer so that the change made in the SV DWORD is done.
The watermark should be gone from your desktop now.
Also Read:[Fixed] Green Screen Error In Windows 11
Method 2: Using a Registry script (automatically)
To make the process of adding the ‘UnsupportedHardwareNotificationCache’ key in the Registry faster, you need to run a registry script, which does this.
- Make sure that the “UnsupportedHardwareNotificationCache” key is add to the Registry with a Registry script. This will make your Windows 11 desktop no longer say “System requirements not met.”
2. Take the zip file.
Filename: Automated scripts for UnsupportedHardwareNotificationCache entry in registry.zip
A note: This will put a.zip file on your computer. If you need to open this file, you’ll need Winrar or another compression tool.
4. Open the.zip file that you just downloaded. Use Winrar or another compression tool to extract the files.
5. Check the place where you put the files in the previous step.
6. From here, double-click on the file called “remove UnsupportedHardwareNotificationCache entry from the registry.” Then, answer the UAC prompt to open the Registry Editor as an admin. This will make the Registry Editor work.
7. You will see this message, and it will ask you if you want to make changes to the Registry Editor. To say “Yes,” click on “Yes.”
8. To accept the changes, click “Yes.”
9. Now, restart the PC to put the changes you made into place.
The watermark will delete from your desktop now.
Also Read:How To Run Android 12L On Your Windows 11
Final words
I hope this article on how to remove the System Requirements Not Met watermark on Windows 11 was clear to you. If not, you can ask any questions about this article in the windows forum. Is that what you want to do? If so, then please share this article with your family and friends.


