


 Header Through Cloudflare")


![[Interview] The Future of Screen Experiences ②: From Watching to Understanding With Vision AI Companion](https://www.hawkdive.com/media/samsung-tvs-and-displays-vision-ai-companion-interview_thumb932-218x150.jpg "Exploring Vision AI Companion: Transforming Screen Experiences for Users")


Although upgrading to Windows 11 is quite convenient and presents ample benefits like a new user interface, improved reliability, stability, and security. Though, there are however some concerns associated with it. It’s essential to keep in mind that Windows 10, as well as Windows 11, have their own distinctive problems. For instance, your Windows PC may undergo internal crises occasionally that can hinder or prevent the booting process and make it hard to sign in. These difficulties may furthermore include the pitch-black screen and recurring crashes, the system’s incapacity to run, or even slow loading.
The rationale for the erratic behavior of the Windows system is oftentimes because of corrupt system files that are required for the system to boot up adequately. These files may have been corrupted due to diverse reasons such as a virus invasion or improper shutdown of the system.
To preach this issue and fix the boot concern, the advised solution is to utilize the Startup Repair tool. So, what is the Startup Repair tool, and how it can assist troubleshoot this issue? Let’s find out.
What is Startup Repair Tool?
The System Recovery Options menu delivers the Startup Repair tool as one of its recovery options. The pursuit of this tool is to handle precise system issues that may provoke Windows to fail the bootup process. Besides that, in the circumstance where Startup Repair cannot commence automatically due to the severity of the issue, Windows delivers different alternatives to access and run the feature, even if you are unable to access the desktop. For example, it is conceivable to begin Startup Repair from outside the Windows 11 environment.
In this post, we will show you how to Use Startup Repair in Windows 11 and discuss different ways to boot your system to an Advanced Startup window so you can perform the Startup Repair easily in case you failed to access Startup Repair.
Also Read- How To Enable Or Disable Open Search On Hover in Windows 11
Use Startup Repair in Windows 11
Method 1: Use Startup Repair Through Settings
The foremost method to use startup repair in Windows 11 is to boot your system through Settings on your Windows 11. To Startup Repair through Settings in your Windows 11, follow the steps below:
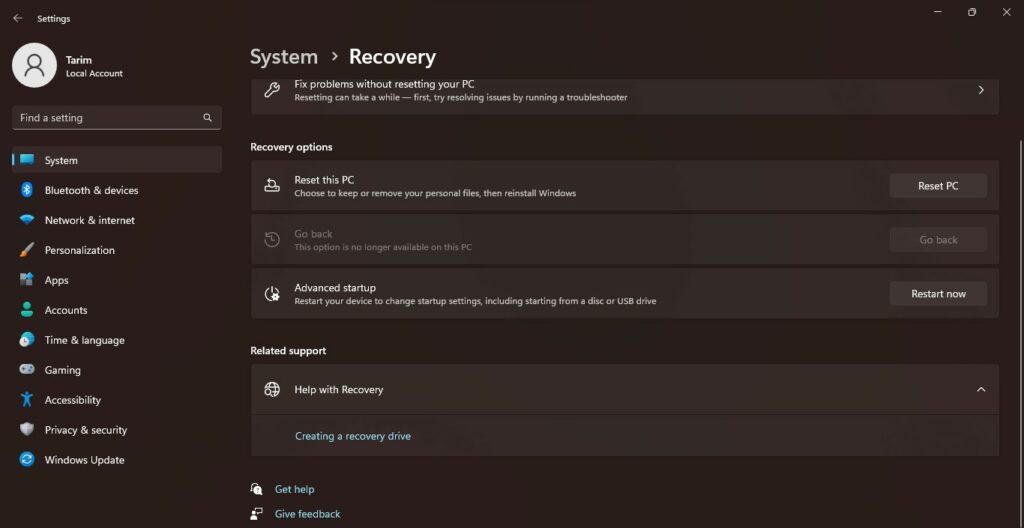
- First, you need to go to the Setting on your Windows by pressing Win + I. After that, head to the System tab by tapping on it and ultimately select Recovery.
- Now, once you are in the Recovery settings, scroll down and go to the Advanced Startup option.
- Then, you just need to click on Restart now. This is one way to boot your PC to an advanced Setup. If you somehow failed to boot your PC in this way, follow Method 2 mentioned in this article.
- Your system will now restart and you will be able to see the Choose an option window on your screen. Select Troubleshoot option by tapping on it.
- Once you click on Troubleshoot, you will see further two options, just click on Advanced options.
- Lastly, in the Advanced options, you will see the Startup Repair option. Simply, click on the Startup Repair option and then confirm the prompt. After that, your system will initiate Diagnosing your PC and will repair it automatically. You will be able to see all the Startup problems and fixed issues in the log file. Furthermore, if your Startup Repair failed to repair your Windows OS, it will be displayed in the log file as well. You will be given various options to proceed with such as Shut down or Advanced options ( if you click on it, you will be able to try out other tools that you can use to repair your PC.)
Also Read- How To Delete Windows.old Folder In Windows 11
Method 2: Use Startup Repair through Start Menu
Another way to boot your system to Advanced Startup is through the start menu. Keep reading to find out and also the above-mentioned steps (4 to 6) will remain the same.
- To boot your PC, you first need to click on the Start menu located in the taskbar and then click on the Power option.
- After that, there you will see the option to Restart. Just before clicking on Restart, you need to hold + press the Shift key and click Restart while pressing the Shift key.
- Finally, your PC will reboot into the Advanced Startup window. Follow the rest steps as is to use the Startup repair.
Also Read- How To Adjust Transparency Of Xbox Game Bar Pinned Widgets In Windows 11
Method 3: Use Startup Repair Out of your Windows Environment
Another method is booting your system to Advanced Startup externally from your Windows environment. This method is suitable when your system fails to boot up and you cannot even reach the main screen to access the start menu or your system Settings. So, in such occurrences, simply, pursue the steps mentioned down below to utilize Startup Repair outside of your Windows environment:
- Begin by holding + pressing the Power key to shut down your system
- Then, you need to press the Power key again. Just repeat this process a few times until you see the Windows logo on your screen or a note saying Diagnosing your PC or you might see a Please Wait note as well.
- Once, it detects the problem it will fix the issues and Restart the system as usual.
Also Read- How To Turn On Or Off Tablet-Optimized Taskbar In Windows 11
Frequently Asked Questions
How can I Startup Repair in Windows 11 Command Prompt?

To boot into Advanced Startup and eventually use Startup repair, you need to first right-click on the Start menu and click on Terminal (Admin) to open the Windows Powershell terminal. After that, just jot down or paste this prompt shutdown /r /o /f /t 00 and hit enter to proceed to the Startup Repair option.
How does Windows Startup Repair work?

Windows Startup Repair is a built-in feature of the Windows operating system. Besides, it is programmed to automatically establish when the computer fails to boot into the operating system for two consecutive times. This is because the Startup repair does diagnostic tests which identify that there is a systematic problem precluding the computer from adequately booting up. The Startup Repair feature inspects the computer for issues and tries to fix them to ensure that the operating system can be loaded successfully on the following restart.
Additionally, if your Startup Repair doesn’t automatically launch, you can use the methods in this post to use Startup Repair on your PC.
Is Windows Startup Repair safe?
The Startup Repair tool is particularly created to handle issues such as missing as well as corrupted system files that are needed to load the Windows operating system. By scanning your device for problems like distorted system files or invalid boot files, it endeavors to repair any identified issues. Since it is developed by Microsoft and is particularly beneficial when Windows fails to boot accurately, it is deemed a reliable and safe tool.


