


 Header Through Cloudflare")


Although first mocked, Apple’s AirPods have now become one of the company’s most cherished products. AirPods strike the ideal mix between being simple while yet being of high quality and useful. It’s true that some individuals are still using AirPods from the original generation. Since we were first exposed to the product some years ago, it has undergone a number of revisions. In case you’re interested in learning more about the new AirPods Pro 2 and how to adjust your AirPods’ settings, continue reading.
Airpods Settings: How to Change?
You may now adjust a variety of parameters on your AirPods to suit your own preferences better. You may rename your AirPods, change the purpose of the double-tap gesture, and do much more.
Aside from adjusting the volume and noise suppression, you may utilise one AirPod as a microphone. Your Airpods may be personalised in a variety of ways. Here’s the breakdown of the steps required to learn it yourself, should you be so inclined.
The level of personalization available with your Airpods is contingent on the model year you have. The earbuds can’t be personalised in every way because of the many Airpods models. All the available Airpods settings are listed here.
Setting up Your AirPods with iOS 16
Depending on the AirPods model you have, you may have access to a variety of options:
#1. Either remove the AirPods from their case and place them in your ears, or open the case and place it near your phone.
#2. Go to your phone’s Bluetooth settings by going to your phone’s Settings and then tapping Bluetooth.
#3. Access the AirPods’ configuration options by clicking the I symbol (information) that appears next to the headphones.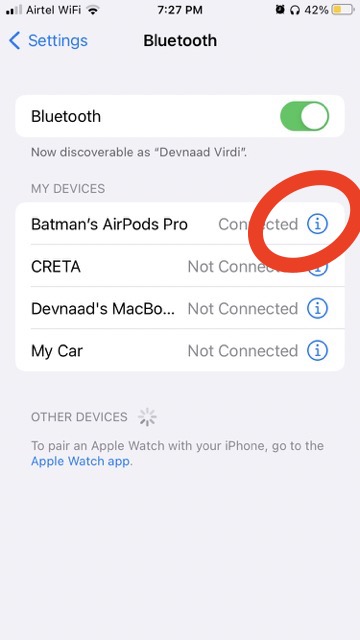
Possible modifications:
#1. Select “Name” and give your headphones the name of your choosing.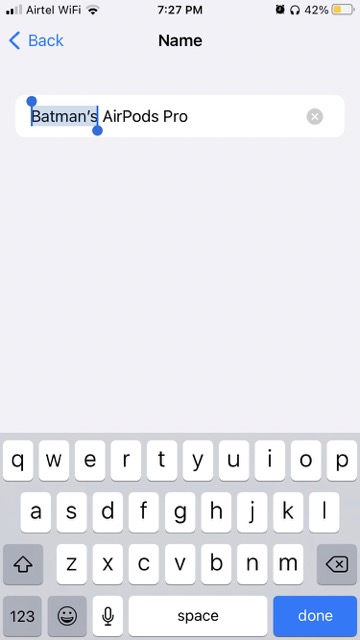
#2. To configure the behaviour of multiple taps, select either “Left” or “Right” from the on-screen menu. Double-tapping can activate Siri, play/pause music, skip to the next or previous track, or be disabled entirely.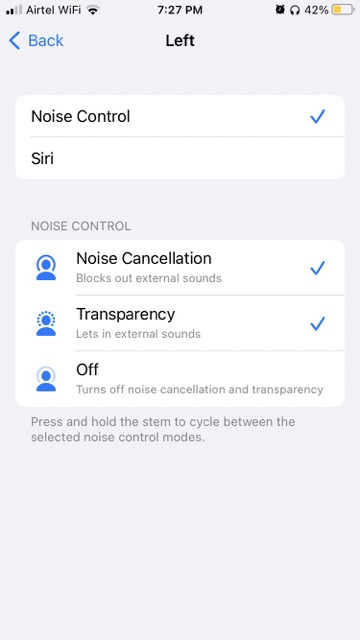
#3. If you want your AirPods to automatically recognise when they’re in your ears, you may turn that feature on or off by toggling the corresponding switch. If enabled, your phone’s audio will begin playing as soon as you insert the AirPods and stop when you remove one or both of the headphones.
#4. Select which AirPod acts as the caller’s microphone by tapping the “Microphone” option. If you have one AirPod turned on and leave it on “Automatic,” the microphone will switch.
Apple AirPods’ many benefits
#1. AirPods are quite convenient.
An additional perk of Apple AirPods is that you can move about while maintaining a phone conversation. In fact, thanks to Apple’s wireless AirPods, you can multitask while listening to your favourite tunes without ever having to put down your phone. You may play music, take phone calls, and restart playing at your convenience. While using AirPods, you may legally operate a motor vehicle. However, you should take precautions to avoid any sort of mishap.
#2. The sound quality of AirPods is excellent.
Apple’s AirPods are wireless headphones, but that doesn’t mean you have to sacrifice sound quality for convenience. You can’t beat the sound quality of AirPods.
When listening to tracks like “Iron” by Woodkid, the bass from the AirPods will surprise you with how hard it hits. Apple’s tuning provides sufficient low and high-frequency range, soundstage, clarity, and detail to faithfully reproduce various musical styles.
#3. You can take your AirPods wherever.
Another advantage of Apple AirPods is their mobility. Because there are no cables involved, Apple AirPods are more convenient to bring along on the go. The small footprint means they can go practically everywhere. Tuck them inside your purse, rucksack, or the palm of your hand.
#4. AirPods are compatible with devices not made by Apple.
AirPods’ compatibility with non-Apple devices, including phones, tablets, PCs, TVs, MP3 players, etc., is an additional perk. So, you can use the AirPods with your TV or computer to listen to your shows without having to take them off of your ears. In this manner, you won’t have to worry about disturbing anybody else in the room while watching your favourite shows.
#5. Stream music from your iPhone to your AirPods
As was previously said, once you link your AirPods with one Apple device, you may use them with any other Apple device you possess. The hassle of constantly trying to connect your iPhone, Apple Watch, iPad, or MacBook to iCloud is eliminated. This fantastic addition will save you time and effort whenever you connect your headphones to your phone, tablet, or computer.
The AirPods are unlike the iPhone, where major upgrades and new features are introduced with each new model. You may buy any version of Bluetooth headphones and still have a nice time listening to music or podcasts. Consequently, there is almost no need to upgrade from the original version of AirPods if you are satisfied with them. Also, if you already own AirPods Pro, 1st generation, there’s no reason to upgrade to 2nd generation. We recommend the AirPods Pro 2 to anybody eager to try out Bluetooth earbuds for the first time. Sound quality, durability, and features are all excellent for the price.


