


 Header Through Cloudflare")


MacOS Ventura brought in many features that enticed users with outdated laptops. Features like smart search corrections, undo send, and missing recipients. There are tons of features like collaborative invitations and so on. However, those with an outdated mac may not get access to the new software as well Apple supported security updates. This blog will be a full step-by-step walkthrough that anybody can follow. We have a lot to cover, so let’s get started.
How to install macOS Ventura on your older unsupported mac with Open Core Legacy Patcher?
It will help renew your older mac into a brand new one so that you can install new applications, unlock Ventura’s new features and install the latest security updates to keep your mac secure.
Important Tips
Make sure you back up all your data. Tech expert Mr. Macintosh recommends this not because of the Open Core legacy patcher. But even supported Macs with software updates and security updates sometimes have issues. Thus, if you have a backup, you can always restore your data and get started right back from the beginning with no data loss.
Secondly, this process is unsupported by Apple. It is an open-source project so if you are wondering how it works, you can go right to the page and look at every single bit of code. However, if you want to argue with the other side, Apple has already not supported your old Mac anyway. So you’re done with the company and you will not receive any more security updates for your outdated model. Therefore, this is the only way to get some of the latest security updates and support to your computer. This way you can keep it running well into the future.
Also Read: How To Install macOS Ventura In VMware?
Backup Plan
The next thing is to have a backup plan if things don’t work and this kind of goes back to the back of all your data. In short, if the installation goes wrong at any point, maybe you can have a backup USB installer for maybe Monterey, Big Sur, High Sierra, and just in case. Normally you have internet recovery on your Mac but it’s always good to have a backup plan just in case it does not work out.
Furthermore, you should try to upgrade first but when that is not possible, you can do an erase and fresh install. There is nothing like installing a fresh operating system on an empty drive. It’s going to run the absolute best possible but an upgrade does work. You can try it and you can maintain all your applications, all day. However, if you run into any problem like slowness, you can always do a fresh erase and install after to get back up and running.
In addition, if you run into problems that you have no clue about, you can head over to Mr. Macintosh’s tutorials for reference or open core legacy patcher discord community. You can also check out the troubleshooting section of the Open Core Legacy Patcher and check for its updates.
Also Read: How To Install macOS Ventura On Windows 11
What you need to get macOS Ventura on an unsupported mac?
Unsupported Mac from [2012 – 2016] – The current version of open-core legacy patcher only supports macs with a metal graphics card. Therefore, if your mac is older than 2011 and under, you have to hold tight for a little bit while the developers work on a version that can support your non-metal Mac.
Recommended hardware = SSD drive & 8GB RAM (Note: Macs with 4GB RAM can also make do)
16 GB or larger USB flash drive or external hard drive A flash drive helps cut down on the installation time.
3.0+ USB and keep it in your hand in case you need it in the future for troubleshooting.
Which models support Open Core Legacy Patcher?
- 12″ MacBook 2015 -2016
- 11″ & 13″ MacBook Air 2012 – 2017
- 13″ & 15″ MacBook Pro 2012 – 2016
- Mac Mini 2012 – 2017
- 21.5″ & 27″ iMac 2012 -2016
- 8,1 -9,1 MacBook
Steps
- Step 1: Click on Finder or go to macintosh hard drive and click on Applications.
- Step 2: Locate Open Core Legacy Patcher and double-click on it.
- Step 3: As soon as you open it, OCLP will check for updates. You should always use the latest version that’s available.
- Step 4: Click on view on Github and download the latest version. However, if you don’t have the app and you’re starting off fresh then no problem. All you need to do is go to the main Open Core Legacy Patcher page and click on Github over in the corner.
It will bring you to the same page. Scroll down to the release section, just click on the latest release and it will bring you right to the same place you had if you had the application.
- Step 5: Furthermore, scroll down to the asset section and click on OpenCore-Patcher-GUI.app.zip. It will immediately start downloading into your downloads folder. When it’s almost done, it’s going to jump up and down here on the dock with the downloads folder and its done.
Also Read: How To Clean Install macOS Ventura On Mac
To install the latest version of your applications folder
- Step 1: Close the previous version of OCLP and go into the downloads folder.
- Step 2: Moreover, drag open the OCLP right over to your applications folder and now you have to replace the old version.
- Step 3: Click on replace there and after that, you will get the latest version installed.
- Step 4: To open it, double-click on OCLP. It will verify and tell you that it is the first time it’s ever run on this system. Tap on open.
- Step 5: Now you are ready to close the application and the next thing you want to do is prepare your USB drive for installation.
Also Read: How to Install macOS Ventura on Hackintosh
Prepare USB Flash Drive
- Step 1: Now plug in your USB hard drive flash drive or thunderbolt drive and erase it. It is important to erase your USB drive clean as it will be erased anyway during the installation process. It is recommended that you go in there and back up any files that you had before you start.
- Step 2: The OCLP will erase the drive for you but if it’s formatted in a weird way, it’s better to just erase it with Disk Utility first just so that you don’t have any problems with the application.
- Step 3: To get to Disk Utility, all you need to do is to go to Macintosh hard drive or click on finder.
- Step 4: Then go to applications and then go down to the utility folder.
- Step 5: Inside this, you will see Disk Utility. Once it opens, you gotta be able to change the view and be able to see the volume layout.
Go to show all devices
- Step 6: Click on View and then click on Show all devices. In addition, you can also get to it from the above view option and click on Show all devices. Now you can see the entire layout of the internal drive but will not do anything there.
- Step 7: You will only be using the USB drive so that’s why it says external. You don’t need to touch anything else, just go to the external and you will see it labeled like the name of the drive and you’re ready to go.
- Step 8: Furthermore, click on the top of the level drive and then click on Erase. The reason you are clicking on top of the drive is that you want to get the scheme properly. So if you buy from the store and it’s formatted in MS-DOS, you won’t be able to fix the scheme. Then you will have problems with the Open Core Legacy Patcher application.
Step 9: Thus, if you see all three you are ready to go. For the name, you can leave that in the untitled, format you can change it to mac OS extended (journaled) and then click on Erase.
Step 10: Close the Disk Utility.
Also read: How To Create A Bootable macOS Ventura Installer On A USB Drive
Download macOS Ventura & Create a USB Installer
Your drive is now ready to go so the first thing you need to do in the application, is you’re going to create a Mac OS installer. Thus, click on the button Create macOS installer.
Create macOS Installer
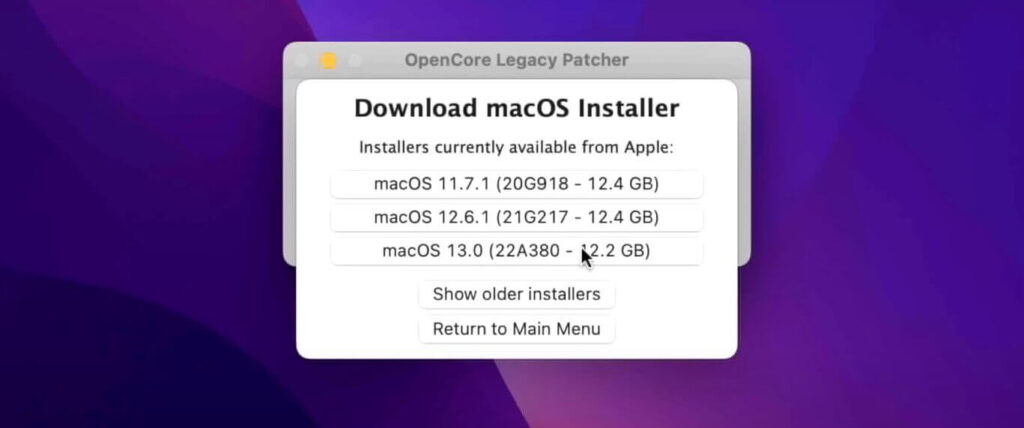
Step 1: After that click on Download macOS installer. It will try to contact Apple and tell you what full installers are available. You will be able to see the latest versions of the operating system that are available. Moreover, you can see macOS Big Sur, Monterey, and Ventura.
Step 2: Click on Ventura 13 and in the future, it will go 13.12345…and so on. It will immediately start downloading. The process may take a while depending on your internet connection and once it’s downloaded we will go to the next step.
Step 3: Now the Open Core Legacy Patcher will verify the install assistant package that includes the full installer. This sometimes helps if there is any kind of download problems with the app. And once that check is finished, then it’s going to go to the next part.
Also Read: MacOS Ventura USB Installer For Hackintosh Using OpenCore
Steps to continue
Step 4: It’s now going to have to install the full installer to your applications folder and that’s why it will ask for your administrator password.
Step 5: Enter the password and wait as it takes a while to verify it. It’s going to install directly into your applications folder. If it is extracted to the applications folder, it’s done. Now you can create the USB installer by pressing the flash installer button.
Continue with Open Core Legacy Patcher
Step 6: The first thing it’s going to do is scan for the full installer in the Applications folder. Moreover, if you want to take a look, you can find it in the applications and on under Install macOS Ventura.
Step 7: Then click on Install macOS Ventura. It’s going to prompt you that it will format the USB and since you have already erased it before, it’s ready to go.
Step 8: Click on it. So now what it’s going to do is it’s going to prompt you for your administrator password. Thus, type your password and click on Okay. It will immediately start unloading the drive. You will see that it has already been renamed macOS Ventura and it’s going to use create install media to put the full installer onto the USB drive. Depending on the drive that you are using, it could be very slow. Furthermore, it could take upwards of an hour to write 12 gigabytes to the USB drive or as little as maybe five minutes if you have a really fast Thunderbolt driver or USB3 drive.
Step 9: Wait for it to finish.
Partition drive
Now the installer has been created and as you can see the message comes up saying it’s done but the next step is that we have to install the open-core legacy patcher configuration to an EFI partition of the USB drive.
Step 10: So your next step would be to click on Install open core to disk. It is going to create the configuration with all the settings and put them in a temporary location there. And then it’s going to come up with a next message saying that it finished building the configuration which is the next thing you want to be able to install to the disk.
Reboot Your System
Furthermore, you will be able to see two lists there: first is the internal drive – disk 0. And the next disk with a numbering like 235 will be the USB drive but make sure you get the listing here. It should match up with the kind of drive that you have and the size here. So you have to click on the second disk and tap on the EFI. Then you have to enter the administrator password to mount the disk. It will mount the EFI, create the information, and then unload it.
Now you will get a message to reboot to apply and you can boot from that USB disk. All you need to do is click on reboot and you have to hold down the option key so you can boot to your USB installer. Click on reboot and then click on restart. After you rebooted by holding down the option key, you will hear a chime and the Apple logo appear and show your boot selection.
You should be able to see your USB drive suite tab over or you can use your mouse cursor and you can click on EFI boot. Then you will see your boot drives and click on macOC Ventura. As soon as you do it, it’s going to boot directly to the macOS Ventura installer, right from the USB drive. All right, now you are in the full installer. Now that you are in recovery, you have to decide whether you’re going to do an upgrade or a fresh erase and install.
Erase HD and Fresh Install Ventura
If you want to an erase install which means it erases your entire drive and you are going to install a fresh copy of Ventura, do the following:
Step 1: Go to disk utility to be able to erase the drive. Thus, click on disk utility on your screen and tap on continue.
Step 2: Once it loads up, you can go back into the view that we discussed while clicking on view and further show all devices. This will help you to see the entire drive layout. On the left hand side is the internal drive.
Step 3: So all you need to do is click on macintosh hard drive and tap on erase.
Step 4: Moreover, you can erase the entire volume group and further do a fresh install.
Upgrade Install
- Step 1: Close the disk utility and click on install macOS Ventura. You are now going to do an upgrade by keeping all your data and applications on the Mac and it will upgrade from previous operating systems like Big Sur or Monterey directly to Ventura.
- Step 2: Click on continue and tap on continue again.
- Step 3: Furthermore, click on Agree and then agree again.
- Step 4: Then you have to click on the internal hard drive and tap on continue.
It will take some time to install again depending on the speed of your driver, your USB drive, or if you have a spinning hard drive. The process can take up to an hour or even two hours to complete this process. However, if you have a fast SSD and a fast USB drive, it could go a lot quicker.
Automatic Reboot after the first part
You have already rebooted and it’s automatically selecting the macOS installer and the next part, do not have to press the keyword at all. It’s all automatic. So the next part is it’s going to go to the installing macOS part with a progress bar on the screen. This process will take a little bit and it will show the amount of time left for the completion. According to experts, this part will take somewhere between twenty minutes to forty-five minutes depending on the speed of your computer.
Final Reboot & Installation of new OCLP macOS Ventura
In the above part, you saw the process of updating the Open core legacy patcher to the folder that will be able to be kicked off once the setup assistant comes up. This will help to give you graphics acceleration, so you don’t have to go through a slow setup assistant. Thus, it is a really nice feature added a couple of releases back. Once it’s complete, it will take you to the login window.
Spotlight Indexing Note macOS Ventura
After that, you will make it to the macOS Ventura on your unsupported mac. Log in to continue. Keep in mind that after an OS upgrade, the system is going to be a little bit slow because it has to do a full spotlight indexing of the drive. So it can know when you do a spotlight search, it can know where all the files are and that can run up the fans, make the mac a little bit hot, and also make it slow.
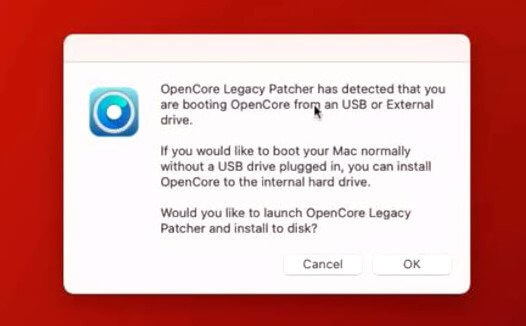
Thus, you have to give it a little bit of time to be able to finish those items before you start using and doing a lot of things. Once it’s done, the mac should be running at a good speed and a good temperature. So now the next thing you have to do is wait because the open-core legacy patcher launch statement is going to kick off here and then tell you a couple of things. For example, it’s going to say, hey you booted from a USB drive, and do you want to install it to the local hard drive? Click on okay.
Installing OCLP Bootloader to internal hard drive macOS Ventura
As soon as you click on yes, it immediately builds that configuration as we talked about before to the temporary file there. And then it immediately pops up saying that the insulation is finished and now we can install it to disk. Click on install to disk and after that when you see the next section on the screen, you will notice that one is in Blue and one is in Black.
The one that is in Blue is the current startup disk that open core legacy patcher is being used to start up the mac. So for now your USB drive is being used and that is why it’s in Blue. However, you are going to install that configuration to your internal drive, and then it will be Blue after you check later. So you have to click on disk 0 there and then click on the EFI. In addition, you will need your administrator password to do this and click on Continue.
As soon as do this, it will start cleaning up the installation location and unmounting the drive. Give it a few seconds for it to complete. Now you are going to reboot to apply those settings and what you’re going to do is to reboot.
Reboot and EFI boot
Hold down the option key. Because you have to change the startup disk from the USB drive to your internal drive. And then you have to click on reboot, hold down the option key and then restart. Continue holding until you see your startup selection screen. Hold the option, keep holding the option, and there you go. You need to move the arrow key or use the mouse over to your EFI boot. And then hold down the enter key to be able to boot from that it will immediately boot to your new macOS Ventura installation.
Furthermore, you can unplug your USB drive, post which you can log in. And that’s it. You are now up and running macOS Ventura on an unsupported MacBook Pro by Apple. Now that you’re back up, next you can learn how to change the wood picker if you want to. Moreover, if you reboot right now you will be able to see what the Blue picker will look like when you start up the mac from fresh.
Reboot part 2 macOS Ventura
Step 1: You need to restart the mac. As you do so, by default it will show you the wood picker immediately after the machine startup.
Step 2: Furthermore, you can see the macintosh hard drive is already selected and it will automatically boot to that. However, if you don’t like that what you can do is, you can turn that off. By going into the Open Core legacy Patcher application and changing the settings.
Step 3: You can do that once you get booted up. Go into Macintosh hard drive and then you will open up your open core legacy patcher application.
Step 4: Double-click on open core legacy patcher and click on Settings.
Step 5: Uncheck the Show Boot Picker option and click on Return to main menu.
Return to main menu
Step 6: You can click on build and install open core. Then you have to write that new setting to that temporary file location and then you have to install that on the internal drive with the new settings.
Step 7: Thus click on install to disk and tap on the internal drive which as you can see is in Blue. It is a Blue EFI showing you that it is booting now from your internal drive.
Step 8: Enter your password and then click on Reboot.
Step 9: Furthermore, click on restart. After that, the screen will shut down and the Apple logo will appear for a while. After that, it will start booting right up like a native experience Mac would be. You can either leave it with the boot picker icon or change it to this.
macOS Ventura Installation
In addition, you do not have to install the post-root patches like you normally do whenever you install and upgrade a macOS security update or a software update. When you install an upgrade or an update, it wipes out those patches. So you have to go there and reapply those patches. However, it applies automatically when you do a full installation or an upgrade. Therefore, if you want to check that those patches were installed, there’s a new option in the app to see what that looks like.
All you need to do is click on the post-install root patch and the first thing you’re going to see is available patches to your system. Mostly nothing will be available. All applicable patches have already been installed and it even tells you when it happened and what happened when you did the upgrade along with the date. Therefore, you don’t have to worry about installing the patches. Just go there and check if you need to install them or if they are already installed.
How to install a macOS Ventura security update or a software update?
You can see how the first thing that’s different is that there’s a new system settings. The system preferences have been redesigned into the system settings to look more like your iPad or your iPhone controls. So to be able to get the software update you need to do the following:
Step 1: Click on general and on the right-hand side you will see a software update. Click on that.
Step 2: It will immediately check for software updates. When it finds one you will see a little Red marker here and it will tell you what update is available. Most probably you will see an update for the next version like macOS 13.1 macOS Ventura.
Step 3: All you need to do is to click on update now and immediately it will start to download the software update. One thing you will notice is that the update is larger in size. Normally the software updates for a supported Mac are anywhere between two and four GB in size but since we have to patch the root volume to put the pieces back that Apple ripped out. You have to install a full 11GB software update.
Step 4: So it’s going to take a little bit longer to download and install but it will still install properly and bring it right back to the login window when it’s done.
Steps continued macOS Ventura
Step 5: What will happen after that as mentioned earlier it wipes out all the post-volume patches and they will have to be implied again. Once you log back in after the software update open core legacy patches should automatically install. Whether you need to install the post root volume patches again. And you should get a pop-up message on the screen after about ten to twenty seconds.
It will say hey open core legacy patcher has identified. That you need to install the post room volume patches because you install the software update.
Step 6: Click on install now and you will be brought right to the screen. You will be prompted to download the latest version of open core legacy patcher from the Github page. Again, it’s always recommended to grab the latest version of open core legacy patcher. To get the latest fixes and then all you have to do is click on install root patch.
It will say that the patches that are going to be applied to your system. Click install and reboot and you’re all set after the software update.
Conclusion
Mykola and Indiana K are both co-developers of the open core legacy patcher. If it weren’t for them this project wouldn’t be here today. This is a passion project for them and all the developers that are included. Moreover, there is no other way to operate because the work that is put into this outside of their normal lives, outside of their jobs is truly amazing. There are many people on a tight budget who cannot afford to buy a new Mac. Thus stay away from the latest security updates.


