


 Header Through Cloudflare")


Apple’s macOS was the first operating system to have file-sharing capability. It may be found in the Sharing options and is utilized to share your Mac’s files and folders with authorized users or groups on the same network. And you can even use File Sharing to allow others to access your complete Mac.
And Mac File Sharing also allows you to grant what sort of permission to the individual user, such as Read & Write, Read Only, Write Only, and No Access.
This function becomes less popular with the rise of cloud storage, a form of networked file sharing. However, it is still useful for transferring files from Mac to Mac or Windows to Windows via the Internet.
To solve the SMB File sharing, turning off File Sharing, rebooting my machine, and then switching on File Sharing again will help in fixing the issue
Do you know how to activate and configure Mac file sharing?
If you wish to share particular files and folders with other people, you can follow the procedure below.
Set up file sharing
1. Start by selecting Apple > System Settings from your Mac’s menu bar, then clicking General in the left pane and Sharing in the right. (It might be necessary to scroll below.)
2. Switch on File Sharing, then click the Info icon on the right.3. pick the folder you want to share by clicking the Add button at the bottom of the Shared Folders list, navigating to it, and then clicking Add.
4. The Public folder of each user having an account on your Mac is shared immediately. Select the folder you want to stop sharing, then click the Remove button in the upper right corner of the Shared Folders pane.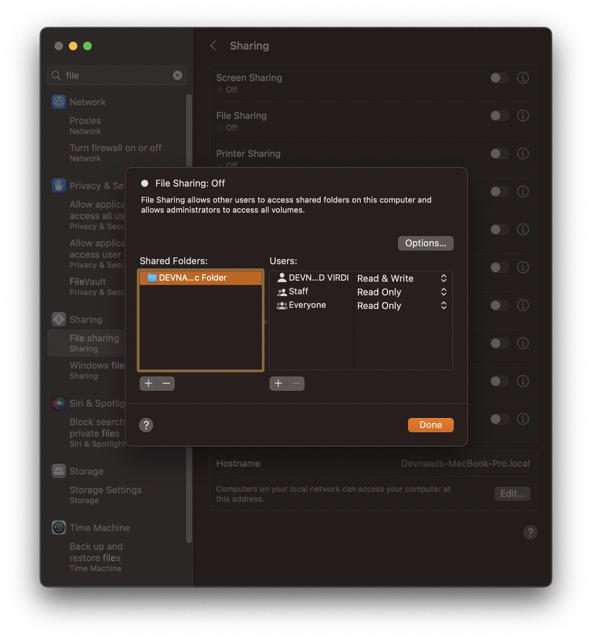
5. Right-click the folder’s name while holding down the Control key, select Advanced Options, make any necessary changes, and then click OK.
6 By default, your Mac will allow users who have been added to Users & Groups to access it remotely over a network. A user with administrator privileges may access a Mac’s complete system.
7. Select the folder you want to restrict access to in the Shared Folders list, then click the Add button at the bottom of the Users list.
- The whole Mac user base can contribute by adding individuals or groups. Choose Users & Groups from the left sidebar, then click Select to apply your selection(s) to the right side.
- You may include anyone on your network by adding users or groups: Pick a category (Network Users or Network Groups) on the left, then pick one or more names from the list of users or groups on the right, and finally, pick one.
- Include a contact in mind and make them a sharing-only account: A new account may be made by clicking the Create Account button after selecting Contacts on the left, then selecting a name on the right, clicking Select, and finally creating a password.
8. Choose the user in the Users list, click the drop-down menu next to their username, and then select the appropriate permission level from the list.
The user has full read/write access to the folder, meaning they may both view its contents and make changes to its contents. The folder’s contents can be viewed, but the user is unable to make any changes or add any new files.
When a folder is set to “Write Only” (Drop Box), the user can add files to it but cannot view or modify the files already there. User is denied access to the folder and cannot view its contents or make any copies.
9. To finish, select done.
The best way to transfer data between Macs is using File Sharing.
You may now configure another Mac to access the shared files or folders after you have enabled File Sharing and configured the files or folders you wish to share on your Mac (instructions for doing so are provided above).
In a different Mac:
1. Check that the Mac can join the same network as your Mac.
2. Check the box next to File Sharing in System Preferences > Sharing.
3. Launch Finder and navigate to Go > Network from the main menu.
4. Choose “Connect as” and then “Connect” from your Mac’s menu bar.
5. Select the Way You Will Sign in to This Mac (Guest, Registered user, Using an Apple ID).
6. Log in with your account password and click the Connect button.
7. The shared files or folders have shown up on this Mac.
Ventura: How to Enable File Sharing
Steps for sharing a folder.
When you’re ready to share a folder on your Mac, just follow these simple steps:
1. Launch the “System Preferences” menu.
2. In the left column, click “General.”
3. Activate the “Share” option.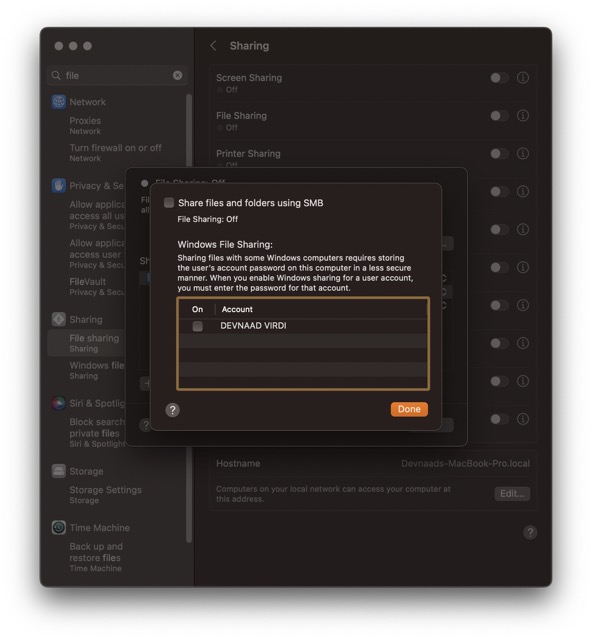
4. Turn on file sharing and then click the “i” to the right of the toggle.
5. If you want to change certain settings, use the “Options…” button
6. Check the box next to your user’s name.
7. Then, when you’ve shut down these windows, choose “To enable full disk access, go to “Privacy & Security.”
8. Just turn’smbd’ on.
How to Fix Mac File-Sharing Problems
If even after following the advice above, File Sharing is still not functioning, you can attempt different options to share your files and folders.
Use iCloud Drive
You may use iCloud to share your Desktop and Documents folders with other Mac machines.
Learn how to collaborate using iCloud by reading this.
1. Open System Preferences and select Apple ID.
2. Choose iCloud from the menu bar.
3. Select iCloud Drive from the menu, and then click the gear icon.
4. Choose Desktop and Documents Folders by checking the box and then clicking Done.
5. Desktop and Documents folders will now be back up to iCloud Drive. Files in iCloud can access from any Apple device.
Two Macs may exchange data via AirDrop.
AirDrop allows you to transfer information wirelessly between two Macs. Photos, movies, and other media may be easily shared across Macs in the same room via AirDrop. It’s Bluetooth-enabled and functional. File sharing with coworkers in the office is made possible using this method.
To facilitate file sharing among Mac users, make advantage of the Public and Shared folders.
The Public and Shared folders are pre-set options for facilitating file sharing among many Mac users. The Shared folder is stored in the Macintosh HD/Users/Shared folder. Inside of the Home folder is where you’ll find the Public folder. If you drag a file or folder into a Shared or Public folder, other users can access it from their accounts.
So this is how you can fix the issue of SMB file sharing.


