


 Header Through Cloudflare")


Disk Utility For Mac is the tool to use when you suspect a problem with your hard drive or want to make a backup copy. We all know, Apple’s macOS has a huge user base because of its friendliness and simplicity. Additionally, Apple creates aesthetically pleasing hardware, which is why several of its models are perennially featured among our picks for the finest laptops money can buy. Most of the time, your Mac will function without a hitch, but you may need to investigate strange behavior now and then.
Using the built-in utilities, Mac users may learn a ton of useful information about their computers. The “About This Mac” option, accessible by clicking the Apple logo in the top left corner, provides access to a wealth of information about your Mac’s hardware and applications.
You may learn more about your computer’s inner workings and performance with the help of utilities like Activity Monitor, Terminal, and System Information. Disk Utility is a very helpful and valuable tool. We introduce you to this Mac application and show you how it works.
What is Disk Utility?
Disk Utility is a built-in feature of macOS and Mac OS X that lets users manage their discs and other storage media. Its features include, but are not limited to, the following:
- Disk installation, removal, and ejection
- Splitting up data on a hard drive or other storage media
- Creating and controlling RAID arrays of discs
- Physical disc and volume management.
- Format and Erase discs.
- Make sure your storage devices are reliable.
- Restoring data from a damaged or corrupted storage device
- Creating and modifying disc images of various types
Disk Utility included a fix disc permissions option in Mac OS releases previous to El Capitan OS X 10.11. Apple has implemented System Integrity Protection (SIP), starting with El Capitan. This new safety measure limits the system’s root user account privileges.
This helps prevent accidental or malicious use of root access, but it also disables features like Disk Utility’s fix disc permissions option. You have to choose between system security and giving the user more say over their surroundings.
Disk Utility: Why Do You Need It?
The hard drives in your computer are essential to its functionality and efficiency. They provide safe storage for your computer’s operating system and the programmes that make it useful. All the digital images, music files, films, and documents you create are stored on your hard discs.
There are several situations in which Disk Utility would prove useful. Perhaps you’re just curious about how your hard drive or other storage devices are utilized, and this program will provide you with that information. If you want to keep specific files and programs separate from the operating system, you can do so by partitioning the disc.
You can fix damaged discs with Disk Utility. If your hard drive has issues, you can try fixing a damaged or corrupted disc by selecting the First Aid option. Disk Utility can be used on both the hard drives inside of your computer and any external drives you may have connected to it.
Checking Out Your Disks
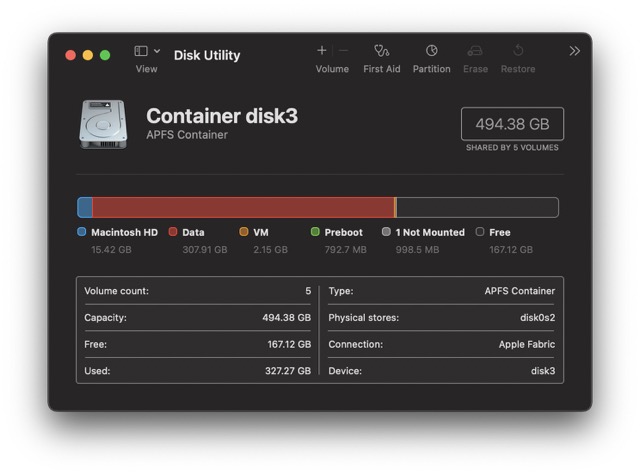
When you launch Disk Utility, it will display a list of all the drives that are currently connected to your computer. All drives, both internal and external, are listed independently. You can switch between seeing all devices and just the logical volumes by using the View drop-down menu in the top left corner.
Select the device or volume you want details on and click on it. The percentage of disc space that is used and the amount of disc space that is free, as well as the disk’s capacity, mount point, drive type, and file system, will all be displayed. When you select a disc, the options available in Disk Utility’s main menu will be highlighted as you click on the drive. Here are your choices:
- First Aid
- Partition
- Erase
- Restore
- Mount
Disk Utility: How to Diagnose a Bad Disk
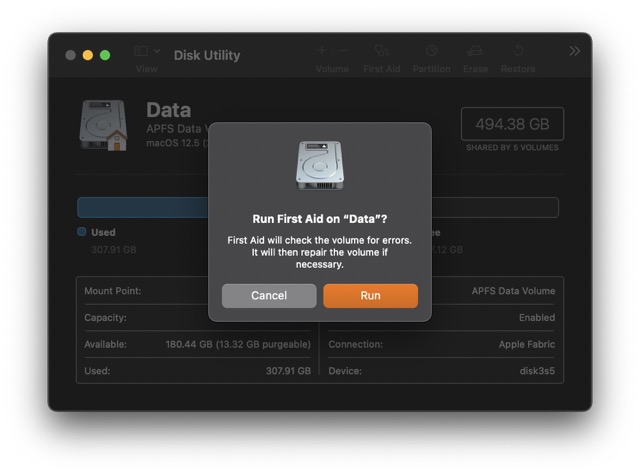
If you suspect a problem, you can use the First Aid function in Disk Utility to examine your internal or external hard drive.
If there is a problem with your disc, Disk Utility’s First Aid tool will run diagnostics and fix the problem automatically.
Please note that First Aid cannot be used to repair your Start-Up drive while the operating system is active. Next, we’ll go over some steps for doing so.
Whether you’re using an internal hard drive in your Mac or an external hard drive, you can run First Aid to see if there are any issues:
- Launch the Disk Utility.
- The sidebar will allow you to select the device you’re having issues with. If you don’t see Show All Devices, select it from the menu that appears to the right of the View option.
- Use the “First Aid” link.
- If there are any problems with the volume, Disk Utility will fix them. Proceed by selecting the “Run” button.
- Be aware that you may not be able to use your Mac while Disk Utility checks the volume.
- Disk Utility will try to fix the disc if it discovers a problem.
Disk Utility will give you a heads-up if it detects an imminent disc failure or cannot fix the drive. If this happens, you need to back up your data immediately. Learn how to back up your Mac by reading this article. How to erase files and recover them from a damaged hard disc, SSD, or external drive is another resource you may want to look at.
If Disk Utility says the disc is fine, it is probably fine.
Use Disk Utility to create and manipulate volumes on hard drives and other storage media.
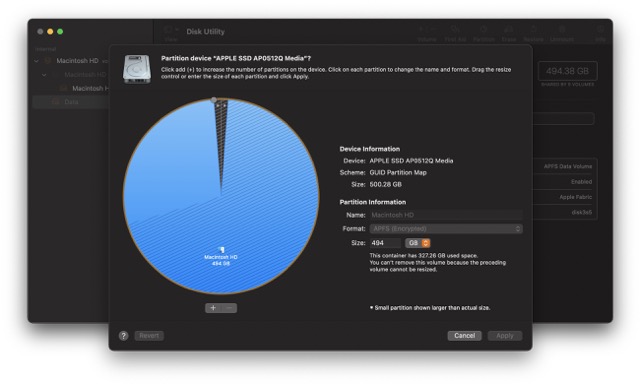
It’s crucial to know the distinction between a disc and a volume before digging into this common application of Disk Utility. Disk Utility makes liberal use of these terms. The “disc” in question is the actual hard drive. A disc partition is called a volume once it has been formatted. If you delete the disc, all the volumes it contains will be removed because a volume is a subset of the disc. However, you can delete a single volume without removing anything from the drive.
Disk formatting is commonly used to differentiate between deleting a volume and a disc. Disk Utility’s wipe volume and format disc options highlight the significance of this idea. If you’re looking to wipe a volume, you can do so in either a simple or secure fashion. As an alternative to wiping a volume, Disk Utility also allows you to format the entire disc, albeit this process is more time-consuming. It is important to remember that you can only format the Startup drive by entering macOS Recovery mode and selecting Disk Utility from the menu.
Make backups of your Mac’s hard disc
- Find the relevant disc and open it by going to the menu bar and clicking File.
- Select New Image, then Image from (partition name), and finally, a destination to store the image.
- After selecting the destination drive, clicking Restore, and then selecting the image file to restore, you can do a full or partial image restore to the end partition.
It’s important to remember that this action will completely wipe the end partition.
Disk Utility: How to Format a Drive
A drive may need to be formatted for many reasons. You may want to build a partition for Windows or a different version of the Mac operating system, encrypt an external storage drive that you use for work, or wipe your startup drive so you can do a fresh install of OS X.
A few of the many possible file types are:
- Since macOS 10.13, Apple has used a new file system called Apple File System (APFS).
- Before macOS 10.13, Apple’s file system was called Mac OS Extended. MS-DOS (Fat Allocation Table) and
- ExFAT was created to provide compatibility with Windows.
How to Make a Disk Image and Restore It
In what ways may a Mac user make a disc image?
- Access Disk Utility by selecting Finder followed by Applications, Utilities, and finally Disk Utility.
- Choose File > New Image > Image from Folder from the main menu to import an image from your computer’s file system.
- Choose the disc you normally boot from, and then click Open.
- Put in the disc image’s name and any tags you’d like to use. Then, decide where to store it.
- The disc image can be encrypted by selecting an encryption method from the Encryption menu that appears when you click the disc image.
- When you select Format from the resulting menu, you will have the option to save the file as a hybrid image (HFS+/ISO/UDF), DVD/CD master, read-only, or compressed file. Depending on your specific needs, you can choose from the available options.
- To save the disc image, first, click Save, then click Done.
Restore Disk image
One can make a clone of a volume using the “Restore” function in Mac Disk Utility. An image of the destination Mac hard drive must be created first using Disk Utility to clone data from one Mac to another.
A disc image is a copy of a disk’s data and structure that can be used to restore a system to an initial state, transfer data between computers, or create a backup.
What is RAID and how does it work?
RAID enables many hard drives to function like a single drive. The last common application of Disk Utility involves some more complex steps. Your data storage system’s speed, reliability, and capacity can all be improved by using numerous hard drives in a RAID array. When it comes to multimedia applications like video editing, many power users opt to keep a RAID configuration for optimal performance. When used in conjunction with a robust 15-inch laptop, a RAID array can dramatically increase producers’ productivity and writing rates. After being lost in OS X El Capitan. The ability to create and operate RAID arrays is now available in macOS.
Create and control four of the most common RAID types within Disk Utility.
- RAID 0 (Striped)
- RAID 1 (Mirrored)
- RAID 10 (Mirrored set of Striped drives)
- JBOD (just a bunch of disks)
There are benefits and drawbacks to each setup, but fortunately, Disk Utility handles them easily by default. When attempting a RAID configuration, remember that backing up your data is the most crucial initial step.
Final thoughts
You should now be familiar with Drive Utility for Mac. Also, you understood to use it to manage your disc and partitions on a Macintosh computer. If you’re having problems with your hard disc, Disk Utility is one of the best native macOS applications. In addition, the application lets you do several important backup and encryption operations without leaving it. RAID tool may also be quite helpful for your productivity if you are an advanced user or creator. You probably won’t need to fix your Mac very often over its lifetime. But knowing that Disk Utility is there to help you if you do will give you peace of mind.


