


 Header Through Cloudflare")


In Windows 11, File Explorer is a potent tool for navigating and managing files and folders on your computer. One of its convenient features is the AutoSuggest functionality, which delivers suggestions as you type in the File Explorer address bar. This feature furthermore significantly enhances productivity by quickly suggesting relevant paths, file names, or URLs, preserving time and effort.
Whether you favor having AutoSuggest enabled or disabled, this post will walk you through the straightforward steps to configure this feature in Windows 11, authorizing you to tailor your File Explorer experience to your requirements.
Also Read- How To Enable Or Disable Open Search On Hover in Windows 11
How Can I Enable or Disable AutoSuggest in File Explorer Address Bar in Windows 11?
Method #1. Enable or Disable AutoSuggest in File Explorer Address Bar Using Regedit in Windows 11
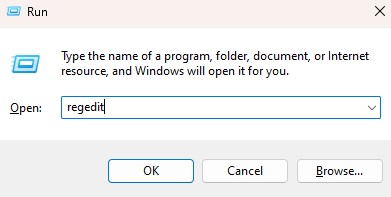
Step 1: First you need to open Registry Editor which you can do by pressing Win + R. Then, you require to type or paste regedit in the Run box, and lastly, press Enter. When you hit enter, you will see a UAC, simply press Yes to continue.
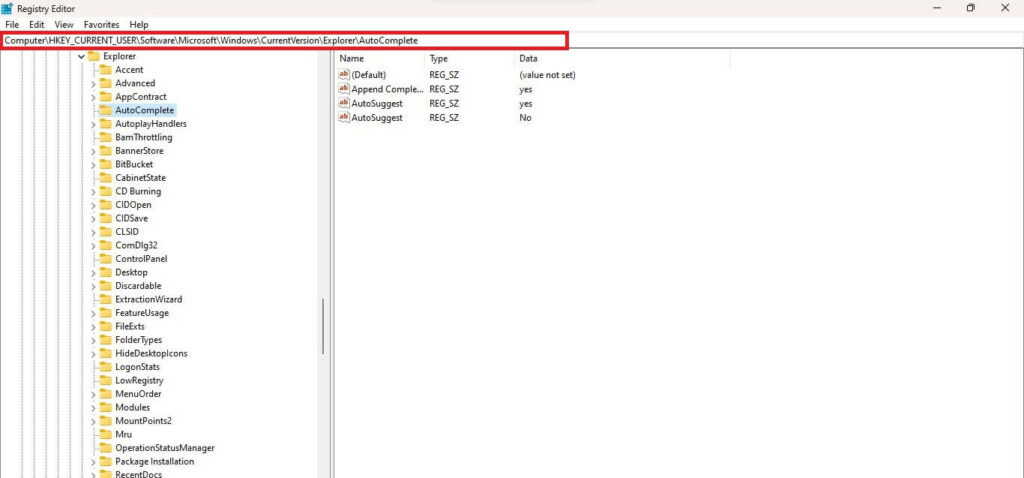
Step 2: Next, in the Registry Editor, head to this location:
HKEY_CURRENT_USER\Software\Microsoft\Windows\CurrentVersion\Explorer\AutoComplete
Step 3: Once you are in the mentioned location, you require to make a String Value. You can make a String Value by simply right-clicking on the blank windows on the right side and then selecting New. Once you click on New, you will see more options in the drop-down, choose String Value from there.
Note: If you are unable to find the AutoComplete Key located under the Explorer, you can create one. Simply, right-click on Explore, choose New, and then select Key. Finally, you need to name that Key as AutoComplete.
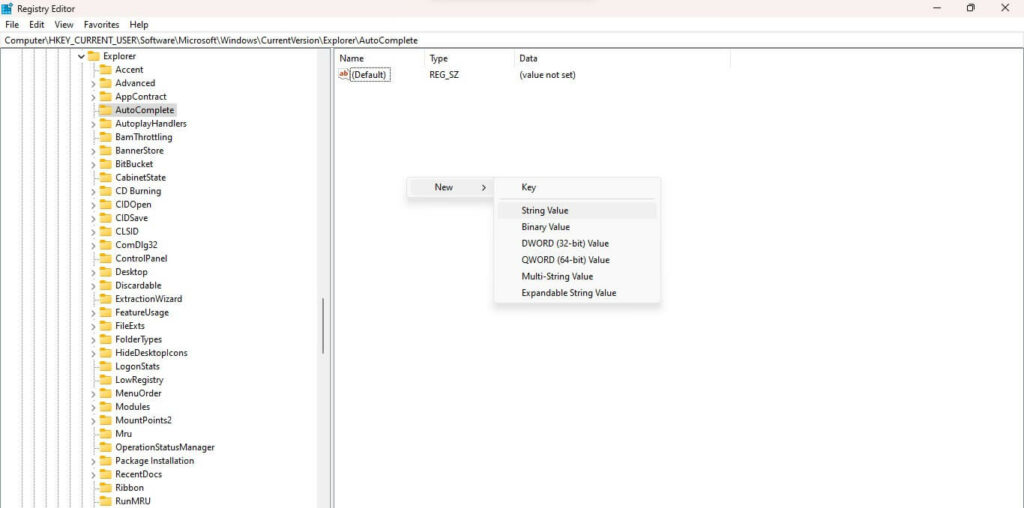
Step 4: Once you choose the String Value, you need to rename it as AutoSuggest. Once it is renamed, you have to double-click on AutoSuggest and set its value to Yes or No.

So if you want to:
Enable Autosuggest: Jot down Yes and then press OK.
Disable Autosuggest: Jot down No and then press OK.
Also Read- How To Pair Android Phone Via Bluetooth With Windows 11 PC
Method #2. Enable or Disable AutoSuggest in File Explorer Address Bar Using Regedit in Windows 11
In case the above method does not work out for you, you can enable or disable AutoSuggest in File Explorer Address Bar Using Control Panel in Windows 11, and to do that, you need to:
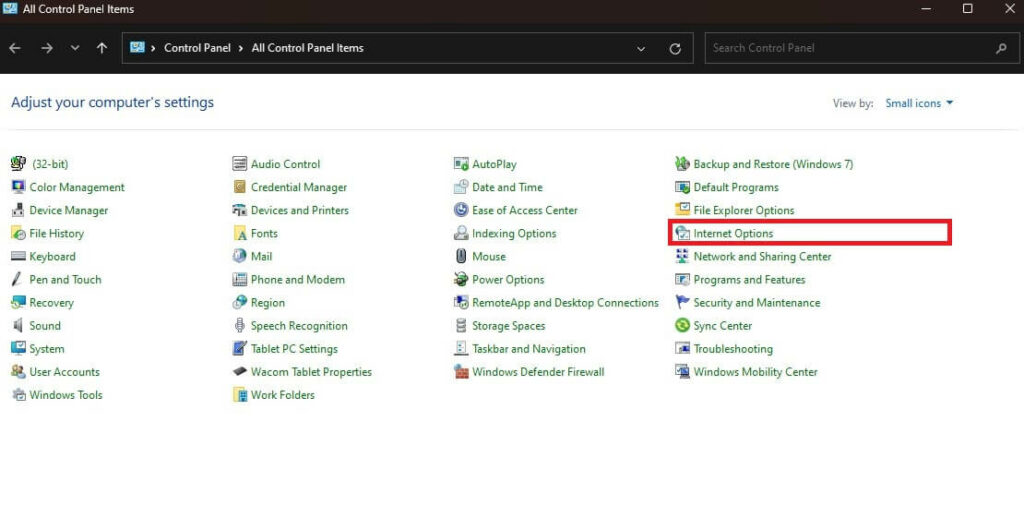
Step 1: First, you need to open Control Panel. To open it, you have to simply type or paste Control Panel and hit enter.
Step 2: Once you are in the Control Panel, you need to locate Internet Options and click on it.
Step 3: Now, when you click on Internet Options, an Internet Properties window will show up. In that window, you need to click on the Content tab and then click on Settings located beside the AutoComplete label.

Step 4: After that, in the AutoComplete Settings, you will see the box for Address Bar, located under the Use AutoComplete, you can choose what according to your preference.
If you want to:
Disable AutoSuggest: Uncheck the Box for Address Bar, and click OK.
Enable AutoSuggest: Check the Box for Address Bar, and click OK.
Step 5: Finally, click on OK again and close the Internet Properties Window.
Method #3. Enable or Disable AutoSuggest in File Explorer Address Bar Using Advanced Settings of Internet Properties in Windows 11
You can also disable the AutoSueggest feature using the Advanced Settings within the Internet Properties. You simply need to:
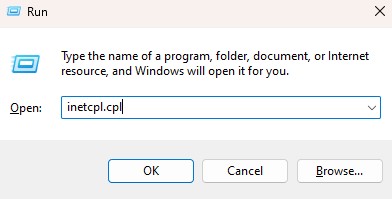
Step 1: Start by pressing opening the Control panel and head to Internet Properties or you can just press Win + R and paste inetcpl.cpl in the Run box and hit enter to directly open the Internet Properties.
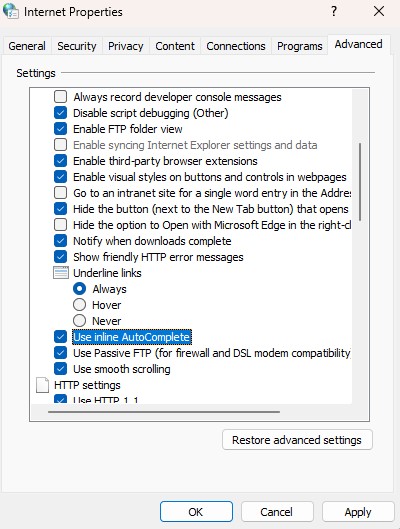
Step 2: After that, you need to click on the Advanced tab and then locate Use inline AutoComplete which you will see listed under the Browser label. Simply check or uncheck the box according to your preference.
Step 3: Finally, click on Apply to save changes and then click OK and exit the Window.
Also Read- How To Use Startup Repair In Windows 11
Frequently Asked Questions
What is the address bar in File Explorer Windows 11?

The Address Bar in File Explorer performs as a visual representation of the presently chosen folder location on your PC or network. It exhibits the path or address of the folder you are presently viewing or working with. Furthermore, to head to a particular folder in File Explorer utilizing the Address Bar, you can just jot down the folder location straight into the Address Bar. By tapping into the Address Bar, you activate the text input field, authorizing you to enter the preferred folder location.
What does the address bar in File Explorer display in Windows?

In Windows, the address bar in File Explorer displays the path or address of the currently selected folder or file. It shows the location of the folder or file within the file system hierarchy. The address bar delivers a textual presentation of the folder’s location in terms of its path. The path comprises a series of folder names separated by backslashes (), starting from the root directory of the drive.
For instance, if you are presently operating on a folder named “Documents” found within your user profile folder, the address bar will demonstrate the path as follows: C:\Users\YourUsername\Documents. Besides that, the address bar updates dynamically as you navigate via diverse folders within File Explorer. It reflects the current folder or files you have chosen or are viewing as noted earlier.
How Can I turn off “Show More Options” In Windows?
In Windows 11, the context menu occurs when you right-click on an item and delivers a list of actions for that item. The unique design in Windows 11 features a condensed layout that originally exhibits solely the most normally utilized options. Besides that, this forms a neater interface and lessens visual clutter. To access further options, there is a “Show more options” entry at the base of the context menu, which expands the menu when clicked or using the Shift+F10 keyboard shortcut. This authorizes users to view and access the full range of available options for the selected item.
Nonetheless, this option can be frustrating to some people but there is no option given by Microsft to disable it. But you can disable Show More Options using the terminal. You simply need to:
1. Open Terminal by right-clicking on the Start located in the taskbar and clicking on Terminal (admin).
2. After that, in the terminal, paste the following command and press enter:reg add "HKCU\Software\Classes\CLSID{86ca1aa0-34aa-4e8b-a509-50c905bae2a2}\InprocServer32" /f /ve
3. Finally, close the terminal and restart your system.


