


 Header Through Cloudflare")


Windows 11 Kiosk Mode is a way for IT teams and administrators to keep Windows 11 devices running only on one app or a set of apps, which gives them more control and governance. Windows Kiosk Mode is a great way to keep Windows 11 devices that are used for a specific purpose, like self-check-in kiosks at airports, point-of-sale terminals at self-service restaurants, or digital signage used for advertising, from being used for other things. It also makes sure that users can’t change the settings on the devices, use them for other things, or even change the settings on the devices.
Some of the desktop computers in an organization have a specific use. To show you what this looks like, think of a computer in the lobby that customers use to look at your product catalog. Or, a computer that shows a digital sign with pictures on it.
Also Read: 8 Best Fixes: Discord Not Opening On Windows 11
Types
Windows has two types of locked-down experiences that can be used for public or specialized use:
Single-app Kiosk: It runs a single Universal Windows Platform (UWP) app above the lock screen in full-screen mode. People who use the kiosk can only see that app. When the kiosk account (a local standard user account) signs in, the kiosk app will start automatically. You can also set the kiosk account to sign in automatically, and you can set it to do the same thing. In this case, the kiosk app will restart itself.
A Single-app kiosk is a perfect fit for public use. With the help of Shell Launcher, you can set up a kiosk that runs a Windows desktop application as the user interface. You can choose a different application to run instead of the default shell (explorer.exe) that usually starts when a user logs on. This type of kiosk doesn’t run above the lock screen.
Multi-app Kiosk: It runs one or more apps from the desktop. People who use the kiosk see a Start screen that only shows the tiles for the apps that can be used. When you use this method, you can set up different account types to have a different experience.
A multi-app kiosk is good for devices that are shared by a lot of people. When you set up a multi-app kiosk, certain rules are put in place that will affect all non-administrator users on the device.
Setting Single App Kiosk
A feature in the Windows client called Assigned Access lets an administrator control the user’s experience by limiting the number of application entry points that the user can see. Kiosk configurations are based on this feature.
You can choose from a variety of ways to set up your single-app kiosk.
- Settings: The Set up a kiosk option in Settings is a quick and easy way to set up a single device to be a kiosk for a local standard account.
PowerShell: Cmdlets for Windows PowerShell can be used to set up a single-app kiosk with Windows PowerShell. There are two steps you need to take before you can set up a user account on the device and install the kiosk app for that account on it.
The Kiosk Wizard in Windows Configuration Designer helps you set up a kiosk. Windows Configuration Designer is a tool that makes a provisioning package, like a zip file. Provisioning packages contain settings that can be used to set up one or more devices during or after the first-run experience (OOBE). These settings can be used on one or more devices during or after OOBE (runtime). When you use the kiosk wizard, you can also set up the kiosk user account, install the kiosk app, and make other important changes.
Also Read: [Fixed] Activation Error 0xc004c060 In Windows 11
Set up a kiosk in Windows 11 via local Settings
You can use Settings to quickly set up one or a few devices as a kiosk with just a few clicks.
As soon as you set up a kiosk in Settings for the Windows client, you also set up the user account for the kiosk at the same time. Changing the PC settings so that only certain people can do certain things can do this:
- Open the Settings app and go to Accounts. Then choose Other users or Family and other people.
- Select Set up a kiosk > Assign access, and then click on Get started to get started.
- Enter the name of the new account here.
When the kiosk account signs in, choose the app that will run. To choose an app, only apps that can run above the lock screen will be shown. Please see Guidelines for choosing an app that can be given to people who don’t have it on their own to use. if you choose Microsoft Edge as the kiosk app, you can set up the following things:
- Whether Microsoft Edge should show your website in full-screen mode (a digital sign) or with some browser controls (public browser)
- When a kiosk account signs in, which URL should be shown?
- When Microsoft Edge should start up again after a period of not being used (if you select to run as a public browser)
- Close the window.
The account tile is on the Set up a kiosk page. To remove access, click on the account tile, and then click Remove kiosk.
Set up a kiosk in Windows 11 using PowerShell
There are several PowerShell cmdlets you can use to make sure that you have access to multiple devices.
To run the cmdlet:
- Go into your account and sign in as a manager.
- For Assigned Access, make a user account.Sign in with the user account that was given access.
- Install the Universal Windows app that allows you to do what you’ve been given permission to do.
- Sign out of the account that has been given access.
Go into your account and sign in as a manager. - On a Windows client, type “PowerShell” into a search bar and look for the Windows PowerShell Desktop app.
Make sure you’re the owner of PowerShell.
- Configure assigned access by AppUserModelID and user name:
Set-AssignedAccess -AppUserModelId <AUMID> -UserName <username> - To Configure assigned access by AppUserModelID and user SID:
Set-AssignedAccess -AppUserModelId <AUMID> -UserSID <usersid> - Configure assigned access by app name and user name:
Set-AssignedAccess -AppName <CustomApp> -UserName <username> - To Configure assigned access by app name and user SID:
Set-AssignedAccess -AppName <CustomApp> -UserSID <usersid>
Also Read: How To Change Size For Recycle Bin Storage In Windows 11
Set up a kiosk using the kiosk wizard in Windows Configuration Designer
Windows Configuration Designer’s Provision kiosk devices wizard lets you set up the kiosk in your Windows 11 to run either a Universal Windows app or a Windows desktop app. You can choose which one to run.
Make sure you have Windows Configuration Designer installed. Then open Windows Configuration Designer and click Provision kiosk devices to set up the devices. Choose your project title and click Next. Then, choose the following settings:
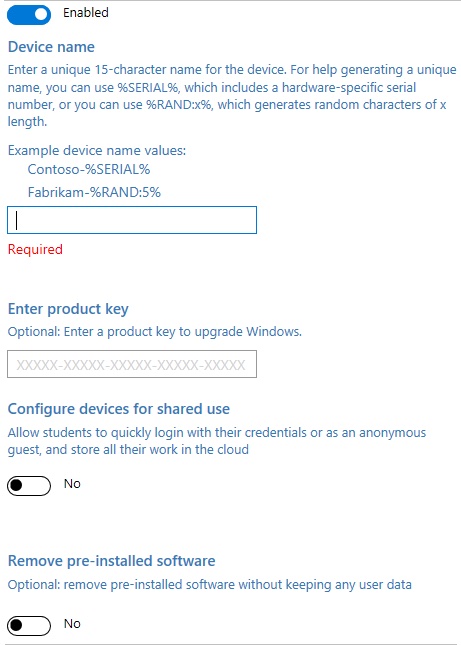
1. Enable device setup:
If you want to set up your device, choose Set up device, and make the following choices:
- Device name: You need this. It’s important to give the device a name that is at least 15 characters long. You can use variables to make the name more unique, like Contoso- percent SERIAL percent and Contoso- percent RAND:5 percent.
- This will let you get the product key. Optional. Select a licence file to upgrade your Windows client to a different edition. This is how you do it. For more information, check out the upgrades that can be made.
- Devices that can be used by more than one person need to be set up this way. For shared use situations, this setting makes the Windows client more efficient. It’s not important to make this setting for a kiosk. Default: Set this value to “No,” which may be the case by default now.
2. Set up the network:

If you want to set up a network, choose Set up the network, and make the following choices:
- It’s time to set up a new network: To turn on wireless connectivity, choose On.
- To find out the name of your network, type in its Service Set Identifier (SSID).
- It’s up to you which network type you want to use: open or WPA2. If you choose WPA2-Personal, type in the wireless network’s password, and then click OK.
3. Enable account management:
if you want to set up account management, choose Account Management, and make the following changes:
- Keep track of the accounts of your organization or school: Choose how devices are added. Choose from these:
The Active Directory: In order to join the device to the domain, you need to enter the credentials for a user account that doesn’t have a lot of power.
- Before you use a Windows Configuration Designer wizard to set up bulk Azure AD enrollment, make sure your organization is set up to use Azure AD join. In your Azure AD tenant, the number of devices per user determines how many times the bulk token in the wizard can be used. This number is set by the number of devices per user in your Azure AD tenant.
- If you choose this option, you can give the bulk token you get from the wizard a name that’s easy to remember. Set a date when the token will expire, so that it will no longer work. After 180 days, you can’t use it any more than once a day for the rest of your life.
- Select the option to get a lot of tokens at once, and then click In Let’s get you signed in. You’ll need to enter an account that can join a device to Azure AD and then your password. Select Accept to give Windows Configuration Designer the permissions it needs.
- You must run Windows Configuration Designer on your Windows client to use any of the wizards to set up Azure AD enrollment. If you choose to be a local administrator, you’ll need to enter a user name and password. Make sure to change the password every 42 days by going to the Settings app and typing in the new one. It could happen if the password isn’t changed during that time. The account could be locked out and not be able to sign in.
Also Read: Windows 11 File Explorer Tabs Configuration Guide
4. Add applications:
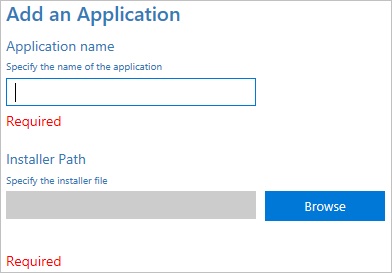
To add apps to the devices, click on Add applications and choose the apps you want. You can put more than one app in a provisioning package, including apps for Windows desktops (Win32) and apps for the Universal Windows Platform (UWP). There are different settings in this step based on the application you choose to use.
5. Add certificates:
Choose “Add certificates.” Then, choose the settings for the following:
certificate name: Make sure to give it a name before you do this!
certificate path: Choose the certificate you want to add from the list and click “Add Certificate.”
6. Configure the kiosk account and the kiosk mode app:
To add the account that runs the app and choose the type of app, choose Configure kiosk account and app, and make the following changes:
- To run the kiosk mode app, you need to set up a local standard user account.
Select “Yes” to set up a local standard user account.
- Then, choose the User name and Password for the account. This is the account that runs the app. If you choose No, make sure you already have a user account to run the kiosk app.
- When you sign in, you don’t have to do anything. Make sure to choose “Yes” so that you are able to sign in automatically when the device is on. No means that the account doesn’t already have a sign-in.If there are issues with auto sign-in after you apply the provisioning package, then check the Event Viewer logs for auto logon issues (
Applications and Services Logs\Microsoft\Windows\Authentication User Interface\Operational). - Users who will be able to use this kiosk mode app need to enter their usernames here. In-App type, choose the type of app you want to run. Choose from these:
A desktop application for Windows: It’s time to enter the path or file name. If the path to the file is in the PATH environment variable, you can use the file name instead of the file path. Otherwise, the full path must be given.
It’s a Universal Windows app: Go into the AUMID
Also Read: Amazing Windows 11 Keyboard Shortcuts You Should Know!
7. Configure kiosk common settings
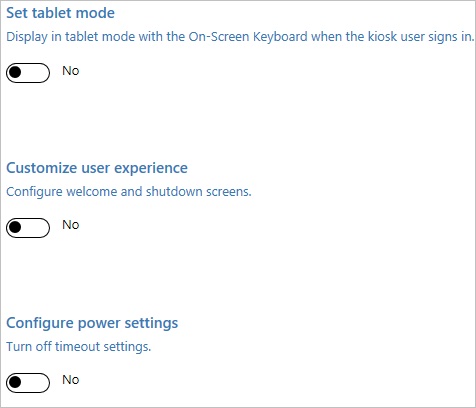
To set up tablet mode, welcome and shut down screens, and power settings, choose Configure kiosk common settings. Then, make the changes to the following:
- Set tablet mode
- Customize user experience
- Configure power settings
8. Finish:
To finish the wizard, choose Finish, and set the following setting:
Keep your package safe: To protect your provisioning package, choose Yes. Enter this password when you put the provisioning package on a device.
Also Read: How To Clean Install Windows 11
Conclusion:
Here are various methods on how you can set up a Kiosk in Windows 11. Setting up the kiosk mode has multiple benefits as it allows you to provision multiple apps. You can even command if you want the apps to be automatically installed across your devices and improve the overall efficiency of your devices.


