


 Header Through Cloudflare")


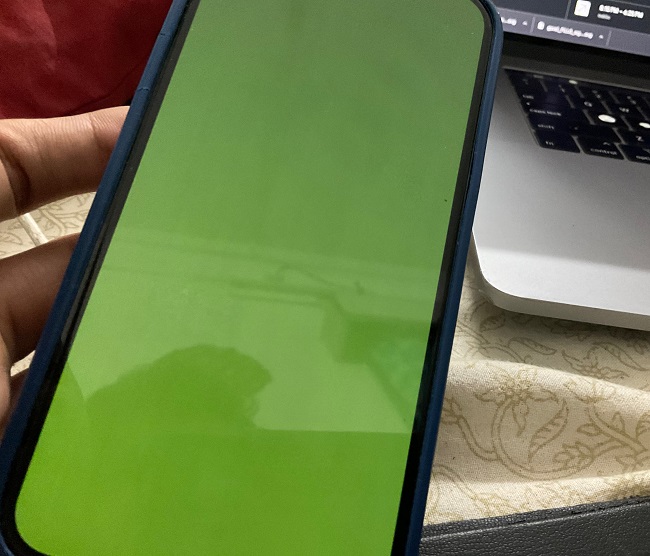
Have you ever seen your iPhone’s screen turn green like a neon light? It’s a strange problem that’s been bothering some folks who own the iPhone 13 Pro, iPhone 13 Pro Max, iPhone 14 Pro, and iPhone 14 Pro Max ( As reported by iPhone users on the Apple discussion forum). When this issue happens, the screen goes completely green, and your phone freezes – nothing works, and you can’t tap or swipe. Let’s talk about what is going on and what the resolution is.
How to Fix iPhone Green Screen Issue?
Imagine using your fancy iPhone, and suddenly, the screen becomes a bright green color! But here’s the real twist – the phone stops responding like it’s taking a nap. People who faced this problem are sharing their stories on Apple’s discussion forums, and many are scratching their heads, wondering what’s causing this.
Weird Timing of the Green Screen Issue
Here’s where things get even weirder: this green screen trouble mostly(As per the users’ comment) happens to iPhones that are more than a year old, like around 13, 14, or 15 months. Isn’t that strange? It’s like the phones are playing a trick on their users, just after the warranty time is over. This is as per the comments by most of the users who reported this problem on the Apple discussion forum and they ended up paying $400 or the equivalent for replacing the screen.
Different Stories, Same Green Problem
While the start of this problem can be different for everyone, there’s a common thing – the screen turns green! Some people say it happened after they updated the iPhone software, while others mention using apps like FaceTime, Facebook, iMessage, or games. It’s like the green ghost can pop up anytime. Users are frustrated and saying “Is that how long iPhones are going to last moving forward?”
For one of the users, the problem started with flickering green lines on the screen while using and after 2-3 hours, the entire screen turned green. Also, all the users reported that their phone was running perfectly fine and had no issue otherwise before this occurred.
You may also like to Read: What Is Screen Tearing & How To Fix?
Looking for a Fix
Okay, so when your iPhone turns into a green screen monster, what do you do? Well, it turns out that most of the time, it’s something inside the phone’s hardware that’s causing trouble. You might need to replace the screen, which fixes the problem for nearly everyone. But before you rush to the store or call Apple, let’s try some simple things first.
Let’s Fix the iPhone green screen issue
1. Force Restart your iPhone
- Press the volume up button and let go quickly.
- Press the volume down button and let go quickly.
- Press and hold the side (power) button.
- Wait for the Apple logo to appear; this could take 10-20 seconds.
- Once you see the Apple logo, release the side button. Don’t worry about any other screens, even if you see the one with the “slider” to turn the device off. Just focus on that Apple logo!
You read more about the iPhone Force restart here.
2. Try Updating iOS using iTunes
Sometimes, software bugs can cause your iPhone to act up. If the previous steps don’t work, try connecting your iPhone to a computer using a USB cable. Use iTunes (on older computers) or Finder (on Macs running macOS Catalina and later) to see if you can restore or update your device.
To check for updates and update your iPhone using iTunes, follow these steps:
1. Install iTunes (if not already installed): Make sure you have the latest version of iTunes installed on your computer. You can download it from the Apple website.
2. Connect Your iPhone: Use a USB cable to connect your iPhone to your computer. If iTunes doesn’t open automatically, launch it.
3. Select Your Device: In iTunes, you’ll see an icon representing your iPhone at the top left corner. Click on it to select your device.
4. Check for Updates: In the iPhone Summary panel, you’ll see information about your device. Look for the “Check for Update” button. It’s usually located next to the device’s name and information.
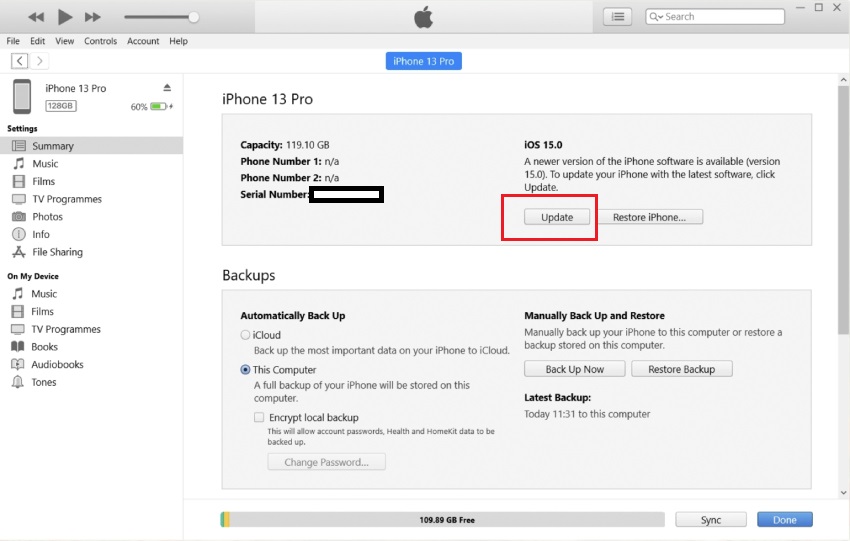
5. Update Your iPhone: If an update is available, iTunes will prompt you to update your device. Click the “Download and Update” button to start the update process.
6. Agree to Terms and Conditions and wait for the update to complete. Keep your device connected. After the update is installed, your iPhone will restart. You might see the Apple logo and a progress bar.
7. Once the update is complete, your iPhone will start up, and you’ll need to go through the setup process. Follow the on-screen instructions.
3. Reset Your Phone
This one is a bit tricky. You can erase everything on your phone and start fresh, like when you first got it. But be careful – this might not work for everyone, so backup your iPhone using iTunes first.
- Once your iPhone is backed up using the above method. Select the device again in iTunes on Your PC or Mac while the phone is connected with a USB cable.
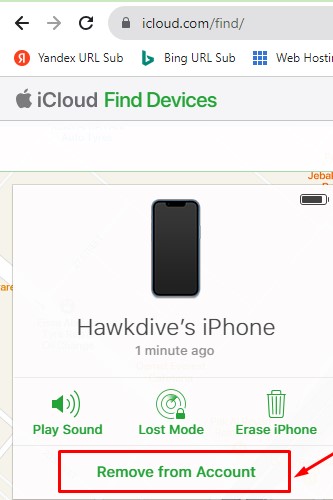
- Click the Restore iPhone button. If the “Find My iPhone” is enabled, you will first need to Turn that off or remove your device from iCloud. However, since the screen is not working and you can’t do anything on your phone, the only option you have is to remove the device from iCloud.
- Go to https://www.icloud.com/find/ and Sign in using the same Apple ID you are signed into on your iPhone. Select the iPhone from the list at the top.
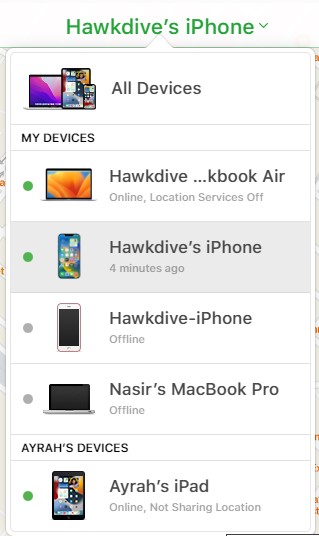
4. Now your device must be offline, which means the device should be either turned off or disconnected from any internet connection. Once it is offline, You will see the option to remove it from the account.
5. Now click the Restore iPhone.. button on your iTunes device summary page. A dialog box appears asking to confirm restore, click the restore button again.
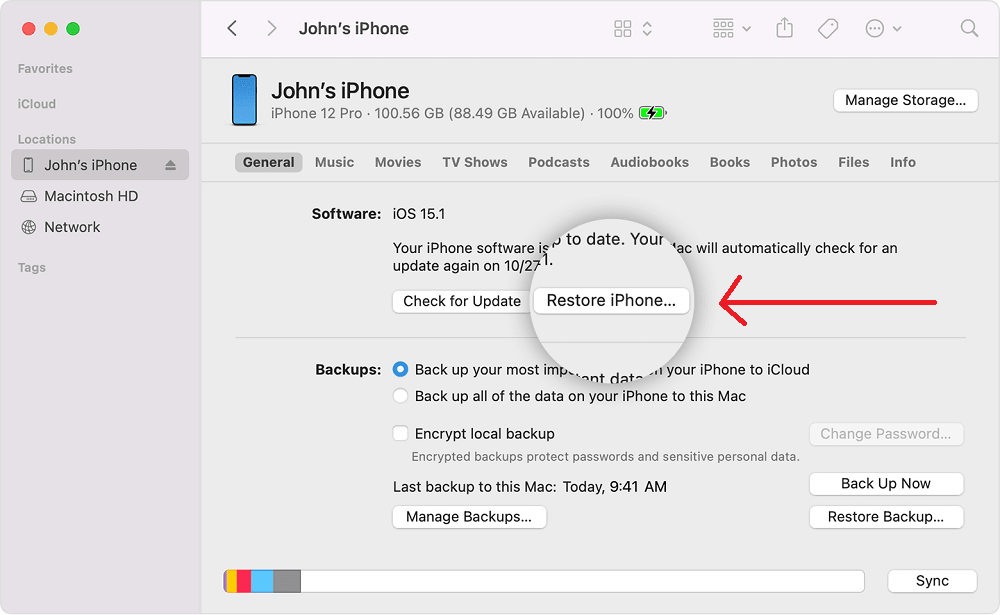
Now iTunes will download the latest iOS version and install it on your iPhone after erasing everything. I hope this solves your issue.
You may also like to read: How To Unlock Disabled iPhone 14 – 5 Quick Ways
4. If nothing Works- Hardware Issue (Contact Apple Support)
If the above-mentioned steps do not help, Which I believe will be the case. Remember, as I mentioned before, the root cause of the issue is mostly hardware-related.
So call Apple Care and set up an appointment for repair by Apple’s authorized service center. They will run a diagnostic and most probably ask to replace the screen.
Conclusion In Short
While this problem is affecting numerous users of iPhone 13 Pro and Pro Max, Apple has yet to officially acknowledge it as a recognized issue or confirm it as a manufacturing defect. This is primarily because the problem doesn’t seem to be tied to a specific batch of devices or a particular manufacturing site. It appears to be an issue across random devices. As of now, Apple hasn’t provided a solution beyond screen replacement to address this issue.
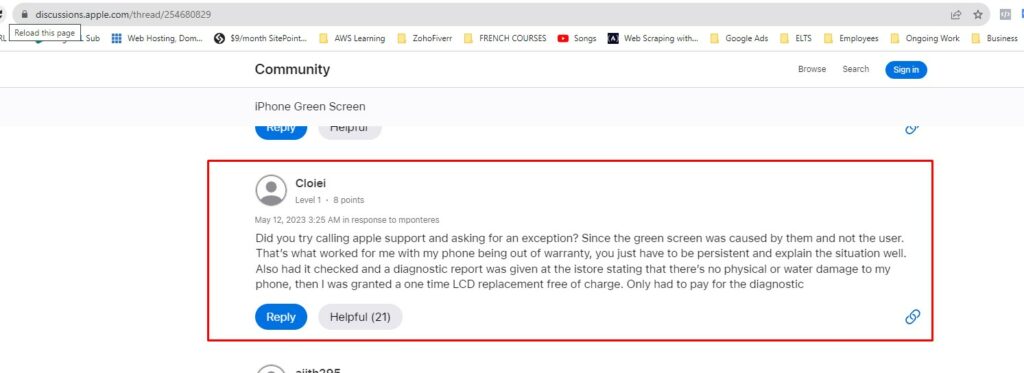
For most of the users who do not have a service warranty, it may cost around $400 or equivalent which may be confirmed by the Apple Genius bar after diagnosis. However, there was one user on the Apple support community who claimed to have it replaced free of cost (Paid only for Diagnosis) after talking to the support team courteously and reasonably (Remember this is not a verified claim, it was a comment from one of the users on discussion forum, you can still give it a try and I think it is worth trying).
I hope this article helps you find the solution or fix your problem. Please share your feedback or reaction in the comment below.
Thank you for reading and happy troubleshooting!


