


 Header Through Cloudflare")


Apple may have halted its contentious attempt to scan customers’ iPhones for photographs of child sexual assault, which is the greatest news affecting privacy recently. We think it’s fair to say that Apple is still the leader among internet firms in safeguarding customer privacy, despite the tremendous outcry from privacy campaigners.
Around 2018, Apple began including new safeguards for user data with each major update to iOS. This year is no different, with the introduction of iOS 15 and iPadOS 15 (both of which are free upgrades as of today). Apple has included eight key privacy and security updates in the latest iOS for the iPhone and iPad. Discover their significance and proper application here.
Apple’s primary goal has always been to ensure its customers’ privacy and safety. Therefore, it should come as no surprise that the newest iOS version, iOS 15, is loaded with privacy-focused options. In this article, we’ll have a look at the best iOS 15 privacy features and advise you on the settings you should use to protect your personal information.
#1. Restrict what apps may see about your location.
Have you ever wanted to prevent an app from tracking your specific position because you believed it wasn’t necessary? If that’s the case, you’ll be happy to hear that Apple has implemented a means to prevent applications from accessing your location.
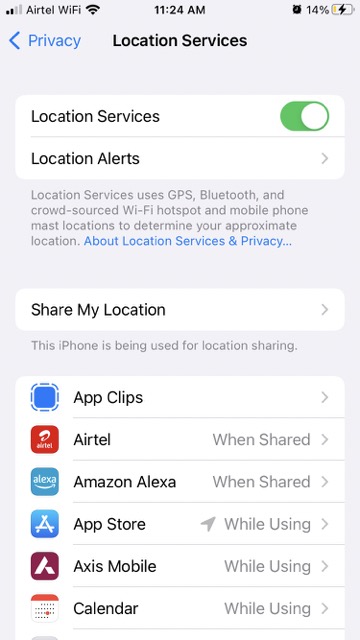
Open the iPhone’s Settings app, then search for and choose the app you don’t want to have access to your location data. To do so, select the Location tab. Next, disable Precise Location by flipping the adjacent switch.
In order to get the most out of ride-sharing and navigation applications while on the road, it is usually necessary to give the apps permission to access your approximate position. However, there are times when it appears pointless to share your location with applications. So, whether you’re concerned about protecting your location privacy or you just don’t want applications to know your general position, this option might be useful.
#2. A report on the privacy practices of mobile applications
The App Privacy Report details which applications, when, and to what locations your iPhone’s sensors and cameras have been accessed during the previous week.
Hundreds of us probably have dozens of applications on our iPhones. Many of these applications are also sucking up additional information about us and transferring it to third-party services and advertising, including access to our cameras, photographs, location, and microphones. The App Privacy Report will detail what information each app is accessing and transmitting. Insight into which programs you might wish to uninstall is improved by this openness.

The App Privacy Report may be seen by navigating to Settings > Privacy. To learn more about an app’s network activity and the information it is accessing, simply touch on its name.
#3. Control which apps may access your location data.
The option to restrict widget access to location information is another important privacy feature to remember. Now you have the option of granting location permission to both the app and the widget at once, or to either app individually. Considering how much energy location services consume, it is always preferable to have command over it.
Use the Privacy > Location Services > App menu in the Settings app to manage which widgets may access your location. You should now have a number of options available to you: Never, Always, Always, Always, Next Time, While Using the App or Widgets, or While Using the App. Pick your top choice and you’ll be all set.
#4. Save and autofill two-factor authentication codes
Two-factor authentication, often known as 2FA, necessitates the use of a password in addition to a code. The codes can be sent to your phone through text message (a less secure method) or retrieved via third-party software like Google Authenticator or Microsoft Authenticator. However, authenticator functionality has been integrated into iOS 15 and iPadOS 15 for the first time.
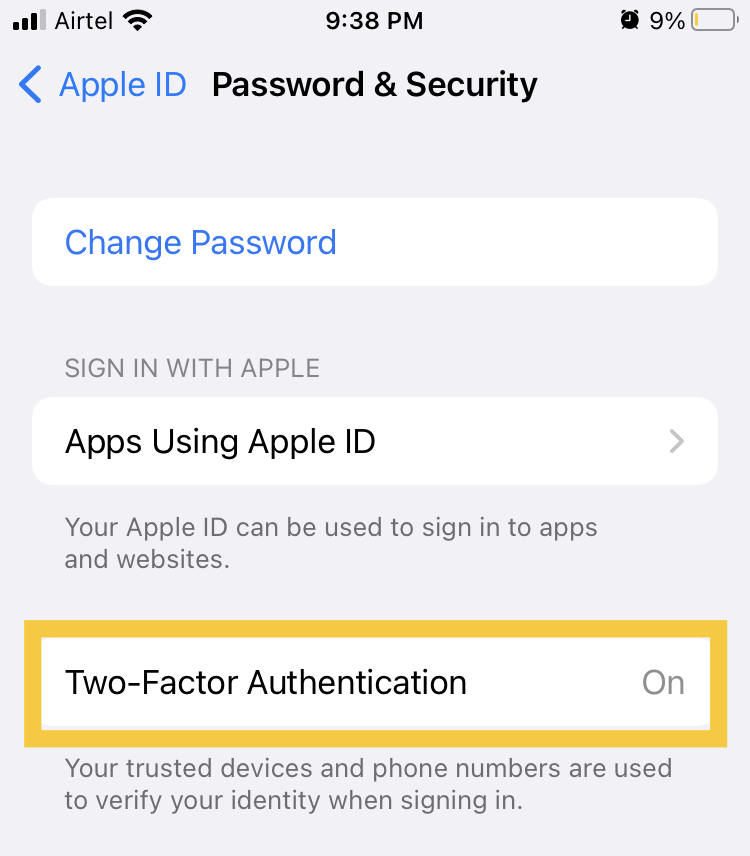
Two-factor authentication (2FA) is essential for data security. The downside of two-factor authentication (2FA) is that it adds time to the process of login into an account since you must input a code in addition to your password. This is especially true if you need to wait for a text message or go into an authenticator app to obtain the code. On the other hand, 2FA codes are automatically placed into a website or app using iOS 15 and iPadOS 15. Due to its simplicity, 2FA may gain wider acceptance.
To use two-factor authentication (2FA) with iOS 15 and iPadOS 15, you must link your accounts’ 2FA features to the iOS 15 and iPadOS 15 authenticator, just as you would with any authenticator app. Open the Settings app, hit Passwords, press the account you want to sync 2FA codes for, tap “Set Up Verification Code,” and then follow the on-screen instructions to set up two-factor authentication for a web-based service (such a bank or healthcare account). After completing this step, each time a website or app in the future requests a 2FA code, iOS 15 and iPadOS 15 will immediately autofill the code for you.
#5. Control How Other Programs Can Access Your Photo App
No longer do you have to provide third-party apps like WhatsApp access to your full picture collection if you only want to share a small selection of images or clips. Third-party apps may now access your whole picture library, or you can choose individual photographs. The photographs you’ve previously shared may be edited to remove those you no longer wish to be publicized, either individually or across all of the apps.
The Photos app’s permissions may be managed independently for each app through the Settings menu on an iPhone. Select the Photos option now. As a result, you’ll be presented with a number of choices: Picked Pictures, All Pictures, or Nothing at All.
If you wish to give the app access to just a subset of your photos, click the Selected Photos option. Access to the selected photographs can be permitted or denied at any time by returning to this setting and selecting the Edit Selected Photos option.
By going to the Settings app, then Screen Time, then Content & Privacy Restrictions, you can manage who can view your Photos from a central location. Please activate the Content & Privacy Restrictions setting. Select the Photos option now. All the pictures that can access your photo collection will be shown here. Select each app, and then adjust its settings to your liking.
It’s worth noting that you can prevent any app from ever utilizing the Photos app again. Be careful to click the option that says “Do Not Allow Changes” to prevent unauthorized modifications.
#6. Hide Your IP Address
Even more intrusive websites may be blocked in Safari by hiding your IP address from web trackers. In the absence of your IP address, internet trackers will be unable to single you out. 
The option to Hide IP Address may be found just under the Prevent Cross-Site Tracking button we just showed you. To turn it off, just flip the green switch to the gray position.
#7.Dictation Capable Devices
One of the most cherished capabilities of iOS is dictation. Moreover, iOS 14 improves upon the functionality of entering text by speech. Apple has not only made dictation more convenient but also more secure by making sure all of the processing is done offline, protecting the user’s privacy. It is important to keep in mind that the search dictation is still handled by a server.
On an iPhone, you may enable dictation by going to the Settings app, then General, then Keyboard, and finally Enable Dictation. You may now use voice input by tapping the microphone icon.
#8. Reveal your current location once.
Allows you to temporarily share your location with an app.
Location permission requests from apps have been available for some time. Maps can show you exactly where you are, and rideshare services can come to pick you up at a predetermined place thanks to this pinpoint accuracy. But there’s no reason to share your location with an app. The new one-time location access feature in iOS 15 and iPadOS 15 lets you give an app temporary access to your precise location. While you’re using the app, it will have access to your location (like rideshare, for example). The next time the app needs access to your location, it will ask for your permission again.
Once developers add this capability to their apps, users will be given the choice to provide access just for the current session instead of being limited to “always accept” or “never” when asked for location permission.
#9. Turn On the Recording Of App Behavior.
iOS 15 does a lot to prevent applications from abusing your device’s resources and also makes it difficult to follow your movements. App activity recording was added in iOS 15 to make this procedure clear and easy. This simply keeps a track of every permission an app requests and every resource it uses over the course of a week, providing you with everything you need to determine the app’s validity.
1. Go to your device’s Settings menu and choose the Privacy option to activate App Activity Recording.
2. To start recording your app’s activity, swipe all the way to the bottom of the screen.
3. Turn on “Record App Activity.”
In doing so, a log of the applications that accessed your location, camera, microphone, etc. for the previous week will be stored. You will also be able to view the actions of individual applications and how they interact with domains. To store the log of app usage on your smartphone, tap the “Save App Activity” button.
#10. Enable Data Security
Those who are really concerned with data privacy but are willing to take some precautions may choose this option. After ten failed tries to verify using Face ID or enter your passcode, your iPhone will activate its Data Protection function. With the Data Protection feature, even if your phone is stolen or lost, the thief will not be able to access any of your personal data. 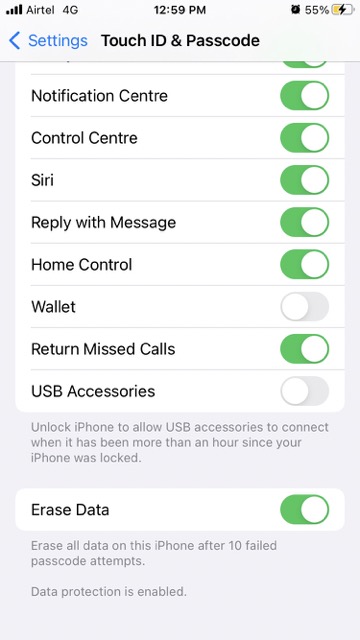
1. Access “Face ID & Passcode” from the Settings menu. Doing so will enable “Data Protection.”
2. Your password is required for access. Next, find the ‘Erase Data’ toggle at the bottom of the screen and turn it on.
3. To activate Data Protection, press the ‘Enable’ button.
Leave a hint for yourself someplace in the house as an extra precaution. To avoid losing data, this will help you keep in mind your password.
#11. Stop network providers from following your iPhone or iPad as you switch carriers.
A device communicating over a Wi-Fi network must first establish its identity by providing the network with its MAC (Media Access Control) address. And if it turns out that the device uses the same Wi-Fi MAC address on all networks, it’s much simpler for network operators to track the device’s movements and activities via the networks. Also, it allows for the collection of personally identifiable information from users, which may be used for surveillance purposes.
With iOS 14 (and iPadOS 14 and watchOS 7), you may now use a new MAC address for each Wi-Fi network, preventing network operators from tracking your iPhone and iPad between networks. In particular, your private Wi-Fi network can’t be traced back to any specific individual thanks to your device’s unique MAC address.
You may access this personal setting by going to the Wi-Fi section of your iOS device’s Settings menu. Click the “info” button next to the Wi-Fi network you wish to join for further details. Then, activate the button labeled “Private Address.”
#12. Always Monitor the Green and Orange Spots
A straightforward permission prompt appears whenever an app on your iPhone needs to use your camera or microphone. While this is to be anticipated, social media applications like Instagram and Facebook have been busted for utilizing this feature in really inappropriate ways on several occasions. Therefore, they have been discovered utilizing your camera and microphone despite your best efforts.Apple released a safety feature that makes it easy to see which app is utilizing the iPhone’s camera or microphone.
1. When the WiFi and cellular signal bars become green in the status bar. It indicates that an app is using the camera.
2. When an app’s icon becomes orange in the status bar, it’s picking up sound through the device’s microphone.
3. If you reach the Control Center on your iPhone after closing an app that was utilizing the camera or microphone, you’ll see an icon for the camera or microphone, as well as the app’s name.
#13. Limit apps’ access to your home network
The need for local network access is warranted by some apps in cases involving Bluetooth or WiFi-based devices (aka home network). A few power-hungry apps, like Facebook and TikTok, are eager to connect to it, despite the fact that it is unclear what it does to the local network.
Thankfully, on iOS 14 and later, you can control which apps have access to your private network.
1. Access the Privacy section of Settings on your iOS device to complete the task.
2. The next step is to select Local Network. All the programs that can connect to your home network should now appear here.
3. Then, to enable or disable an app, just flip its adjacent switch.
#14. Turn off certain alerts
All alerts displayed on the iPhone’s lock screen will be revealed once the phone is unlocked. When a new notification arrives while you’re surfing, the same thing happens. Of course, detailed alerts are fine when you’re surfing in private. But they might be irresponsible or humiliating if someone else is able to see your communications since they were displayed on your phone’s screen. 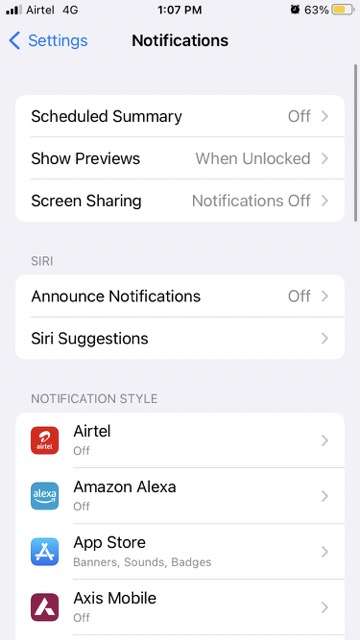
If you don’t want your notifications displayed on the lock screen or otherwise accessible when the phone is unlocked. Apple iOS 15 makes it easy to disable this feature.
#1. To start, open your device’s Notifications settings by going to the Settings menu.
#2. Just click the “Show Previews” button now. If you want to make sure the alerts never show up, choose “Never” as the value.
#15. Use Private Relay to Browse the Web
Apple’s commercial iCloud plans, now called iCloud Plus. It includes a new feature called Private Relay, which is available to the public in beta form. The term “Apple’s VPN” is commonly used. However, a more fair comparison would be to Apple’s implementation of the Tor network. By routing your data through a pair of proxy servers, Private Relay prevents the websites you visit from obtaining your true location and protecting your data in transit. Thus, neither your Internet service provider nor the sites you visit, nor even Apple, have any knowledge of what you do online.
Online, we are extremely vulnerable to being followed by anybody from nosy marketers and corporations to malicious hackers. Although virtual private networks (VPNs) can protect our privacy, they can be expensive and you should be cautious about the one you choose. VPNs might be difficult to understand for those without technical training. However, iCloud Private Relay eliminates the need for manual configuration of a VPN by virtue of its incorporation within iOS.
For use of iCloud Private Relay, you will need to upgrade to iCloud Plus. Then, access Private Relay by selecting Settings > Your Name > iCloud. Please turn on Private Relay by toggling its switch (green).
Hence these are the methods to control your privacy.


