


 Header Through Cloudflare")


On Windows 11, you can quickly set up multiple accounts so that you can share a computer with a lot of people. You can also disable an account rather than delete it when you don’t need it anymore, and this way, you can keep their settings and files if you need to get them back.
Computer Management, Settings, Command Prompt, and PowerShell are all ways to disable an account in Windows 11. No matter what the reason, Windows 11 has at least four ways to do this. As soon as the account is disabled, the system will cut off access and remove the account from both the Start menu and the sign-in screen.
Here, we’ll show you how to remove your Microsoft account from any Windows 11 PC. It’s possible to do this in a number of ways, including through Settings, the Control Panel, and the Users and Groups menu. When you don’t have a local account, Windows won’t let you remove a Microsoft account from your computer. We’ll also show you how to set up a local account. So, without further ado, let’s get started right now.
Also Read:[Fixed] Green Screen Error In Windows 11
Things to think about before you delete your Microsoft account
In this article, we’ll show you how to remove a Microsoft account from Windows 11. Many things need to be learned before going down that road. They are here:
- The first thing you need to do if you want to remove a Microsoft account from your computer changes your account type. You don’t need to remove your Microsoft account from your computer. This process will keep all of your files, folders, apps, and settings, so you can keep them all. If you move to a new place, you’ll be able to use the same account but with a new name. Plus, you won’t be able to use some of the Microsoft services and features that come with it.
- Second, if you decide to remove your Microsoft account from Windows 11, you will need a local account with Admin rights.
- Third, if you remove your Microsoft account, all of the data in that account will be deleted. If you have important files and don’t want to lose them, we suggest that you make a copy.
- Reports say that even the stable version of Windows 11 Home might need a Microsoft account to be set up and installed. It looks like the “Pro” version will let you install the OS with a local account.
- Then, if you want to remove your Microsoft account from your computer, you can’t do that. It can still be used through a web browser with your credentials.
Also read:How To Run Android 12L On Your Windows 11
Currently, you must have a Microsoft account to install Windows 11. This will likely change when the OS is stable for all devices that can run it. That means you don’t have to add a Microsoft account to use Windows 11 because it doesn’t look like you’ll need one (at least the Pro version).
How to disable account using Computer Management
To disable accounts on Windows 11 without removing them, use these steps:
- Click on Start.
- Check for Computer Management and tap the top result to open the app.
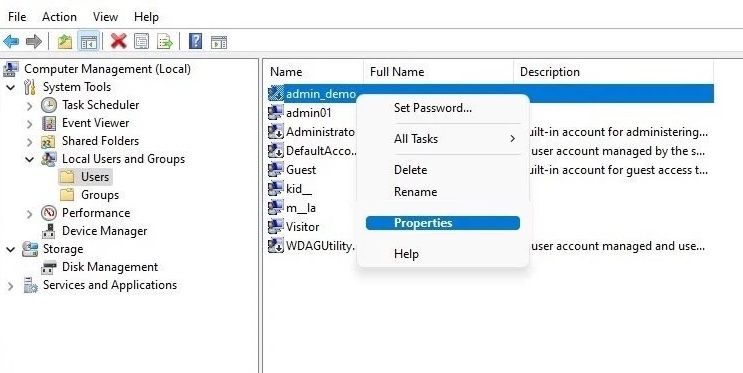
- check the following path:Computer Management > System Tools > Local Users and Groups > Users
- Then,Right-click the user and choose the Properties option.
- Click the General tab.
- Check the Account is disabled option.
- Tap the Apply button.
- Then, OK
Once the processes are completed, the user will be unable to sign in, but the account will remain available in the system until it is deleted.
Also Read: Zoom Using Too Much CPU On Windows 11? Try These Fixes
Activate the Computer Management account.
Follow these procedures to enable an account with Computer Management:
- Open the Start menu.
- To access the app, perform a search for Computer Management and pick the top result.
- Navigate the path as follows:Computer Management > System Tools > Local Users and Groups > Users
- Right-click the user and choose Properties from the context menu.
- Select the General option.

- The option to clear the account is disabled.
- Tap Apply the button.
- To proceed, click the OK button.

Following these procedures, the user will be able to sign in and access his or her Windows 11 account.
Also Read:Windows 11 SE vs Windows 11: A detailed comparison
How to disable an account using the Settings menu
You can disable only family members’ accounts in the Settings app. Microsoft accounts and local accounts cannot be disabled.
Follow these procedures to disable a family member’s account in Settings:
- Navigate to Settings.
- Select Accounts.
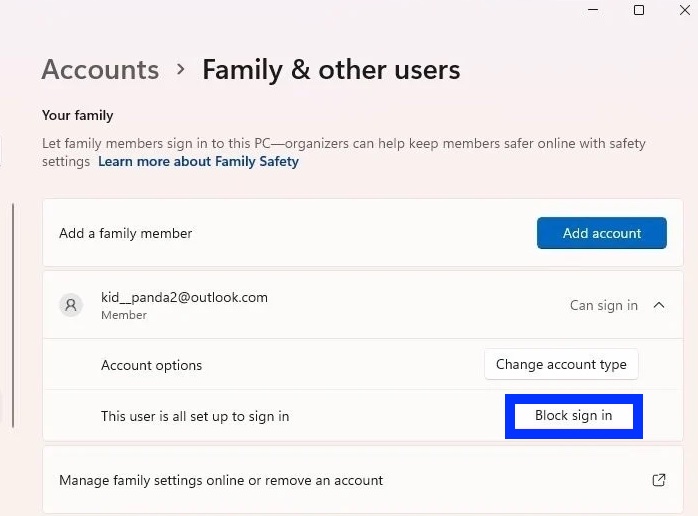
- On the right, click the Family & other users page.
- Select the account and click the Block sign in option under the “Your family” section.
- Choose the Block option.
Once you’ve completed the procedures, neither the family member nor the account will be available on the sign-in screen.
Also Read:[Fixed] SysMain Causing High CPU And Memory Usage In Windows 11
How to enable an account using the Settings menu
You can disable only family members’ accounts in the Settings app. Microsoft accounts and local accounts cannot be disabled.
Follow these procedures to disable a family member’s account in Settings:
- Navigate to Settings.
- Select Accounts.
- On the right, click the Family & other users page.
- Select the account and click the Allow sign in option under the “Your family” section.
- Choose the Allow option.
Once you’ve completed the procedures, neither the family member nor the account will be available on the sign-in screen.
Also Read:Is Discord Mic Not Working In Windows 11? Apply These Fixes
How to use the Command Prompt to disable an account
On Windows 11, use these procedures to disable a local or Microsoft account using commands:
- Click Start.
- Navigate for Command Prompt, then right-click the top result, and choose the Run as administrator option.
- To view the available accounts, type the following command and hit Enter: net user
- To disable the Windows 11 account, use the following command and hit Enter: ACCOUNT-NAME /active:no net user
Replace “ACCOUNT-NAME” with the name of the account to disable in the command.
On Windows 11, this example disables the “admin demo” account. net user admin demo /active:no
Once the steps are completed, the account will be deactivated and will no longer be accessible on the sign-in screen. The account and data, on the other hand, will stay on Windows 11.
Account activation through Command Prompt
To enable Command Prompt for an account, follow these steps:
- Open the Start menu.
- Search for Command Prompt, right-click the first result, and choose Run as administrator.
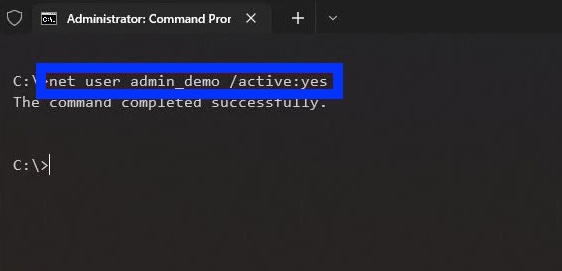
- To disable the Windows 11 account, use the following command and hit Enter: net user ACCOUNT-NAME /active:yes
- Replace “ACCOUNT-NAME” in the command with the name of the account to enable.
- On Windows 11, this example enables the “admin demo” account.
net user admin_demo /active:yes
After completing the procedures, the Windows 11 account will be enabled, allowing the user to regain access to their desktop and files.
Also Read:How To Check For Updates On Windows 11/10 ?
The last words
The tutorial above demonstrates several simple methods for deleting a Microsoft account from your Windows 11 machine. Therefore, go ahead and follow our guide to remove or delink your Microsoft account from your computer and replace it with a local one.


