


 Header Through Cloudflare")


This Guide will explain Mac secrets to transform your MacBook 2022. So, Whether you’re new to Macs or have been a long-time user, there are many minor secrets and shortcuts that many people are unaware of that can make your time with them more productive. And, with most people trapped inside owing to coronavirus lockdowns and quarantines, what better time to learn a few new things that will make your virtual life easier?
Whether you’re running macOS Catalina or an earlier version of the operating system, you can do all of these essential things to stay organized and get more done on your MacBook Pro, MacBook Air, iMac, or Mac Pro (though you should download Catalina for a variety of reasons).
Here are 15 tips and tricks for stuff your Mac might not have been capable of. You should also learn how to set up a new user on your Mac if you’re sharing a device and some of Mac’s best-kept secrets.
Also Read:[Fixed] iOS 15.4.1 Apple Music Not Playing Songs
1. Rearrange the icons in the menu bar
![]()
The menu bar is a convenient method to access frequently used settings and features. You can modify the icon order to your chosen positions to get the most out of it. Hold the Command button while clicking and dragging an icon to the desired location.
The date and time, Siri, and Control Center are menu bar components that cannot be adjusted. You can rearrange all icons to the left of the immovable icons.
Also Read: Mac Stuck On Apple Logo And Won’t Boot? Here’s A Fix
2. Personalize (and find) your cursor

You’ll recognize the white-and-black pointer cursor if you’ve been using the Mac for as long as I have. With some tweaks in the Accessibility options, you can give it some individuality.
Pointer settings are found in the Display section of Accessibility and adjust Mac’s cursor. You can modify the outline and fill in the colors of the pointer and its size. Make your Mac more personal by having some fun with it.
Here’s an additional tip: There’s a checkbox for “Shake mouse cursor to locate” inside the Pointer tab. When you turn it on, you’ll be able to easily wiggle your mouse back and forth to increase your cursor. This is useful if you frequently lose track of the pointer.
Also Read:7 Methods To Fix iPhone Keeps Asking For Apple ID Password
3. Windows should be tiled.
Because macOS is designed for multitasking and working on numerous apps simultaneously, consumers prefer working on a Mac over an iPad or iPhone.
On my Mac, I have a single display and use the Tile Window functionality to see both apps well. Tile Window is available in every Mac app; to use it, go to Window in the menu bar and pick Tile Window to the Screen’s Left (or Right).
The app you’re using will be pushed to the side, and the other side will show the other app windows available. When you select one of those programs, its window will take up the entire side of the screen. (If a running app has nothing open, it will not appear as a choice.) A file or window must be available in the app.) Tap the Escape key on your keyboard to leave this page.
Also Read: How To Unlock Apple Card
4. Change the style of the captions.
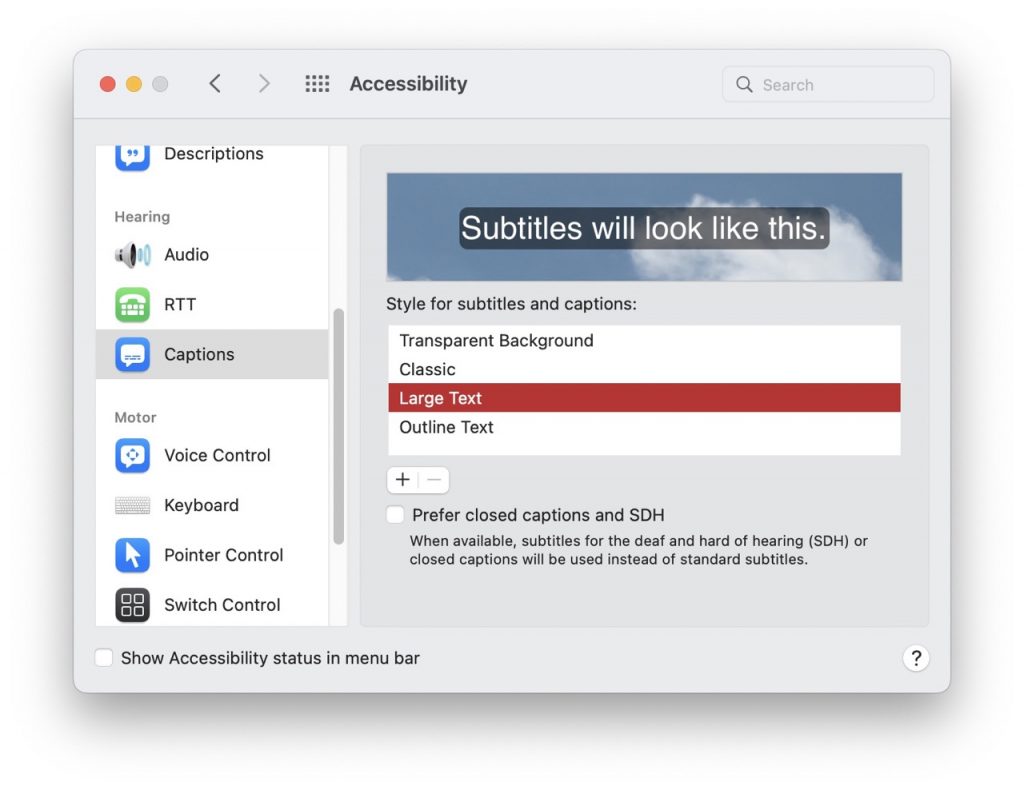
Although the hearing is good, I’m watching more international shows than ever before. I’ve been watching TV with captions turned on, and I’ve enjoyed the show without fear of misinterpreting what’s being said. However, I find the Apple TV app’s default caption style to be too intrusive.
The caption style may be changed in System Preferences > Accessibility, not the TV app’s preferences. Scroll to the Hearing section in the left scroll window and click Captions. Apple provides four caption styles from which to choose. You may also use the “+” button to build your style.
Note that the caption style you choose here only affects Apple apps like TV. For example, you are subjected to YouTube’s kind when you watch a YouTube video.
Also Read: Apple Wireless Mouse Not Working? Try These Fixes
5. Turn each folder into an emoji of your choice
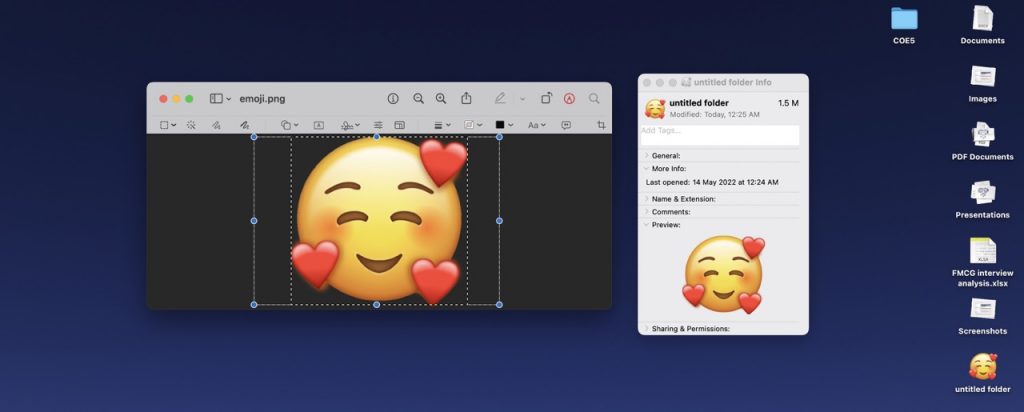
Make your desktop folder icons easier to distinguish (and more entertaining). This is how you do it:
- Go to File > New Folder on your desktop to make a new folder.
- Look up the emoji you want on Google Images (e.g., “heart emoji” or “star emoji”).
- Drag the desired image to your desktop.
- To open the image in Preview, double-click it.
- To make the image translucent, touch the markup icon (which resembles a magic wand), click the image’s background so that a moving outline appears around it, and select Edit>Cut.
- Click and drag a box around the emoji using the markup symbol.
- Select all by clicking edit. Command + C should be pressed.
- Return to your desktop and right-click on the original folder you created.
- Select Get Info.
- On the new screen, click the blue folder icon and press Command + V. Your emoji should now appear.
Also Read: iPad Pro Not Accepting Apple ID Password
6. In Spotlight, perform computations and currency conversions.
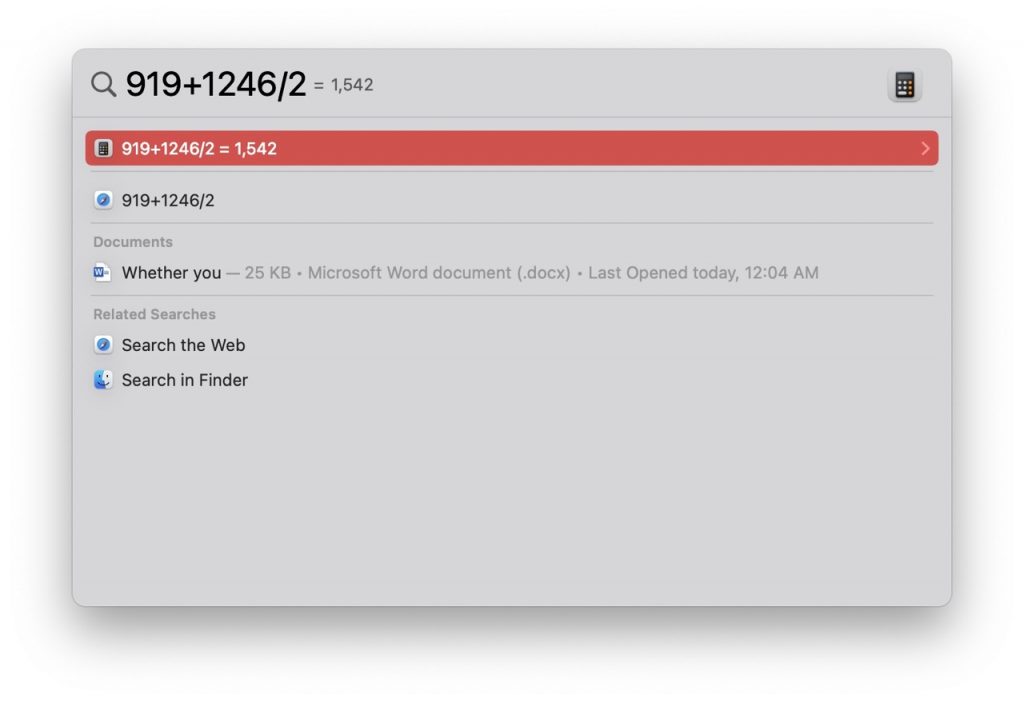 A spotlight is a fantastic tool for traveling around your computer faster and without using a mouse, and it’s one of the most underappreciated Mac features. For example, the spotlight can be used as a calculator and convert currencies.
Click the magnifying glass icon in the top left corner of the menu bar to activate Spotlight or press Command + Space on your keyboard. Write what you want to calculate (for example, “919+1246/2”) into the search field, and the solution will show as a search result, which you can copy and paste.
To use Spotlight as a currency converter, type the amount you want to convert, followed by the currency symbol (for example, $100 or £100). The search results will show conversion rates in various currencies based on Yahoo data.
7. Enter Emojis using your keyboard.
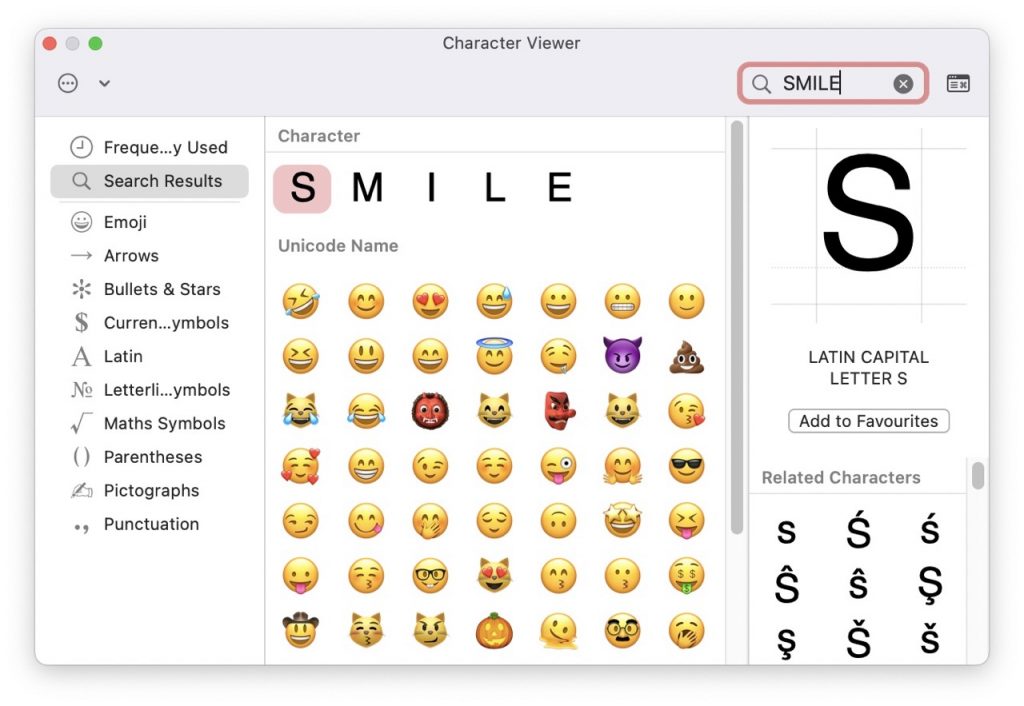
Emojis aren’t just for text messages. Go to the menu bar and select Edit > Emoji & Symbols in practically any web page or software (including Google Docs and Microsoft Word). You’ll see a box containing emojis appear, and you can drag and drop any of them onto the page you’re working on. You can also utilize the Control + Command + Space keyboard shortcut.
8. Make whatever you want a keyboard shortcut for.
You’re presumably familiar with Apple’s keyboard shortcuts for copying and pasting text, such as Command+C and Command+V. You can, however, construct your shortcut to any menu option you like.
- Click the Add icon in System Preferences > Keyboard > Shortcuts > App Shortcuts.
- A box will appear, allowing you to select the application, the name of the menu command, and the desired keyboard shortcut.
- When you’re finished, press Add.
Also Read: Apple Mac Studio – Everything You Need To know
9. Make more precise volume adjustments.
The difference between each volume increment on your Mac can be more than you expect, and your music, video, or podcast can go from too quiet to too loud in a single tap. Hold down the Option + up arrow while pressing the raise or decrease volume key to make the volume increments smaller. This will open the Soundbox, which will allow you to set the volume more precisely
10. Rename a few files all at once
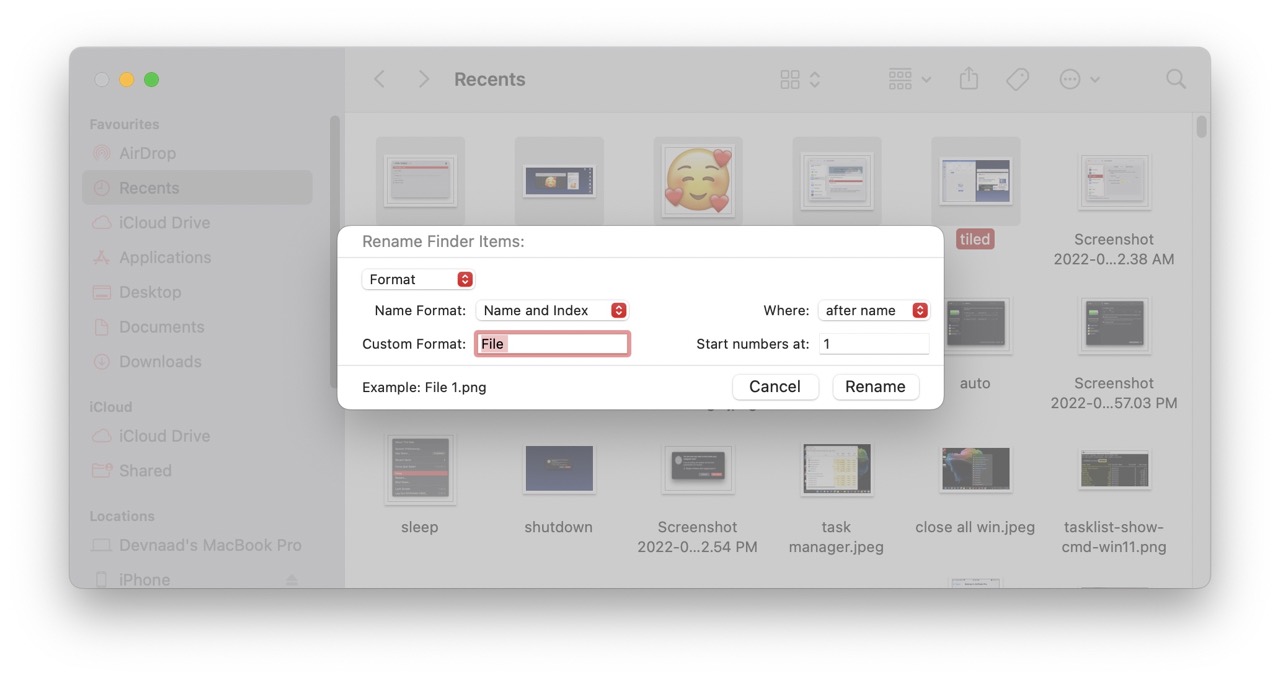
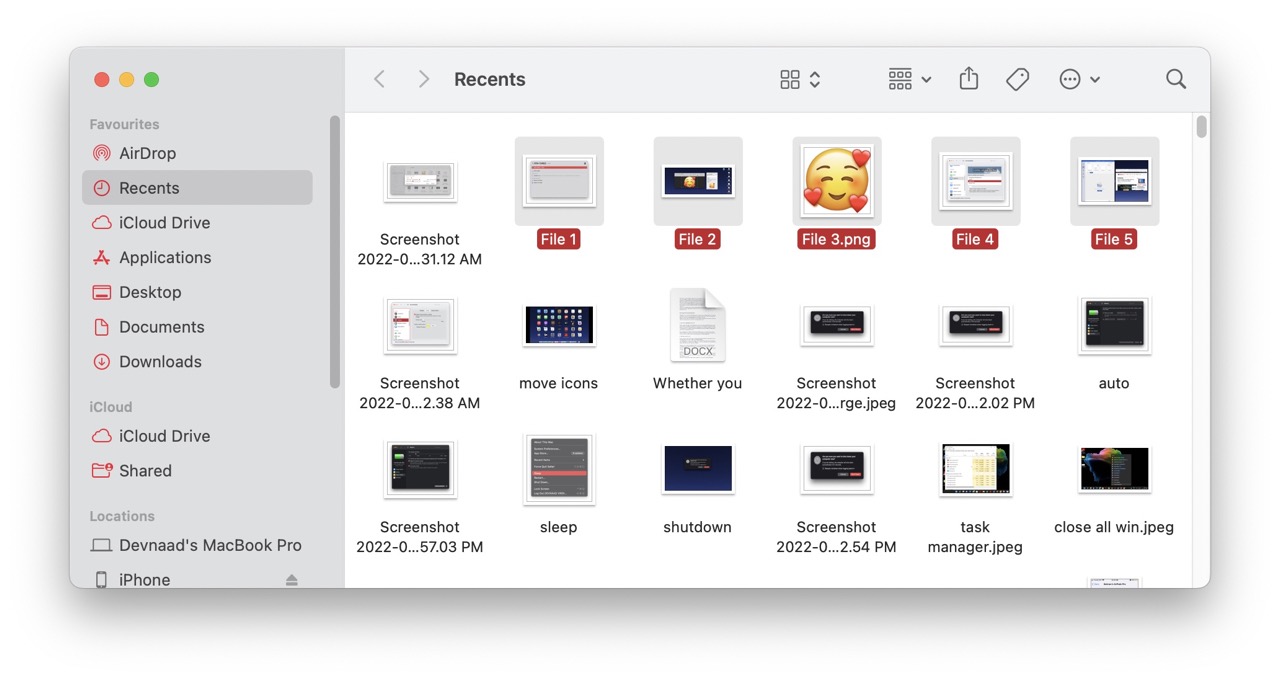
You don’t have to rename several files or photographs on your Mac. Instead, open Finder and click one of the documents or photos you want to rename, then hold down Shift and click the others: Right-click and select Rename X Items from the drop-down menu. After selecting them, click the cog icon and then Rename X items. Then you can add text, modify the text, or apply a format to each photo, such as “John’s birthday celebration” with a number
Also Read: Apple iPhone 14: Here’s Everything We Know So Far
11. Configure the Touch Bar
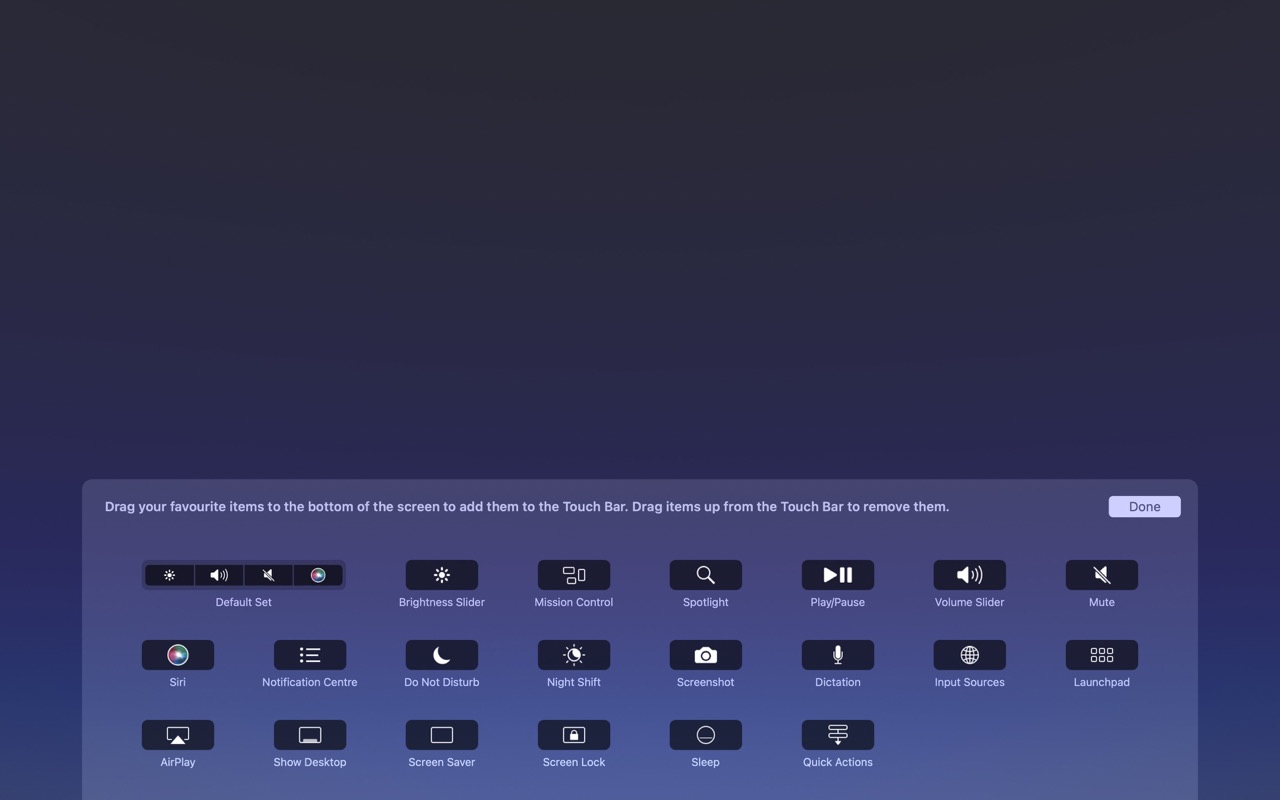
You can adjust the Touch Bar functionalities if you have a MacBook Pro with a Touch Bar. This is how.
- Tap Extensions from the System Preferences menu.
- Choose Touch Bar from the left column.
- Select Customize Control Strip from the drop-down menu.
- A new screen with various buttons will emerge at the bottom of the screen. When the Control Strip is collapsed, this is the set of Touch Bar buttons that appears.
- Click and drag a button to the bottom of the screen to add it. The new button will appear on the Touch Bar.
- Move the cursor to the bottom of the screen until a button is highlighted, then choose the button you wish to remove by moving left or right. When you click and drag up on the screen, the button with the “Remove from Touch Bar” tag should show. To delete the control, drop it.
- Follow the instructions above to modify the Control Strip when extended in the Touch Bar. Expand the Touch Bar in step 4 to alter the button placed on-screen. A brief video of these steps can be found below.
12. Delete all data and settings
We all run into problems that could benefit from a factory restore on our Macs. There’s a simple way to delete your Mac’s settings, data, and programs while maintaining the current operating system if you’re using an Apple silicon Mac or an Intel Mac with a T2 security chip running macOS Monterey. This does not wipe a Mac, only your data.
Open System Preferences (Apple menu > System Preferences), then go to the menu bar and click on the System Preference menu with the System Preferences window at the front. Erase All Content and Settings is a new option under About System Preferences. It operates the same way it does on the iPhone and iPad: pick it when you want to erase all of your data without reinstalling the operating system.
Also Read: How To Fix Apple Apps Not Syncing With iCloud Issue
13. Sign documents in the Preview or Mail apps.
If you’re emailed a PDF to sign, you don’t have to go through the time-consuming process of printing it out, signing it, and scanning it back in; your Mac lets you sign documents immediately in the Preview or Mail apps.
You can do this in various apps and tools, including storing a scanned copy of your signature on white paper and inserting it as an image in a given document. However, if you’re using the Mail app, here’s what you should do:
- Drag the PDF into an email message, hover over it, click the down arrow icon in the upper right, and click Markup.
- Click the signature-looking box at the top.
- Click Trackpad to write your name on the trackpad with your mouse, or click Camera to sign your name on white paper and photograph it with your computer’s webcam. You can also store and reuse a signature.
14. When you are locked out, bypass and reset your password.
Have you forgotten your Mac’s password? Don’t panic; MacOS includes two simple methods for logging back in.
Mode of Recovery:
- Shut off your Mac.
- Hold down Command + R and then push the power button. Hold down Command + R until you see a progress bar appear on the screen below the Apple logo. Your Mac has now entered Recovery Mode.
- Select Utilities > Terminal from the navigation bar. A window will appear. Enter “resetpassword” as a single word, without quotation marks, and hit Return.
- Close the Terminal windows to reveal the Reset Password Tool. You’ll see a list of all user accounts on your Mac; if you change your password, you’ll have to change it for every other user.
Apple ID
- After typing the incorrect user password a few times, you may be prompted to reset it using your Apple ID. Alternatively, you can initiate the same procedure by clicking the question mark icon in the password text field, followed by the arriving icon.
- Enter your email address and password for your Apple ID. A pop-up alert will notify you that a new keychain will be created to hold your passwords. Select OK.
- Follow the on-screen instructions to generate a new password for your user account.
Also Read: How To Set Up An Account Recovery Contact For Your Apple ID
15. Safari allows you to disable cookies and IP tracking.
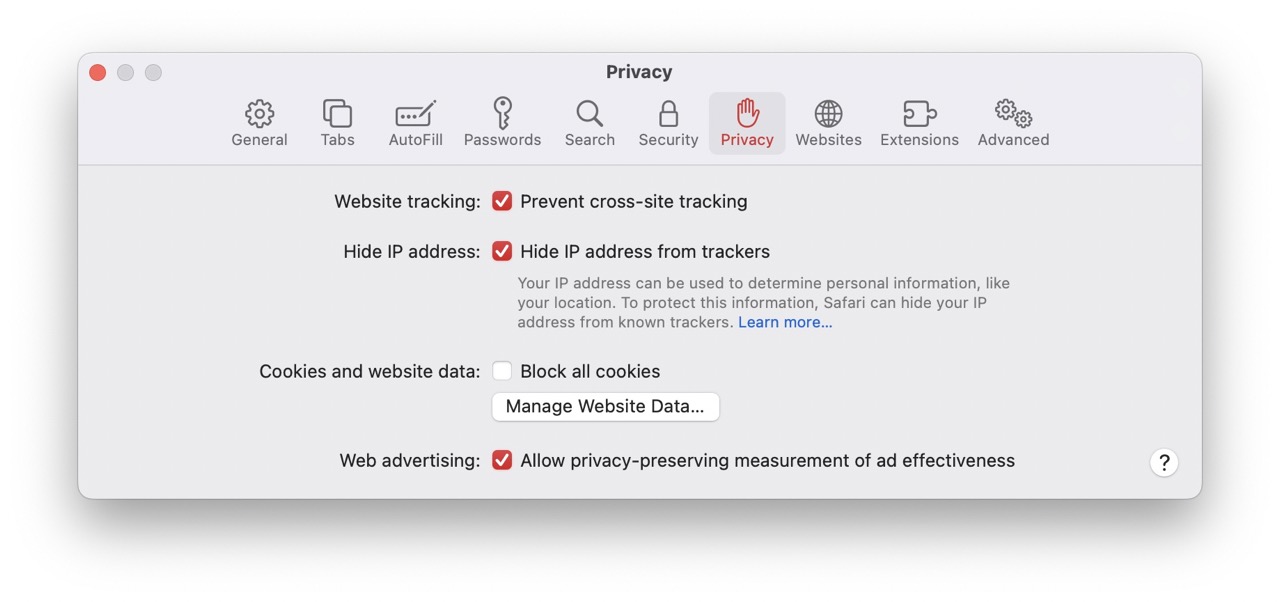
Apple has recently been active in privacy, introducing numerous new security features to shield consumers from unwanted tracking.
- Open Safari > click ‘Safari’ in the menu bar > choose ‘Preferences…’ > go to ‘Privacy’ > then update your settings to block websites tracking your IP and details.
- You have the following options:
- All cookies must be disabled.
- Protect your IP address from trackers.
- Avoid cross-site tracking.
Final Thoughts
Overall, using a Mac is straightforward. It is, in my opinion, the most straightforward and most intuitive operating system on the market today. Don’t you believe they offer unique characteristics that not even Windows has thought of?
There’s a lot to learn with macOS, mainly if you’ve never used Windows. The tips above will help you operate and handle your Mac computer safely.


