


 Header Through Cloudflare")


After upgrading to macOS Monterey 12.3 and 12.4, as well as macOS Ventura, Big Sur, Catalina, etc., it’s typical for the computer to stop detecting external displays. Some manufacturers of external displays, including LG, Dell, Samsung, BenQ, etc., have been plagued by this issue.
When using Ventura, your Mac might not be able to recognize external monitors, and you might experience other issues with your display, such as a messy or unstable connection, a lack of support for the native resolution, a malfunctioning HDMI port, incorrect scaling, momentary blackouts, or flickering.
If you’re on macOS Ventura, Monterey, or another version and your Mac won’t identify external displays; this guide will teach you what to do. Because every situation is different and what works for one person may not work for another, it is recommended to attempt the solutions one at a time until the display is identified and acts as intended.
To permit USB-C accessorizing
For Apple Silicon Macs, macOS Ventura included a new “USB Restricted Mode” that requires user consent before an external USB or Thunderbolt item may communicate with macOS over a direct wired USB-C connection.
When updating software, Apple claims that any peripherals you may have attached will be authorized automatically. Before installing macOS Ventura, your Mac needed to be approved for your display to work.
Because of this, you should attach a USB-C external monitor while your Apple Silicon (M1 & M2) Mac is running and approve the connection when prompted. In the event that you don’t see a notice pop up, you can set one up yourself.
Macs with Apple Silicon (M1, M2) processors and macOS Ventura:
1. Turn on your Mac and access the menu from Apple.
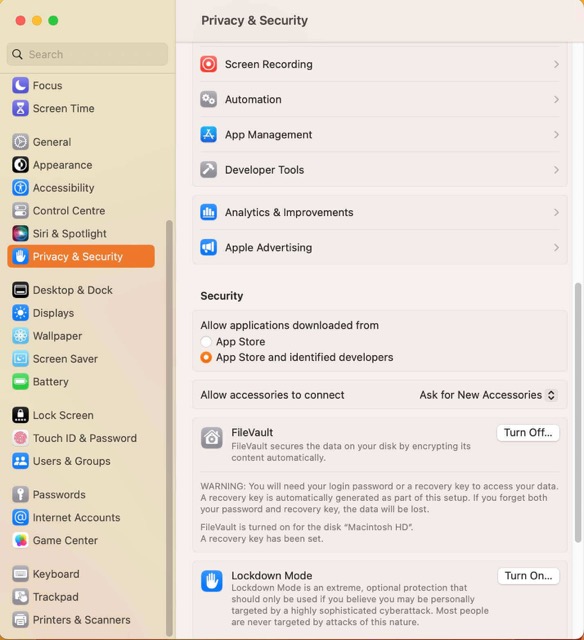
2. Go to the System Settings menu to access the Privacy and Security menu.
3. Click the “Security” tab at the bottom of the page.
4. Choose “Always” from the drop-down selection labeled “Allow accessories to connect.”
Use of External Display
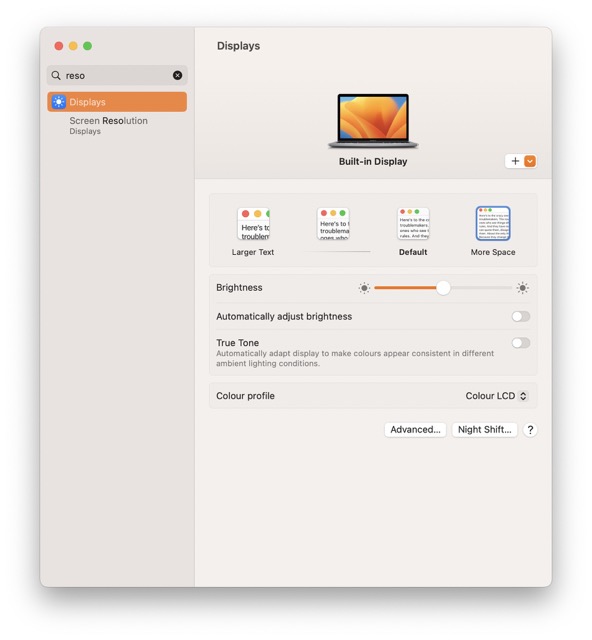
1. Access the Display menu in System Preferences by clicking the corresponding icon in the system’s main settings panel. After that, hit and keep holding the Option key.
2. Select the Detect Displays button that appears as a consequence of this action and double-check the outcomes.
3. If the problem persists, choose Sleep by clicking the Apple menu icon in the upper left.
4. Idle your Mac by letting it sleep. Then, after one minute, you can try to reawaken it. Select Detect Displays once more.
5. Now you can see if macOS Ventura recognizes your external monitor or second screen.
Safe Mode Booting

Restarting into Safe Mode is another viable option if your MacBook isn’t detecting an external display when running macOS Ventura. When you use this feature, your Mac will start with only the required components loaded, blocking any unwanted programs or extensions from interfering with your external display.
The procedure for accessing Safe Mode varies across Intel and Apple Silicon Macs. After entering Safe Mode, select “Safe Boot” from the main menu.
MacBooks with Intel chipsets can have their external displays recognized by following these steps.
1. Do not leave your Mac on.
2. To access the login screen, press the power button and hold down the Shift key until the window opens.
3. Get signed into your Mac. There’s a chance you’ll have to sign in again.
Macs with Apple Silicon (M1 and M2) may experience issues where an external display is not detected.
1. Put your Mac into sleep mode.
2. For the time being, press and hold the power button until the message “Loading starting choices” appears.
3. Determine the disk to use first.
4. To enter safe mode, press and hold the Shift key and select the option.
In Safe Mode, you should verify that the external display is recognized. If that’s the case, you should try restarting your Mac to see if it helps. So, If you can only get it to work in Safe Mode, try removing unused login items or turning off any third-party cleaners, antivirus programs, VPN clients, etc.
If you’re having issues, start with the simplest solutions: USB Type-C and HDMI.
We believe you should try the more basic troubleshooting steps before resorting to the more complicated ones.
If you’re having issues, start with the simplest solutions:
USB Type-C and HDMI.
We advise you to attempt the following simple solutions before going on to more involved solutions:
1. To begin, switch out the USB-C connector on your Mac.
2. The next step is to disconnect your screen and reconnect it.
3. Check that the port you’re using on the screen is compatible with UHD at 60 fps.
4. Typically, only 30Hz is available via the HDMI 1 connector.
5. At this point, you should click the Apple logo and select Restart to restart your Mac.
Raise or lower the resolution of your screen.
If you’re experiencing trouble with scaling on an external monitor or changing the resolution on macOS Ventura, try the following:
1. Select System Preferences > Apple Menu.
2. Select “Large text” or “More space” while holding down the Option key.
3. Your external display should now display a wide variety of available resolutions.
4. Give each a shot and see which one complements your display the best.
A user of the Apple discussion forum reported this strategy.
1. Navigate to Computer > Macintosh HD > Library > Preferences from the Finder.
2. Find the file named com.apple.windowserver.displays.plist and delete it.
3. Remove the trash
4. Your Macbook should restart properly, and you should reconnect your external display.
Underscan, along with other graphical customization options, should now be available.
These are the fixes that we figured out for you. Check these fixes and let us know in the comment section.


