


 Header Through Cloudflare")


In most cases, letting close relatives see your iPhone’s location and other data can be a good idea. The app Safety Check can be used to get help if you or a loved one is in danger from an abusive or violent partner or family member.
This new feature, available as of iOS 16, allows you to sign out of iCloud across all of your devices, revoke access you’ve granted others, restrict communications to a single device, and halt location sharing. Here’s how to activate the new version once you’ve installed it.
Safety Check: latest feature in iOS 16
If you are concerned about the security of your iCloud account, you can sign out of iCloud entirely, delete all of your app permissions, and disable location sharing in Find My Network with the Safety Check feature.
It’s common practice for many of us to provide our partners access to our accounts. However, this can be a problem because it might compromise our privacy and make it difficult to seek aid in domestic violence cases.
Apple developed Safety Check in collaboration with US-based groups that aid victims of domestic and intimate partner violence, such as the National Network to End Domestic Violence, the National Center for Victims of Crime, and WESNET (The Women’s Services Network).
There are two primary components of a Safety Check:
- The first is an emergency reset, which instantly deletes all data on the device and blocks access to it from any and all users and applications.
- The second option, “Manage Sharing and Access,” lets you modify other users and programmes’ permissions on your device.
Why would I ever need to utilise Safety Check?
You and your significant other may decide to exchange personal information during your time together. You may also have added the other person’s Face ID or Touch ID to your iPhone. Alternatively, they may have access to your Apple ID and iPhone passcode.
You can immediately revoke access to shared content on your iPhone when things go south in a relationship. And it only takes a few touches to accomplish this all at once. Alternatively, you can revoke access to specific features (such as location) or applications in bulk if you don’t mind taking your time.
Managing app permissions is another feature of Safety Check that may be utilized in addition to vetting your connections. You can use it to change your Apple ID password, reset the Face ID, add or remove emergency contacts, and much more, all of which will help keep your device more secure.
Ultimately, it’s a feature that every iPhone owner needs to be aware of. And we’ve come to fill you in on the details
What kinds of Apple apps can I restrict using Safety Check?
With the help of Safety Check, you can immediately stop sharing data with the following programmes:
- Shared information about one’s health
- Family Calendar – Coordinated Schedules
- Find My – location sharing
- Photographs – Group Picture Albums
Be wary of those who suddenly become aware of your decision to stop sharing information with them. Exercise extreme caution.
Further, any information obtained by the following programmes and functions is deleted by Safety Check:
- Bluetooth\sCamera\sContacts
- Stored Documents
- Location-Based Services for Regional and Local Networks
- Apple Music
- Motion and Fitness
- Reminders
- Research
- Speech Recognition
Let’s start with a basic comprehension of characteristics:
Quick Exit
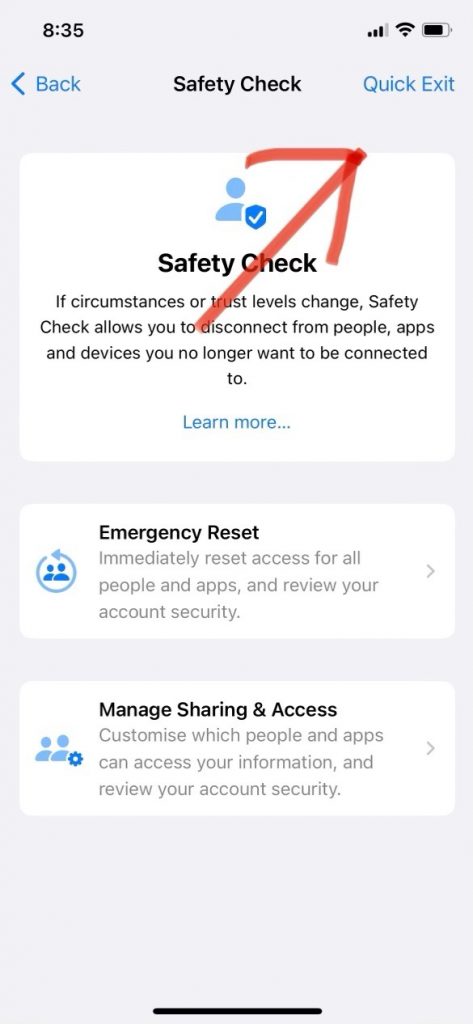
A Quick Exit button is up in the upper right corner; hitting it will preserve your current settings and exit the Settings app immediately, returning you to the Home Screen. It terminates the Settings app without disclosing your current state. Reopening the Settings app through the App Switcher takes you back to the initial Settings page, not the Safety Check screen, if you or someone else who has gained physical access to your iPhone has reopened the app. Therefore, they have no way of knowing your whereabouts.
Use Emergency Reset
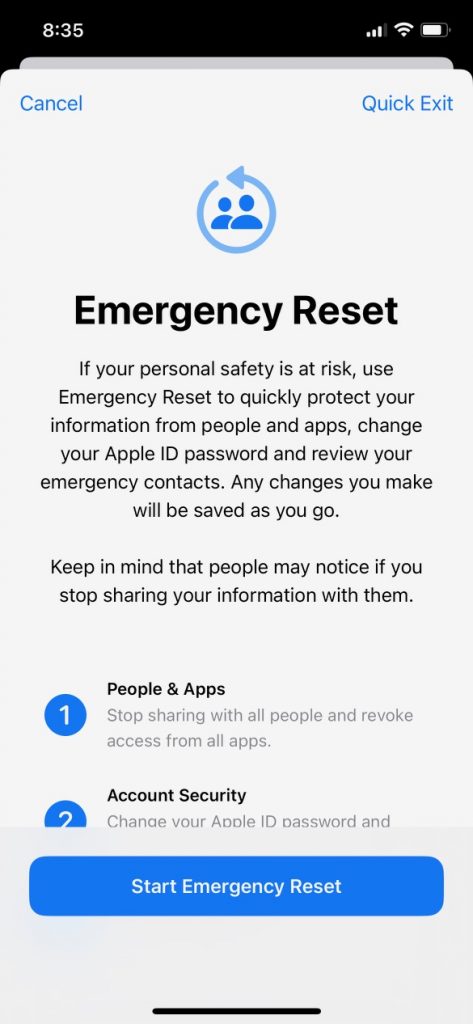
For maximum security in an emergency, it may be best to disable access for everyone and everything. Select the “Emergency Reset” button to remove access for all users and applications immediately.
Face ID, Touch ID, or your iPhone passcode will be required for authentication.
The screen to initiate the factory reset in an emergency will then show up.
To do an emergency reset, you must delete all data from your device, delete your Apple ID from all other devices, change your Apple ID password, evaluate account security, and add or delete emergency contacts. When doing an emergency reset, unlike when configuring access, you will not be able to specify which contacts or apps you no longer wish to have access to your data. Neither can you pick and choose which gadgets to keep and which to ditch. It’s the nuclear option, closing off access entirely. In addition to being much quicker, this method also eliminates the need to carefully examine each setting before applying it.
To recap, here’s what your iPhone will do once you perform an Emergency Reset:
Any ongoing Find My location sharing will immediately cease.
Your app’s permissions for accessing your private data will be cleared, including those for Bluetooth, contacts, calendars, location, microphone, camera, etc. At the time of the next app update, developers will need your permission to utilise them.
When you perform Emergency Reset on an iPhone, iMessage and FaceTime will no longer function on any other iOS device, including Macs, iPads, and other iPhones.
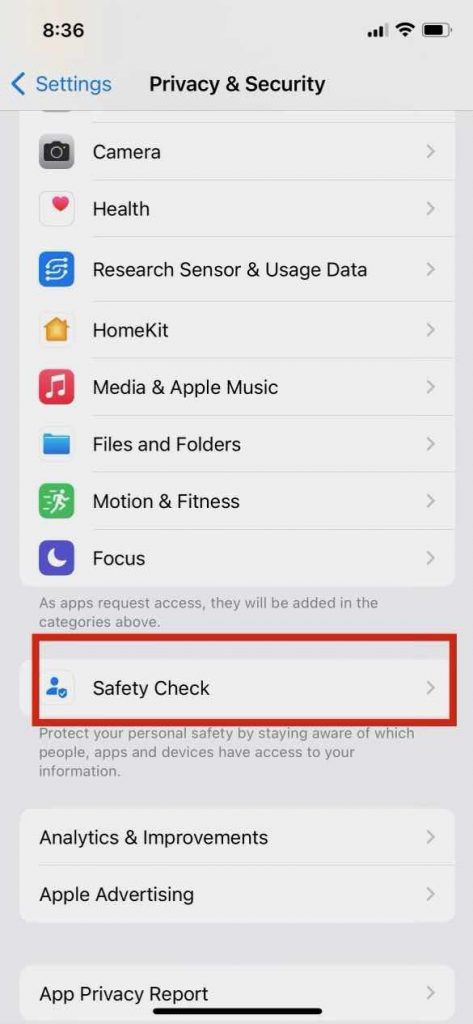
iPhone Safety Check and Emergency Reset Guide
- Launch the Settings programme.
- Select Security & Privacy from the drop-down menu.
- You can do an emergency reset by going to the “Safety Check” menu.
- Select Emergency Reset > Reset All Users & Apps.
- Select the Reset button.
- To disable access on a certain gadget, click on it.
- Choose Remove Selected Devices, then Next.
- Tap Continue once you’ve entered or deleted the trusted number.
- Change your Apple ID passcode Next.

- Edit the list of emergency contacts, then press the Continue button.
- You’re finished, so please tap the button.

Modify the User Interface
With Manage Sharing & Access, you may selectively remove access for specific users. You can see exactly who has access to your data and what apps they are using. You can see what data these applications and persons have access to and decide whether to keep it or remove it.
Rather than disabling all access for all users, you may instead choose to grant or revoke certain permissions for specific persons or apps by selecting the “Manage Sharing & Access” option inside the “Safety Check” settings.
You’ll need to enter a passcode, Touch ID, or Face ID to verify your identity. To proceed, tap “Continue” at the bottom of the screen where you may manage sharing and access.
The ‘Quick Exit’ button, located in the upper right corner of the screen, allows you to swiftly exit Safety Check at any time while checking your settings. The choice to leave is conveniently available on all subsequent screens.
Step 1: Sharing with People
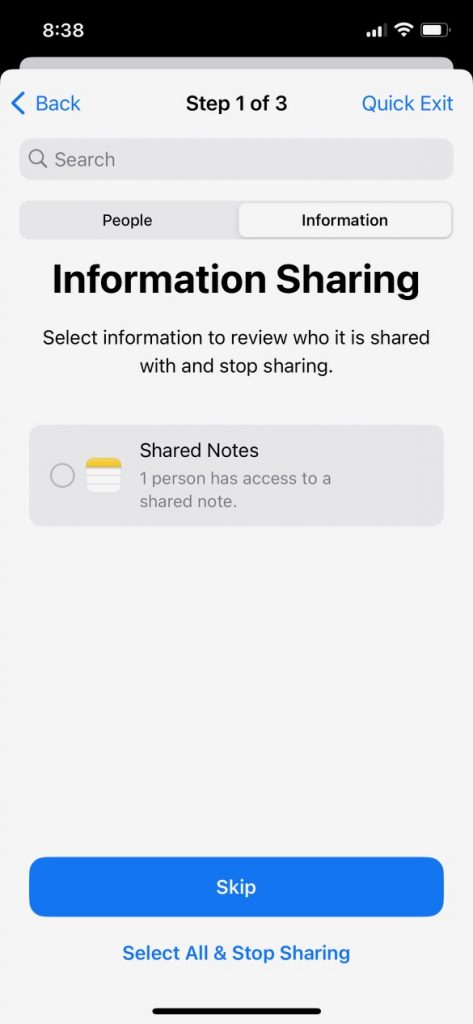
People: Other users can see your shared content. Select Review Sharing from the drop-down menu after tapping the individual’s name. Then, click Stop Sharing after deciding what you no longer want to share (such as your Find My Location, Health data, notes, photographs, and calendar). The next step in the audit process is to examine the access levels of other individuals.
Information: Select Information from the menu bar if you’d rather evaluate and revoke permission based on the type of information (such as location sharing) than the persons with whom you have shared it. Review Sharing allows you to pick a category of shared data, such as Find My Location, Health data, shared photo albums, or shared calendars. Once you’ve identified the individual you no longer wish to share, you can simply tap the Stop Sharing button.
Step 2: Access the App
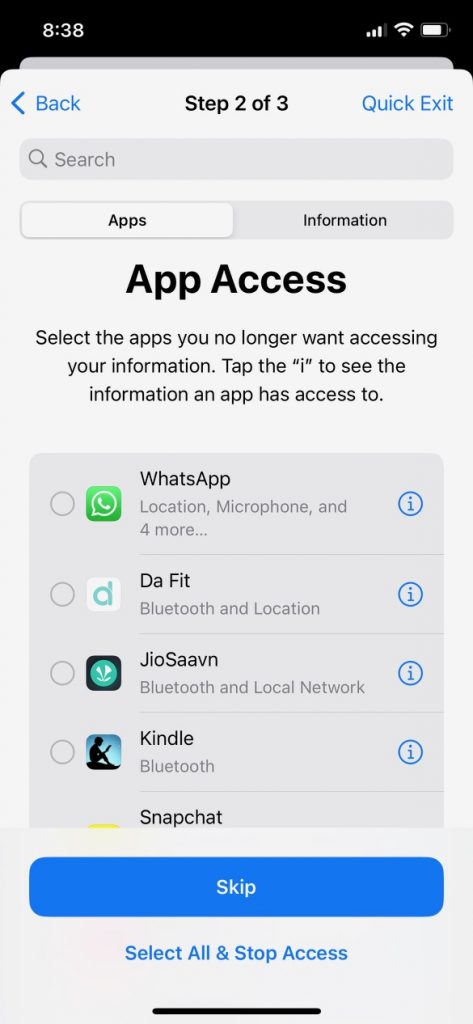
The second phase of the auditing process involves reviewing the permissions you have granted to various applications once you have finished reviewing the information you have shared with other people.
Apps that have access to your Bluetooth, location, camera, microphone, photos, and contacts can be disabled from this screen.
You can disable access to the app’s information by tapping the Information option instead. You can disable access to a specific app by selecting it from the list and then tapping the Stop App Access button, for instance. With this action, any apps that have access to your location will lose that permission immediately.
Step 3: Devices
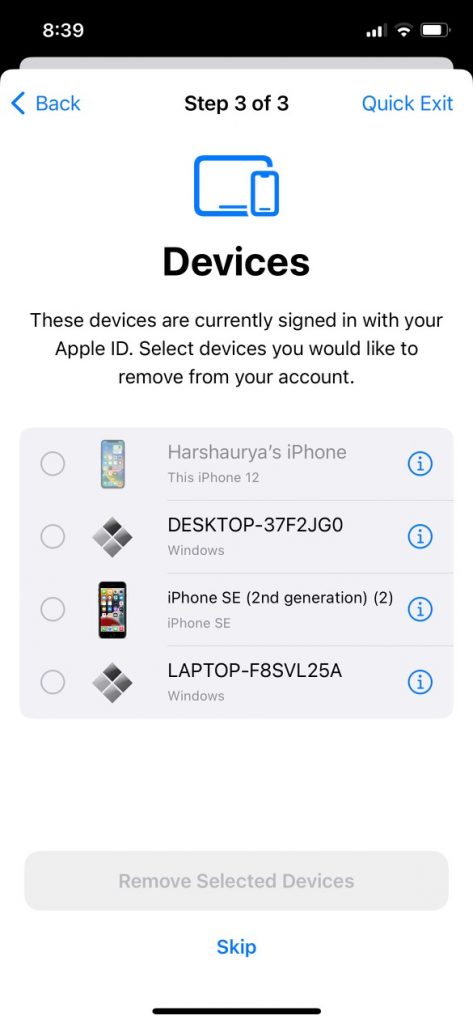
In the last phase, you’ll have complete control over all of your Apple products and preferences.
All the devices to which your Apple ID has been applied are displayed here. Select the device(s) you no longer use or believe are being used without your knowledge. Press Remove Selected Devices (for example, an iPad associated with your Apple ID usually in the living room). Doing so will disable iCloud on that device until you sign in again and enable the sending of sign-in codes.
The next screen is called “Trusted Phone Numbers.” You might have added your significant other’s number as a backup for two-factor authentication (2FA) purposes. The red minus button allows you to delete that at this time. Optionally, you can substitute another known contact number.
At that point, you’ll be able to select the option to Change Apple ID Password. If you are concerned that someone else knows your Apple ID password, you can change it by selecting Update Password.
You then transition to the “Emergency SOS” screen. Your emergency contacts can be edited or deleted from this page.
After that, your iPhone will prompt you to Update Device Passcode. Your ex probably knew your iPhone passcode while you were together. If someone gains access to your iPhone and knows your passcode, they can do almost everything they want. You should adjust it to avoid that.
You will get the Safety Check Complete screen when all of these steps have been taken. As of this moment, your earlier modifications have taken effect. Additional account, data, and device security advice are available on this screen.
In Conclusion
Protect your iPhone, its contents, and your identity with this guide to using Safety Check in iOS 16. I’m hoping you found this tutorial informative. Please forward this message to anyone you believe would find it useful.


