


 Header Through Cloudflare")


It becomes problematic when Ethernet stops working. When it comes to protecting its gadgets, Apple considers being the best. It maintains its high level of security by making available the most recent security and other essential upgrades as soon as they become available. This time, though, a minor issue in the inadequate kernel configuration data has caused a lot of confusion for Ethernet users.
In Macs, the Ethernet port “Broadcom BCM5701 driver” is no longer functional with the latest kernel upgrade. While many recent models lack an Ethernet connector, many Mac users still have one and connect to the Internet.
Fortunately, Apple found and fixed the issue quickly. As quickly as possible, you must discover how to cure Mac Ethernet difficulties and get back to regularly using your Ethernet connection. Installing and updating Incompatible Kernel Extension Configuration Data 3.28.2 is the basic assumption of the solution. After this, You’ll be able to connect to the Internet normally again after fixing the issue.
You’ll now need an Internet connection to download the updated update on your Mac. Users with Wi-Fi connections will be able to download the update with little difficulty. Still, those without access to such a network will have to take additional steps to remedy the situation. So, in the following parts, we’ll examine how to resolve when Ethernet stops working.
Also Read: How To Remove Or Install Memory- MacBook Pro
10 Gigabit Ethernet port on Mac
An RJ-45 10 Gigabit Ethernet port supports different data rates for speeds up to 10Gbit/s over ordinary twisted-pair copper wiring of up to 100 meters (328 feet). Several factors influence the link speed that is automatically negotiated based on what device you connect to, the cable type and technology, and the length. Dealing a rate of 10Gbit/s between two devices, for example, is possible if both devices are 10Gbit/s-capable.
1. Manually Remove and Add The Ethernet Connection
Go to System Preferences to manually re-add the Ethernet connection to your MacBook Pro M1 if it doesn’t recognize it automatically. A simple plug and unplug of the Ethernet jack from a monitor or Mac isn’t the same as this procedure. Using a MacBook Pro, you can do this:
- On your Mac, open the System Preferences app.
- At the bottom of the page, select Network.
- In the sidebar, select the non-working network connection.
- To delete it, click the – button at the bottom of the sidebar.
- Restart Mac
- Return to the Network section of System Preferences.
- Click the Plus(+) button.
To re-add the ethernet connection, follow the on-screen instructions.
After completing the on-screen steps, restart your MacBook Pro to verify that the changes “stick.” You’ll want to ensure you don’t have any problems after restarting your Mac or unplugging it from your monitor.
Also Read:How To Upgrade MacBook Pro Memory From 8 To 16gb
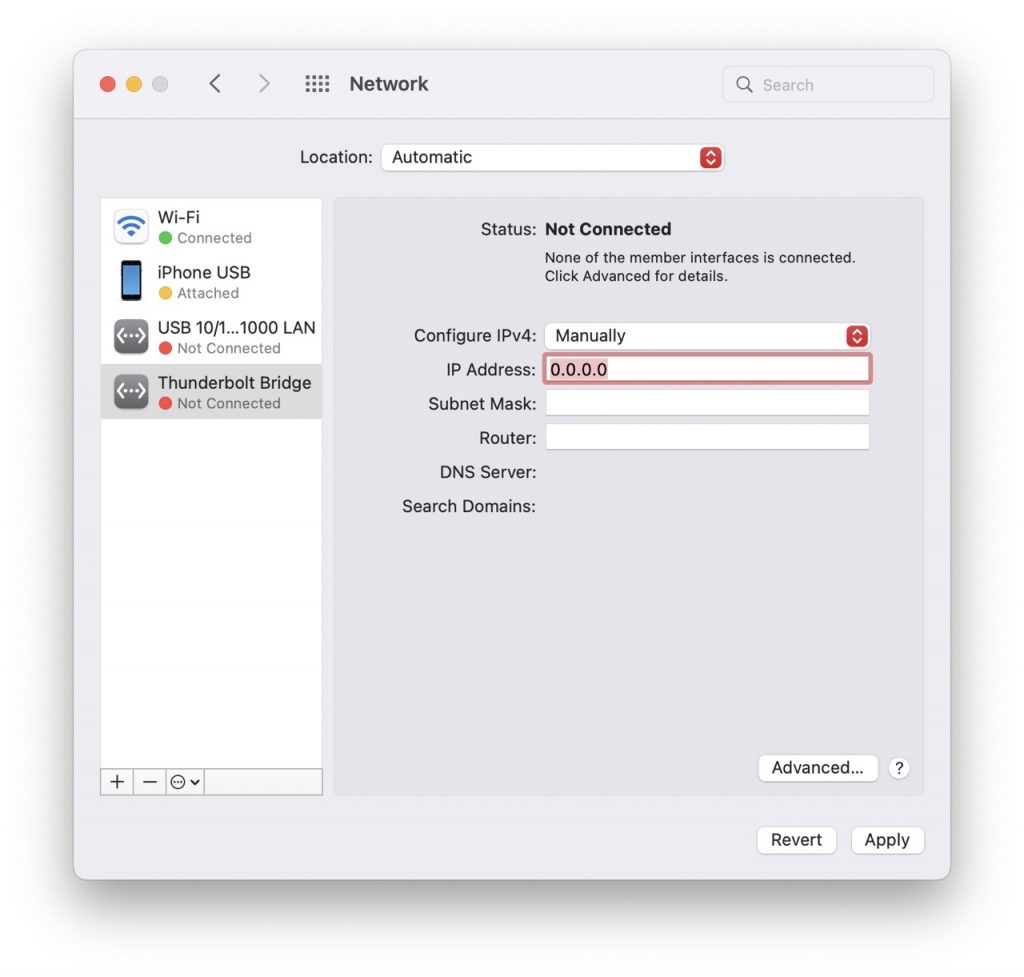
2. Configure IPv4

Configuring the IPv4 of your Ethernet connection is another option; however, it is a little more complicated. By default, ethernet connections on the Mac use DHCP, which assigns an IP address automatically. Some customers, however, have discovered that switching to DHCP with a manual IP address has resolved the problem.
- On your Mac, open the System Preferences app.
- At the bottom of the page, select Network.
- In the sidebar, select the non-working network connection.
- Select Configure IPv4: from the dropdown box.
- Select DHCP with a manual address from the dropdown menu.
- Make sure you’re using the correct IP address.
Your MacBook Pro M1 should be connected to the Internet once the correct IP address is entered. Following the procedures above, you can return to the regular “Using DHCP” selection in the dropdown menu after checking that the connection is steady.
Also Read:Siri Not Working On MacBook-Fixed
3. Switch To A Different Hub
In some cases, the monitor you’re using may not be able to supply enough power to accommodate all of your plugged-in attachments and peripherals. In other cases, you may utilize a different USB-C hub entirely, particularly if you require features such as an SD card reader. We recommend switching to a new hub with enough power to handle everything you require if you fall within this category. Here are a few possibilities to think about:
- CalDigit TS3
Includes 2x Thunderbolt 3 40Gb/s, DisplayPort 1.2, 5x USB-A & 1 USB-C 3.1 Gen 1 (5Gb/s), 1x USB-C 3.1 Gen 2 (10Gb/s data only), Gigabit Ethernet, UHS-II SD Card Slot (SD 4.0), Optical Audio (S/PDIF), 3.5mm Stereo Audio In & Out), Gigabit Ethernet, UHS- Orientation might be vertical or horizontal. Full aluminum construction with an inbuilt heat sink does not require a fan.
The Razer Thunderbolt 4 Dock
For Mac Gives You the Bandwidth and Versatility You Want: 4x Thunderbolt 4 ports, 3x USB-A 3.2 Gen 2 connections, 1x Gigabit Ethernet, 1x UHS-II SD memory card slot, and 1x 3.5 mm audio combo jack expand the capabilities of your Mac.
OWC Thunderbolt 3 Pro Dock
The OWC Thunderbolt 3 Pro Dock provides the best networking, media, and docking for pro video production and demanding data processes. Thanks to its unique productivity configuration, you can manage numerous card uploads effectively, access all of your critical peripherals, and participate in a shared workflow with a 10Gb Ethernet connection.
Apple Thunderbolt to Gigabit Ethernet Adapter
The Apple Thunderbolt to Gigabit Ethernet Adapter allows you to connect your Mac to a high-speed Gigabit Ethernet network quickly and efficiently. 10/100/1000BASE-T networks are supported.
These are only a few possibilities, but you should be mindful of which docks you’re attempting to use. Not all docks and hubs that worked with MacBook Pro models before the M1 will operate with Apple’s latest laptops.
Also Read:Fixed: Battery draining in macOS Monterey – M1 MacBook Air
4: Plug-Out Ethernet Cable and Plugin
In most circumstances, removing the RJ45 connector from the Mac and plugging it back in would resolve the issue permanently. Press down the Small clip to free and pull the cable from the Ethernet port.
There are far too many reasons for this. First, check the ethernet cable.
Your crimping may be loose, or your Ethernet cable may get damaged. Replace the new RJ45 connector and re-crimp it.
On your RJ45 Dropping Internet Connection, I strongly advise you to try the above solution. If this is the case, after performing a Re-Plugin, the Internet is operational.
You can utilize the spare RJ45 cable with a new router if you know this. Alternatively, you can purchase a new RJ45 cable. That’s the one way to solve the issue when Ethernet stops working.
Also Read:How To Fix And Restart The Macbook Touch Bar When It Stops Working
5: Create a New Location
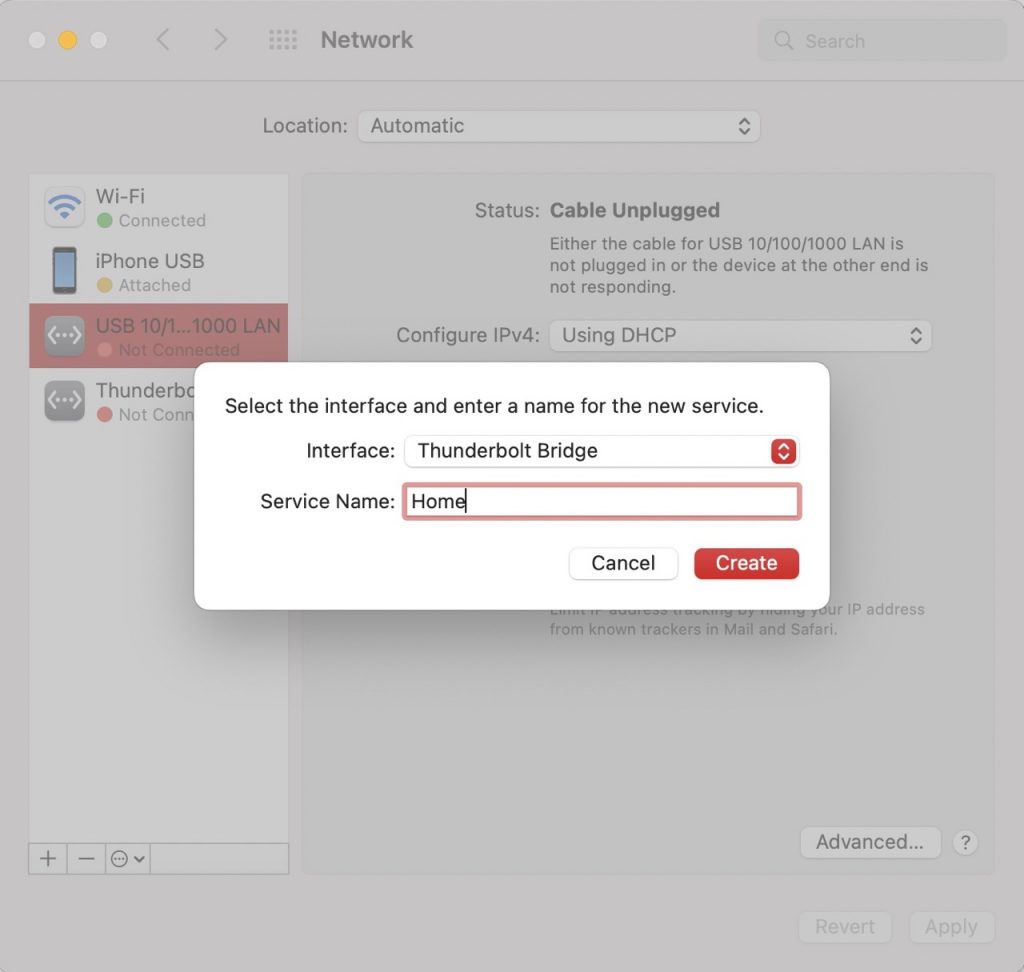
Make a new location for your network profile and settings on your Mac. The new Network location settings will overrule the old setup, and we will be able to use an Ethernet connection on the Mac.
- From the main Mac menu, select Apple > System Preferences.
- Choose Network.
- From the top dropdown menu, select “Edit location.”
- Type a new place name by clicking the “+” button.
- Something like “Office” or “Home” or “College”
Now, click Apply to save your settings and begin surfing the web on your Mac using an Ethernet connection.
Also Read:How to Install Chrome OS Flex on Windows PC, Laptop, and MacBook
6: Try in Safe Mode
Apple also recommends safe mode, and it might help you figure out if an issue is caused by software that loads when your Mac starts up.
Follow the steps below for Safe mode on Intel and M1 Macs if you’re having trouble with basic macOS functionality.
Safe mode on M1 Mac: Turn Off your Mac, then press and hold the Power button for 10 seconds when the Mac boots up. When Mac’s startup screen appears, release the Power button and choose the Startup disc.
In safe mode, press and hold the Shift key while clicking Continue. Log in to your Mac after releasing the Shift key.
Safe mode on Intel Mac: Restart your Mac and quickly press and hold the shift key until you see the login window screen. Safe mode will appear in the top right corner of the screen. That is all there is to it.
The Ethernet internet is still not working, so that’s a problem. There is no problem with the software.
Keep your MacOS up to date by going to Apple Logo > System Preferences > Software Update > Check for Updates. If you find new software, download it and install it.
7: Apple Support
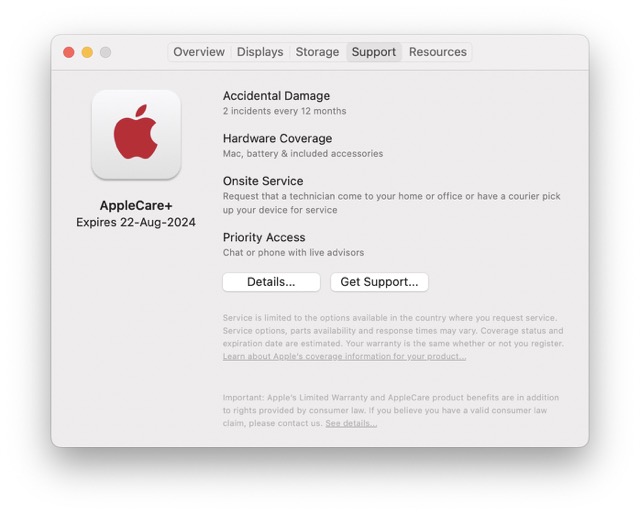
If your Mac is under warranty, contact Apple and schedule an appointment at the Genius Bar online. Apple will assist you from the beginning. And Gree Hardware Repair or Replacement for MacBook models that are still under warranty.
Check if your Mac Warranty is still valid online.
If your Mac is not in warranty or you can’t wait to get to an Apple Store, there is another way to remedy the Ethernet port hardware problem.
Also Read: How To Download And Install Handbrake In MacBook?
8: USB Ethernet Adapter (Hardware Fix)
Use these versatile USB Ethernet adapters to connect your system via Ethernet connection to your Mac computer or Macbook with USB 3 and USB C ports. Plugin and utilize this adapter to save time and money.
Conclusion
Dealing with Mac Ethernet issues can be difficult, but it is not impossible. The information in this post will significantly assist you in resolving Mac Ethernet issues. However, if the problem persists, it is recommended that you visit the Apple forum or seek the assistance of a Mac Expert to remedy your issue.


